[ad_1]
The above video (the rule of thumb for this text) covers an intensive instance venture exhibiting you find out how to construct a Chainlink NFT. As it’s possible you’ll already know, Chainlink is an oracle blockchain venture providing a number of neat options. One in every of these is Chainlink’s VRF (verifiable random perform), which can also be one of many major instruments we’ll use on this tutorial to mint random non-fungible tokens. Basically, we’ll create a dapp with an NFT-minting good contract incorporating Chainlink’s VRF.
For our contract to construct the NFT, we additionally want NFT-representing information (pictures) and metadata information, which we are going to retailer in IPFS. That is the place Moralis’ IPFS API enters the equation. For this, the next code snippet will do the heavy lifting:
outcome = evm_api.ipfs.upload_folder(
api_key=api_key,
physique=physique,
)
With the information in IPFS, we’ll be capable to embrace metadata URIs in our good contract. That is the preliminary Solidity line of code of our good contract:
contract RandomNFT is ERC721URIStorage, VRFConsumerBaseV2, Ownable {
So far as our dapp goes, it would include a JavaScript frontend and a Python backend. Relating to fetching on-chain knowledge, Moralis’ final NFT API will simplify issues through the next strains of code:
outcome = evm_api.nft.get_nft_owners(
api_key=api_key,
params=params,
)
In case you are able to tackle at this time’s Chainlink NFT tutorial, create your free Moralis account and observe our lead!
TRUSTED BY INDUSTRY LEADERS
Overview
Shifting ahead, we are going to dive into the steps it’s good to full to construct a Chainlink NFT minter. This dapp randomly takes NFT-representing information and their metadata and mint NFTs when customers click on on the “Mint!” button on the frontend. Now, to make such a dapp work, there are various points to cowl, so the next description will spotlight the important points, and check with the above video for particulars. Listed below are the core steps that it’s good to cowl to finish our Chainlink NFT tutorial:
Arrange your Chainlink VRF.Write your distinctive good contract script in Solidity or copy our template.Put together the NFT-representing and metadata information and add them to IPFS or use our instance information.Deploy your Solidity good contract that may construct a Chainlink NFT. Construct frontend and backend parts of an NFT minting dapp that ties all of it collectively.
Following our lead, you additionally want a number of instruments to finish the above steps. These embrace Chainlink VRF, MetaMask, Visible Studio Code (VSC), Brownie or Remix, an Ethereum faucet, a Chainlink faucet, and Moralis. We will even do a fast demonstration of the ultimate construct within the “Construct a Chainlink NFT” part.
Under the precise tutorial, you can too discover a number of sections that may show you how to higher perceive the theoretical points of at this time’s matter. That is the place you possibly can study what Chainlink and Chainlink NFTs are and discover the gist of the aforementioned instruments.
Chainlink NFT Tutorial – Methods to Construct a Chainlink NFT
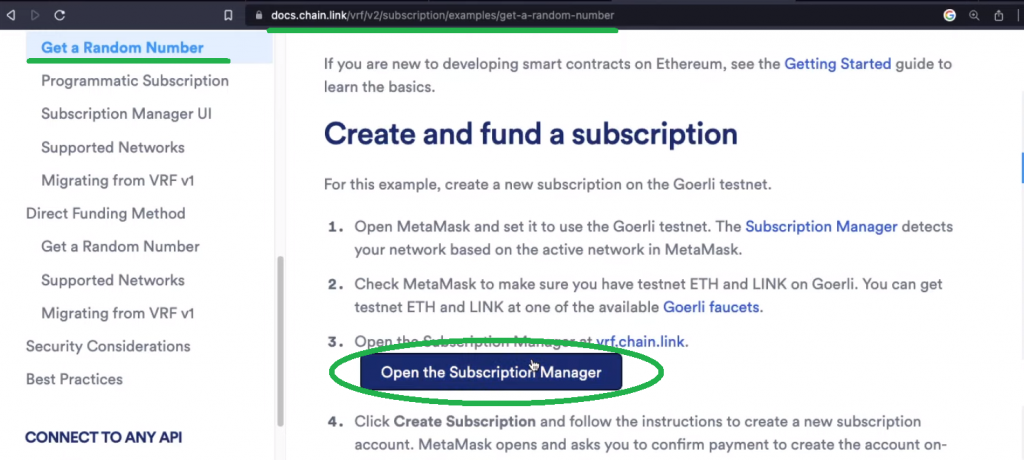
As outlined above, we are able to dive proper into step one – organising your Chainlink VRF. Use the video above, beginning at 2:21, for extra particulars about VRF. Now, begin by opening Chainlink’s subscription supervisor from Chainlink’s docs:
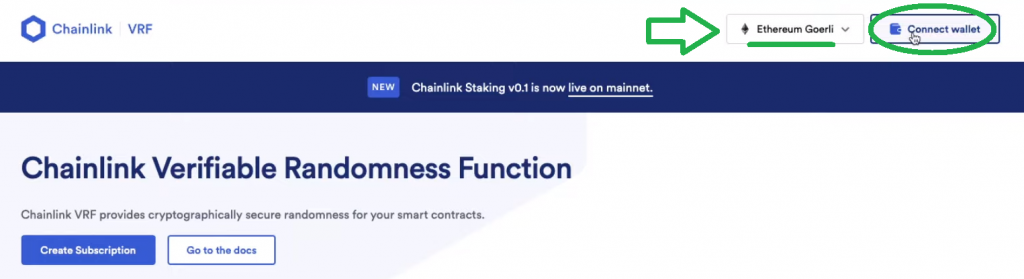
Subsequent, choose “Ethereum Goerli” and join your MetaMask through the “Join pockets” button:
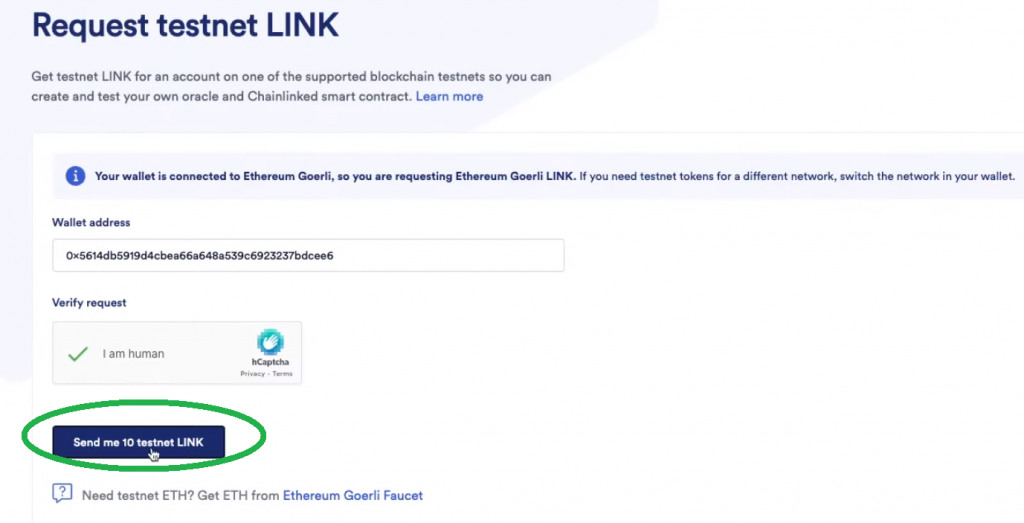
As soon as your pockets is related, click on on “Create Subscription” and ensure the transaction together with your MetaMask pockets. Then, it’s good to make sure that your account has sufficient funds. Since you might be on the testnet, you should use the Chainlink testnet faucet to get testnet LINK. Simply join your pockets and request ten testnet LINK tokens:
Subsequent, return to “vrf.chain.hyperlink“ and choose your subscription:

On the following web page, use the “Add Funds” button:

Then, add ten testnet LINK to your subscription:

Word: After clicking on the “Verify” button, you will need to verify the switch of tokens together with your MetaMask.
By finishing the above steps, you need to have an energetic subscription with a steadiness of ten LINK tokens prepared:

You’ll use your subscription ID and the funds to get a random quantity by utilizing the Chainlink VRF good contract. You possibly can entry that good contract template through the “Get random quantity documentation web page”:
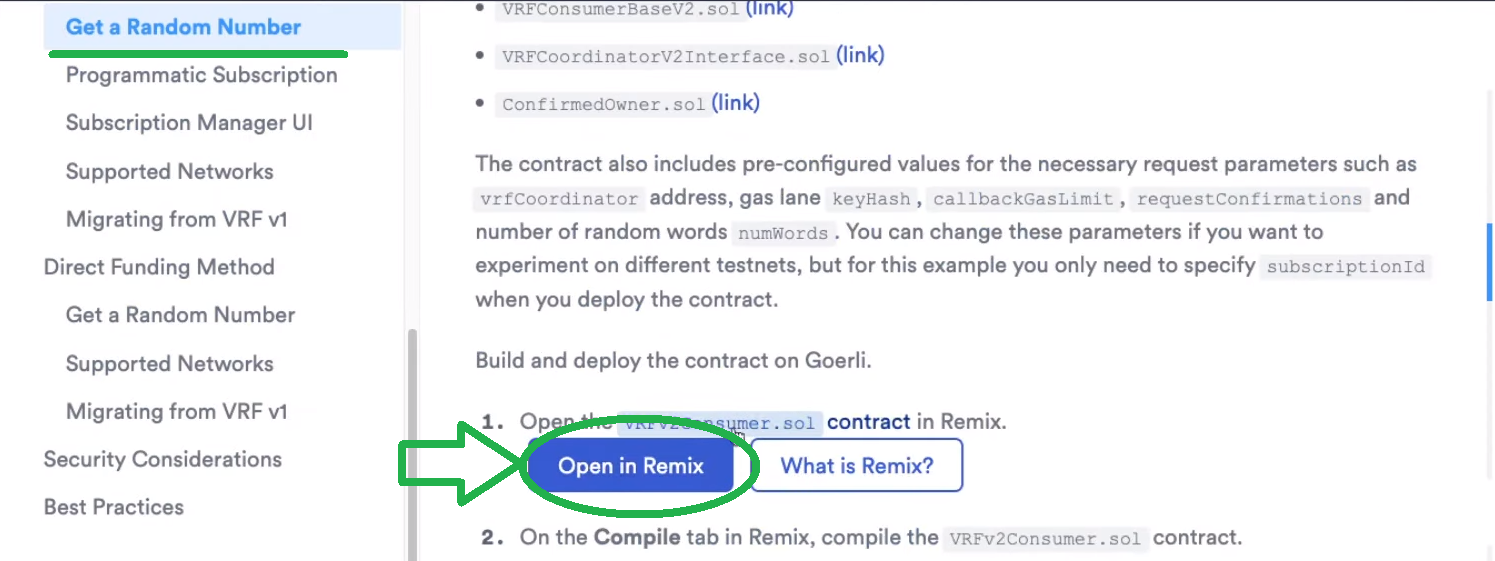
Use the video above (6:56) for a fast code walkthrough of that VRF contract template. All in all, “requestRandomWords” is the perform that generates the randomness and the “fulfillRandomWords” perform executes the motion primarily based on the obtained random quantity. Then, use Remix to deploy that good contract (7:50):

After you’ve deployed your occasion of the above good contract, you’ll be capable to copy its handle:

With the deployed contract handle copied, return to your Chainlink VRF subscription web page and add a brand new client:

Construct a Chainlink NFT Good Contract
Now that you know the way to arrange your Chainlink VRF subscription and use it for the template contract, it’s time you do that for our instance NFT good contract: “RandomNFT.sol“. Use the video above (9:32) to observe together with our in-house skilled as he writes this contract, or copy the entire code from GitHub through the “RandomNFT.sol” hyperlink.
This contract incorporates Chainlink VRF’s randomness for minting our three instance NFTs and is designed to construct a Chainlink NFT. So, its objective is to create an ERC721 token primarily based on deciding on one in all our NFT metadata information. These information additionally embrace URLs pointing to our three instance pictures. Each the NFT-representing information and metadata information are saved in IPFS. For the sake of this tutorial, you should use our information; nevertheless, you might also use your individual information.
Word: In fact, you can too go along with a larger variety of NFTs than simply three, however in that case, it’s good to tweak the code accordingly.
Storing Photographs and Metadata to IPFS
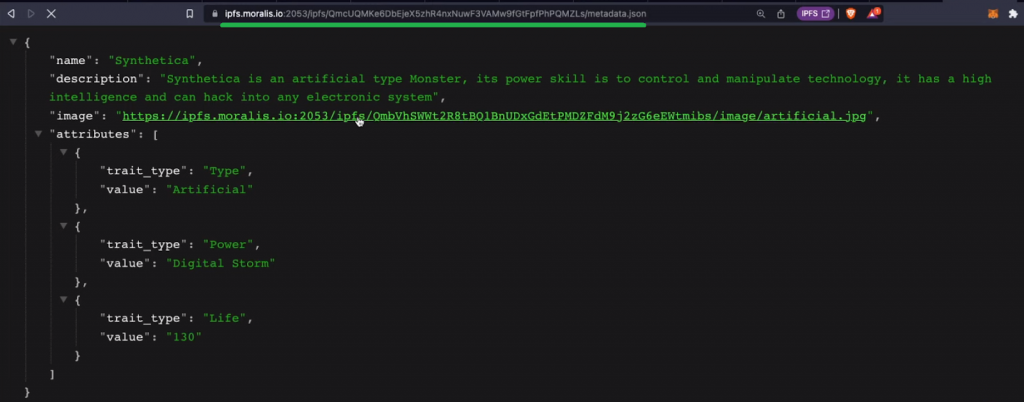
Whether or not you resolve to make use of Brownie or Remix, it’s good to have your NFT-representing information and corresponding metadata in IPFS. For the aim of importing pictures, producing metadata information utilizing pictures’ URLs, and importing metadata to IPFS, we created two Python scripts: “ipf_img.py” and “ipfs-upload.py“. The primary one uploads the pictures to IPFS, whereas the second assemble the metadata information and uploads them to IPFS. Right here’s one in all our three instance metadata information already uploaded to IPFS:
So, if you wish to create your distinctive NFTs, it’s good to have your pictures contained in the “img” folder and tweak the descriptions within the “ipfs-upload.py” script accordingly. Moreover, each of those scripts use Moralis’ “evm_api.ipfs.upload_folder” methodology. As such, make sure that to get your Web3 API key and retailer it inside a “.env” file beneath “MORALIS_API_KEY“. You will get your API key from the Moralis admin space in these two steps:

Word: When you want extra steerage with importing your information to IPFS, use our video information on find out how to add NFT collections to IPFS.
Deploy Your Solidity Good Contract with Brownie or Remix
Our “RandomNFT.sol” contract is constructed to be deployed with Brownie. For the deployment objective through this methodology, now we have a number of scripts: “helpful_script.py“, “deploy_random_nft.py“, and “brownie-confi.yaml” (30:08). Contained in the latter, it’s good to add your Chainlink VRF subscription ID:

To make use of these deployment scripts, you additionally want a non-public pockets key, Infura venture ID, and Etherscan API key. Be sure that to retailer these variables inside one other “.env” file:

Word: When you want steerage with acquiring these variables, use the video on the prime of the article, beginning at 34:00.
With all the above in place, you’re able to deploy your good contract utilizing the next command line:
brownie run scripts/deploy_random_nft.py –network goerli
In case you’re not accustomed to Brownie, you possibly can as a substitute use Remix to deploy your good contract. In that case, the code requires some minor tweaks, so make sure that to make use of the “RandomNFTForRemix.sol” script as a substitute.
Whichever deployment methodology you utilize, make sure that to repeat your deployed contract’s handle and use it so as to add a brand new client to your Chanlink VRF subscription, identical to we did for the “VRF” contract template above.
Construct Frontend and Backend Parts of an NFT Minting Dapp
To wrap up our Chainlink NFT tutorial, you will need to additionally construct a easy frontend JavaScript dapp and a easy backend Python dapp. In fact, you don’t must code the required scripts from scratch. As an alternative, you should use our full code that awaits you on GitHub. To finish the method, you want the above-deployed good contract’s handle and ABI. You possibly can observe our in-house skilled’s lead to do that with the assistance of the “update_frontend.py” script (38:57).
So far as the frontend goes, “App.js” does the trick (40:16). That is the place we import the ethers.js Web3 library and use its modules to cowl the Web3 performance behind the “Join Pockets” and “Mint!” buttons of our frontend.
Concerning the “Get My NFTs” button, you get to make use of the facility of Moralis’ API and implement the ultimate of the three code snippets showcased within the intro of at this time’s article. For this objective, we use the “companies.py” script:
from moralis import evm_api
import os
from dotenv import load_dotenv
load_dotenv()
api_key = os.getenv(“MORALIS_API_KEY”)
def get_nft_owners(handle: str):
params = {
“handle”: handle,
“chain”: “goerli”,
“format”: “decimal”,
“restrict”: 100,
“cursor”: “”,
“normalizeMetadata”: True,
}
outcome = evm_api.nft.get_nft_owners(
api_key=api_key,
params=params,
)
return outcome
To make the above script work, you will need to get the related pockets handle from the frontend. That is the place the “view.py” script enters the scene. Don’t overlook so as to add the “get_owners/” endpoint to your venture settings (contained in the “urls.py” script). Lastly, to see how the “App.js” script makes use of the on-chain knowledge fetched with the “evm_api.nft.get_nft_owners” methodology, use the video on the prime (44:23).
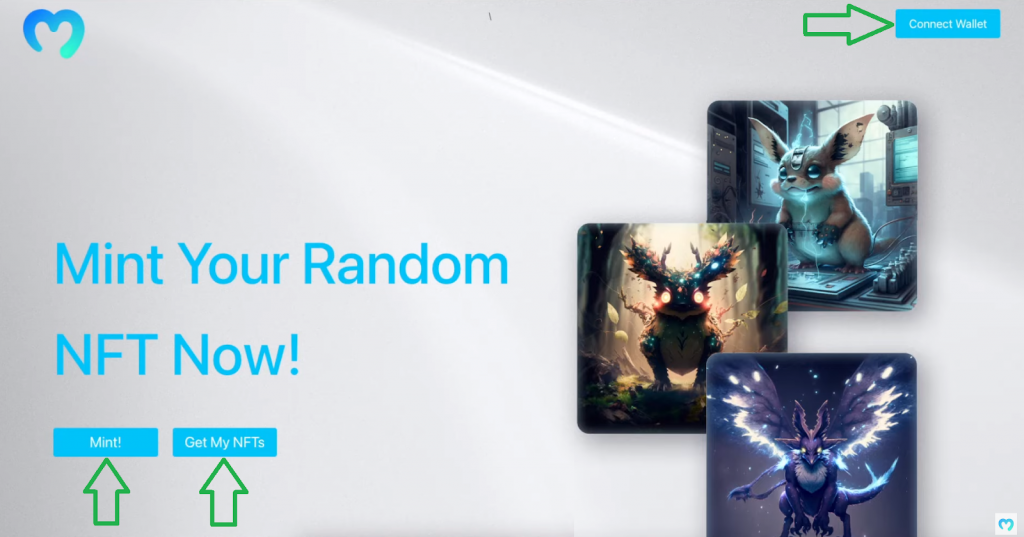
Construct a Chainlink NFT
By following the steps outlined within the earlier part together with the above video, you need to be capable to construct a neat random NFT minter. On the frontend, our instance dapp is fairly easy; it solely has three buttons:
As soon as we click on on the “Join Pockets” button, the MetaMask extension pops up, asking us to pick out our account:
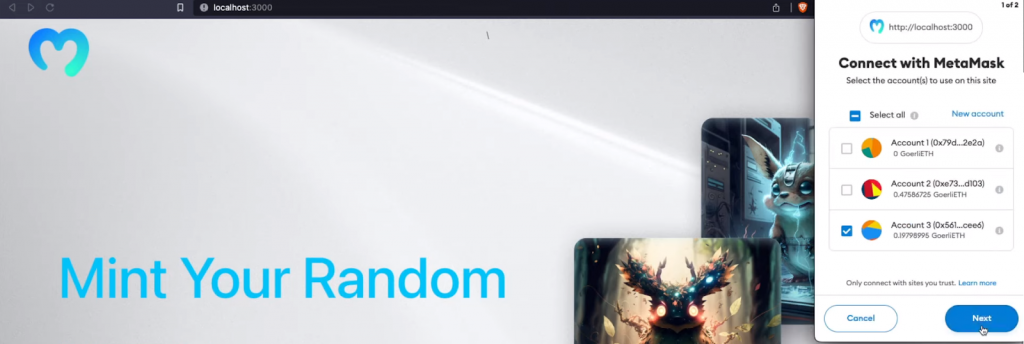
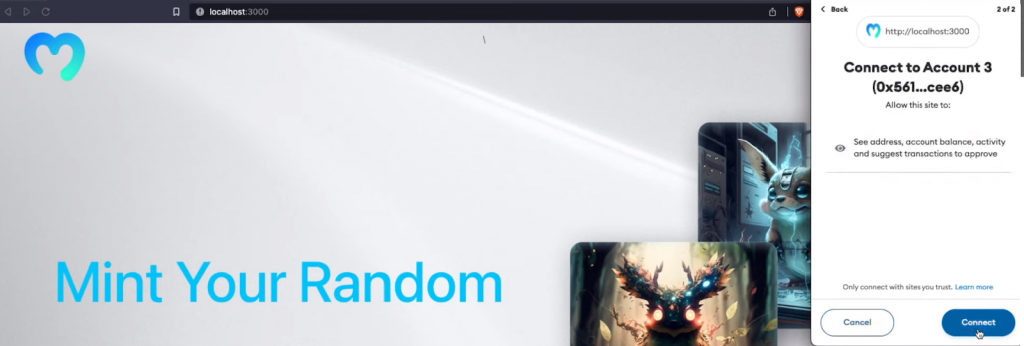
With the account chosen, we have to click on on the “Subsequent” button. Within the second step, we lastly join our pockets through the “Join” button:
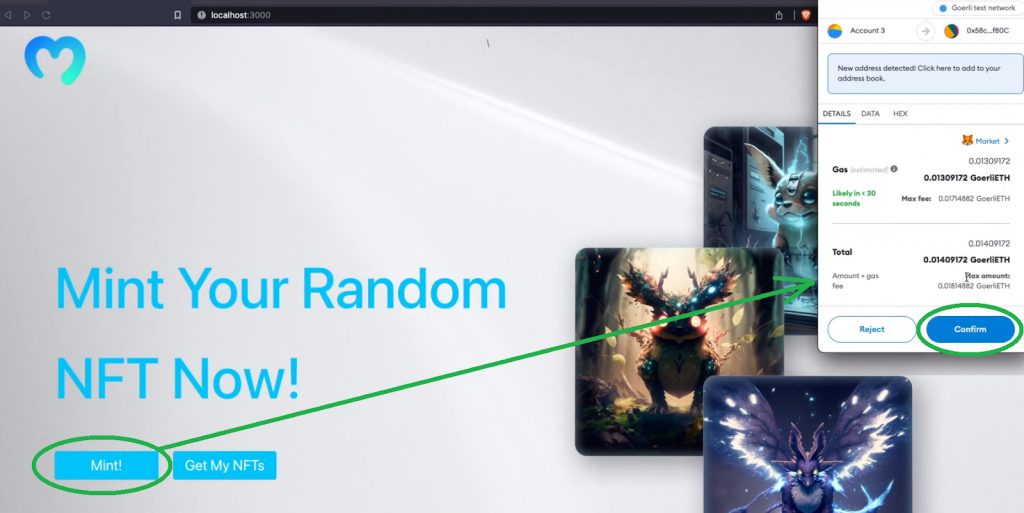
After efficiently connecting our pockets, the “Join Pockets” button modifications to “Related”. Then, we are able to use the “Mint!” and “Get My NFTs” buttons. The primary one will set off our good contract and mint one of many three random NFTs we used as examples. It can additionally assign possession to the related Web3 pockets. Since minting an NFT requires an on-chain transaction, the “Mint!” button triggers MetaMask, the place we have to verify the minting transaction and canopy the gasoline charges:
If we hit the “Get My NFTs” button, our dapp shows all of the NFTs owned by the related wallets that have been minted utilizing this venture’s good contract on the backside of the web page. For instance, this related pockets owns two NFTs:
Exploring Chainlink and NFTs
If you wish to study the ins and outs of NFTs, we suggest you dive into the “NFT” content material that awaits you on the Moralis weblog. There, you’ll be capable to discover the fundamentals in addition to extra detailed points, similar to studying in regards to the distinction between the ERC721 and ERC1155 token requirements. Relating to exploring Chainlink and its merchandise, the official Chainlink web site and the Chainlink documentation are the assets to make use of. Nevertheless, you should use the next sections to cowl the important fundamentals to take advantage of out of at this time’s Chainlink NFT tutorial.

What’s Chainlink?
Chainlink is a decentralized community of oracles constructed on the Ethereum blockchain. The core objective of Chainlink is to facilitate the switch of tamper-proof knowledge from off-chain sources (real-world knowledge) to on-chain good contracts. Tamper-proof inputs, outputs, and computations that Chainlink offers help superior good contracts. Due to Chainlink, conventional programs can hook up with the rising blockchain trade. This may generate extra safety, effectivity, and transparency in social and enterprise processes. Chainlink oracles collectively retrieve knowledge from a number of sources, mixture it, and ship a validated, single knowledge level to the good contract to set off its execution. In consequence, it removes any centralized level of failure.
Present Chainlink merchandise embrace market and knowledge feeds, VRF, automation, proof of reserve, and cross-chain bridging (CCIP). They provide numerous use circumstances, together with randomizing NFTs, as utilized in our instance venture above.
What’s a Chainlink NFT?
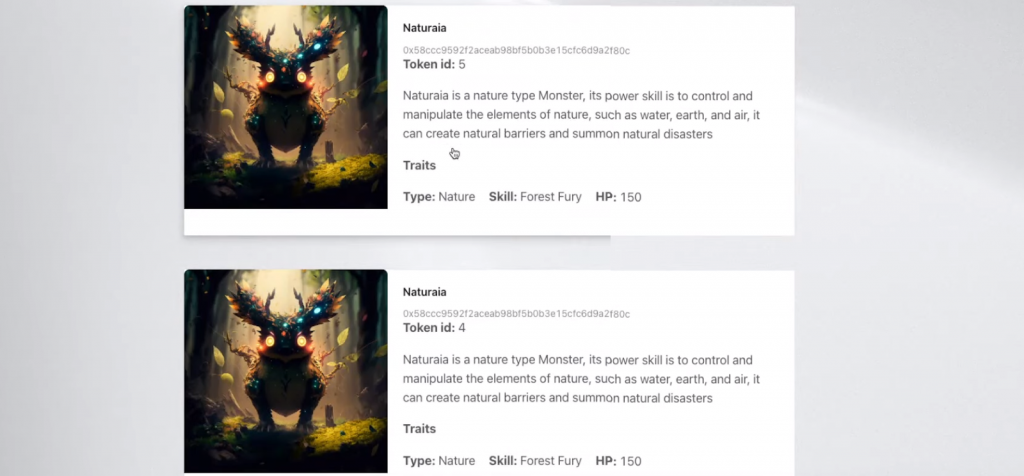
A Chainlink NFT is a non-fungible token whose creation in some way includes Chainlink. On the one hand, because of this a Chainlink NFT makes use of one in all Chainlink’s merchandise, similar to VRF, in its creation course of. That is the kind of NFT we created in at this time’s tutorial. Listed below are two examples of NFTs using Chainlink:
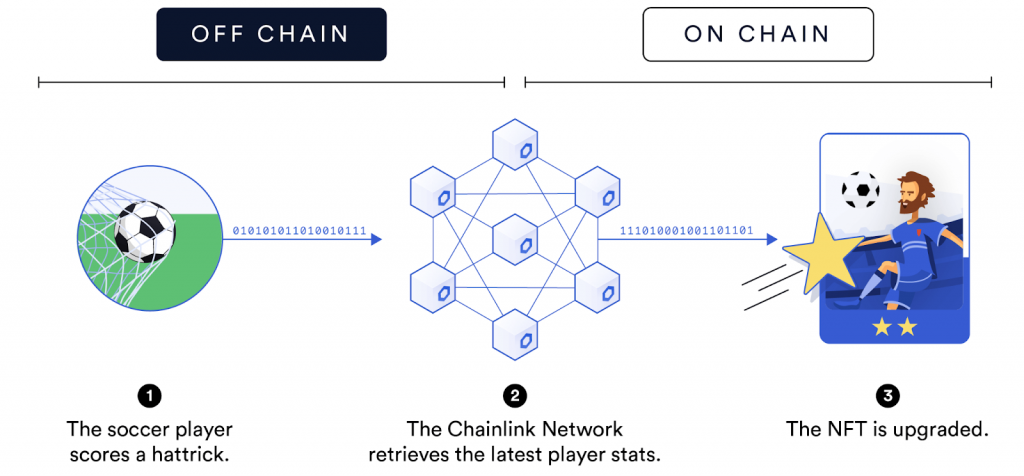
Using Chainlink’s market and knowledge feed:
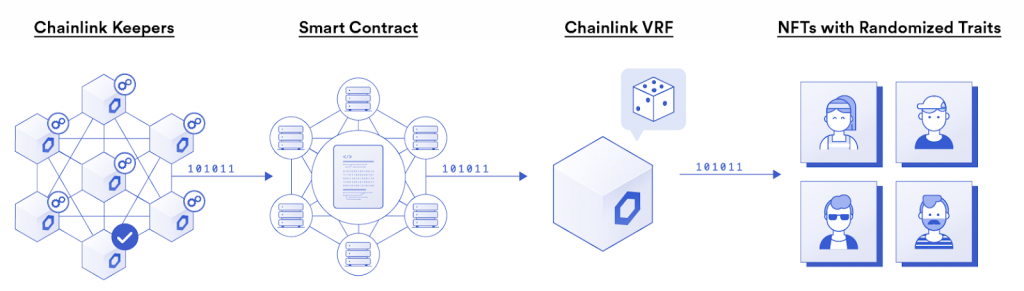
Using Chainlink’s VRF:
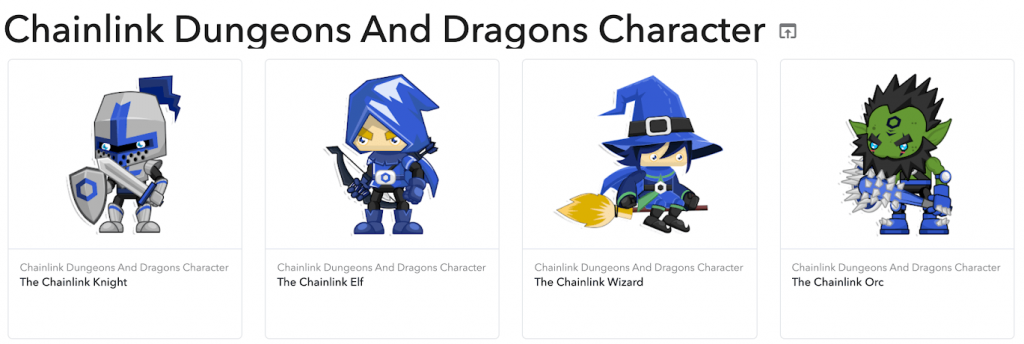
Alternatively, a Chainlink NFT may also be a non-fungible token that was created by the Chainlink core staff or one other Chainlink-associated get together. These sorts of Chainlink NFTs sometimes embrace Chainlink logos, similar to the emblem. Right here’s an instance:
Exploring “Chainlink Construct Deploy NFT” Instruments
When you adopted alongside within the above tutorial, you used a number of highly effective Web3 growth instruments that every one play a significant position within the “Chainlink construct deploy NFT” feat. So, let’s rapidly cowl every of these instruments:
Chainlink VRF – That is one in all Chainlink’s merchandise that gives cryptographically safe randomness. It’s the device to make use of everytime you wish to introduce true randomness into blockchain-based initiatives. MetaMask – MetaMask is the main Web3 pockets that comes within the type of a cell utility and browser extension. The latter can also be essential device for Web3 devs. It permits you to connect with dapps, verify on-chain transactions when deploying or interacting with good contracts, ship and obtain crypto property, and extra. As such, MetaMask is a crucial “Chainlink construct deploy NFT” device. Visible Studio Code (VSC) – VSC is arguably the preferred IDE and code editor. Brownie – Brownie is a Python-based growth and testing framework. It lets you create, deploy, confirm, and take a look at good contracts that focus on Ethereum Digital Machine (EVM). Remix – Remix is a web based IDE that lets you write, deploy, confirm, and work together with good contracts utilizing your favourite browser. Ethereum Faucet – An Ethereum faucet is a crypto faucet offering “take a look at” crypto property for Ethereum testnets. For instance, in at this time’s tutorial, we targeted on the Goerli testnet. When you’d like extra data on Goerli, verify our information exploring find out how to get Goerli ETH. Moralis – Moralis is the final word Web3 API supplier that empowers you to create all types of dapps the straightforward manner. That stated, Moralis focuses on instruments wanted by crypto wallets and portfolio trackers. Moralis affords the Web3 Auth API, Web3 Streams API (for good contract and crypto pockets monitoring), and the final word Web3 Information API. What’s extra, they’re all accessible with a free Moralis account.
Chainlink NFT Tutorial – Methods to Construct a Chainlink NFT – Abstract
In at this time’s article, you had a possibility to construct a Chainlink NFT minting dapp that makes use of an array of NFT-representing information and metadata information. You now know which you could full this problem with the next 5 steps:
Arrange your Chainlink VRF.Write your distinctive good contract script in Solidity or copy our template.Put together the NFT-representing and metadata information and add them to IPFS or use our instance information.Deploy your Solidity good contract that may construct a Chainlink NFT. Construct frontend and backend parts of an NFT minting dapp that ties all of it collectively.
Along with our Chainlink NFT tutorial, we additionally defined what Chainlink is and what a Chainlink NFT is. Additionally, we lined the gist of the instruments required to construct a Chainlink NFT. With the talents and data obtained herein, you need to be able to create your individual randomized non-fungible tokens.
If you wish to discover different blockchain growth subjects or sort out some beginner-friendly tutorials, make sure that to go to the Moralis documentation, the Moralis YouTube channel, and the Moralis weblog. A few of our newest subjects cowl a listing of Web3 libraries, the wei to gwei conversion, and explores the “create ERC20 token” tutorial. Moreover, you possibly can study extra in regards to the Solana Python API, the Web3 get block perform, the most effective Polygon Mumbai faucet, and way more. Final however not least, if you wish to turn out to be blockchain licensed, enroll in Moralis Academy. There, you need to first study extra about blockchain and Bitcoin fundamentals.
[ad_2]
Source link
