

With the Web3 market’s main NFT API and EVM API from Moralis, you will get all transfers of an NFT seamlessly. All you must do is set up the Moralis SDK and name the ”getNFTTransfers” endpoint! Mainly, by including a token handle, the token ID, and the chain to the code snippet beneath, you cowl the central code to get all transfers of an NFT:
const response = await Moralis.EvmApi.nft.getNFTTransfers({
handle,
tokenId,
chain,
});
Calling the ”getNFTTransfers” endpoint returns all transfers related to the token handle and shops them within the ”response” object. From there, it’s as much as you to make use of this data creatively in your Web3 improvement endeavors. That stated, for extra detailed data on calling this endpoint, try the documentation web page on the best way to get all transfers of a non-fungible token. In any other case, be part of us on this tutorial as we present you this works in apply!
Find out how to Get All Transfers of an NFT – Overview
In case you are seeking to construct an NFT market, worth estimator, analytics platform, or every other NFT-related platform, you’ll quickly understand that you simply require on-chain information. An ideal instance is the switch information of NFTs, which you, amongst different issues, may need to show to enhance the consumer expertise. Nevertheless, querying this data has been fairly cumbersome from a traditional perspective. Luckily for you, that is not the case, due to Moralis’ NFT API. If you wish to be taught extra about how this works, keep caught in as we present you the best way to get all transfers of an NFT with Moralis!
First, let’s return to fundamentals and discover precisely what an NFT is. From there, we’ll clarify why you will need to get the switch historical past of an NFT. Nevertheless, if you’re already accustomed to this, you possibly can skip straight into the ”Tutorial: Find out how to Get All Transfers of an NFT in 3 Steps” part. In that half, we illustrate the best way to get all transfers of an NFT within the following three easy steps:
PrerequisitesCall Moralis’ ”getNFTTransfers” EndpointRun the Program
What’s extra, the device you’ll familiarize your self with throughout this tutorial is just one of Moralis’ Web3 APIs. In case you are critical about entering into blockchain improvement, you need to take into account trying out different instruments from Moralis. An ideal instance is the Streams API, permitting you to stream on-chain information into your initiatives’ backends by way of Moralis webhooks!
Now, earlier than you progress additional on this article, enroll with Moralis instantly, as you could have an account to observe alongside within the upcoming tutorial!
What’s an NFT?
Earlier than displaying you the best way to get all transfers of an NFT, this preliminary part explores the intricacies of those tokens. By doing so, you obtain an summary of what they’re, which helps in understanding why it’s important for builders to entry data related to NFTs. So, with out additional ado, let’s reply the query, ”what’s an NFT?”.
NFTs is an abbreviation for ”non-fungible tokens”, and to know what they’re, a wonderful place to begin is to research the terminology. The time period ”non-fungible” originates from conventional economics and describes items, objects, and belongings with distinctive properties. As an example, a portray is non-fungible, as artwork items are typically one-of-a-kind. Based mostly on this definition, NFTs are distinctive, one-of-a-kind cryptocurrency tokens.
To make the outline above much more comprehensible, let’s discover the opposite aspect of the spectrum: fungible belongings. Since non-fungible belongings are distinctive, it implies that fungible belongings are interchangeable.
Within the blockchain world, a transparent instance of a fungible asset is Bitcoin. All Bitcoin tokens are an identical, suggesting that one will be swapped for one more with out financial compensation as they’ve the identical worth. The identical can’t be stated for NFTs. Why? As a result of these tokens have distinctive properties, one may not share the identical worth as one other.
Since NFTs are non-fungible tokens, their uniqueness makes them best for representing nearly every other non-fungible belongings. Consequently, that is why many individuals affiliate NFTs with digital artwork. Nevertheless, be aware that NFTs typically don’t ”include” an asset like a digital artwork piece however quite level to a non-fungible asset of their metadata, offering proof of possession.
However, with a quick introduction to NFTs, allow us to now discover why you will need to get the switch histories of those tokens!
Why is it Vital to Get the Switch Historical past of an NFT?
Anybody can question a blockchain community for data, such because the transaction historical past of an NFT. However why is it vital for builders to get all transfers of an NFT?

Let’s say you need to construct a market comparable to OpenSea, an NFT analytics platform, or an NFT worth estimator. In these situations, you possibly can extremely profit from the power to get all transfers of an NFT. With this data, you possibly can create a extra compelling consumer expertise (UX) by, amongst different issues, displaying an NFT’s transaction historical past straight in your app’s consumer interface (UI). Because of this, your customers can keep away from querying the blockchain themselves and make knowledgeable selections primarily based on this information.
You may additionally need to use this information to calculate common costs, worth developments, and rather more. Accordingly, this information will be extremely helpful in your Web3 improvement endeavors. That stated, it’s equally vital that builders have quick access to this on-chain information, which is the place Moralis enters the image!
You may question a blockchain for on-chain NFT information in a number of methods, nevertheless it typically requires a large period of time and engineering sources. Nevertheless, with Moralis’ NFT API and the ”getNFTTransfers” endpoint, you will get all transfers of an NFT with just a few traces of code.
If you wish to be taught extra about this, be part of us within the following part, the place we offer a complete tutorial on the best way to get all transfers of an NFT in three steps!
Tutorial: Find out how to Get All Transfers of an NFT in 3 Steps
Now that you’ve got familiarized your self with NFTs and have a extra profound understanding of why it’s important to get all transfers of an NFT, this part will present you the best way to purchase this information. To make this course of extra seamless, we use Moralis’ NFT API to make a single name to the ”getNFTTransfers” endpoint.
All you must do is provide a contract handle, token ID, and the chain you have an interest in. In flip, you obtain a response if the type of an array containing all transfers related to the desired handle. You’ll additionally obtain extra information relating to every transaction, such because the block quantity, transaction hash, contract sort, and rather more!
What’s extra, by way of this Moralis device, you will get all transfers of an NFT in solely three steps:
PrerequisitesCall Moralis’ ”getNFTTransfers” EndpointRun the Program
By following the steps above, you will get all transfers of an NFT very quickly. If this sounds thrilling, be part of us as we kickstart this tutorial by protecting the required stipulations!
Step 1: Conditions
Earlier than we dive into the script we use to get all transfers of an NFT, you must take care of a number of stipulations. First, you could guarantee that you’ve got each NodeJS and npm prepared. So, when you shouldn’t have them already, go to the next webpage and obtain the newest model of NodeJS: “https://nodejs.dev/en/obtain/“.
From there, the following prerequisite is to enroll with Moralis. Establishing your account is free and solely takes a number of seconds! So, create your account instantly.
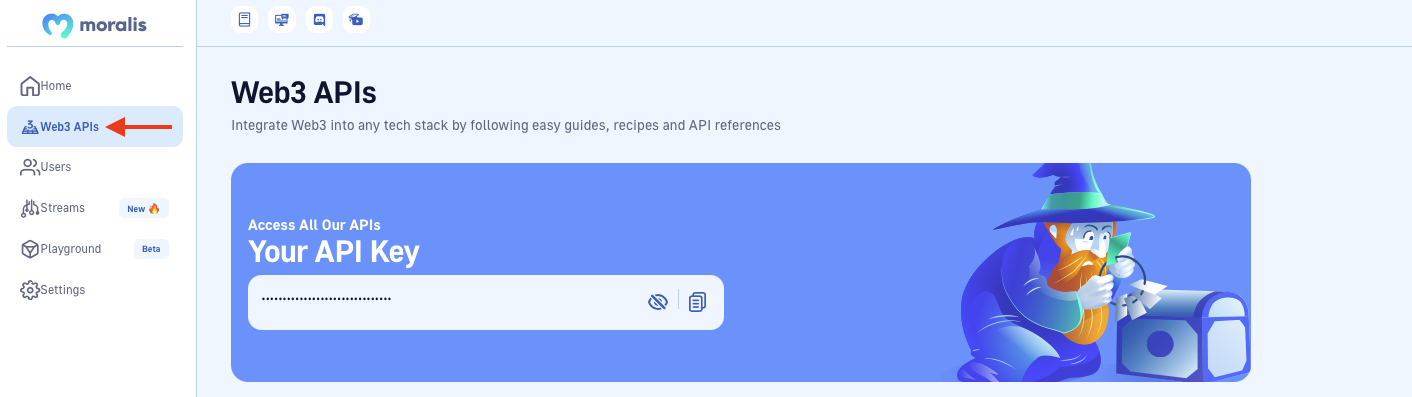
Nevertheless, you may surprise, ”why do I would like a Moralis account?”. With a view to make API calls to any of Moralis’ endpoints, together with ”getNFTTransfers”, you require an API key, which is why you must be a member of Moralis. Upon getting joined, you’ll find your key by logging in and navigating to the ”Web3 APIs” web page:
You may go forward and replica the important thing instantly by clicking on the “copy” button:
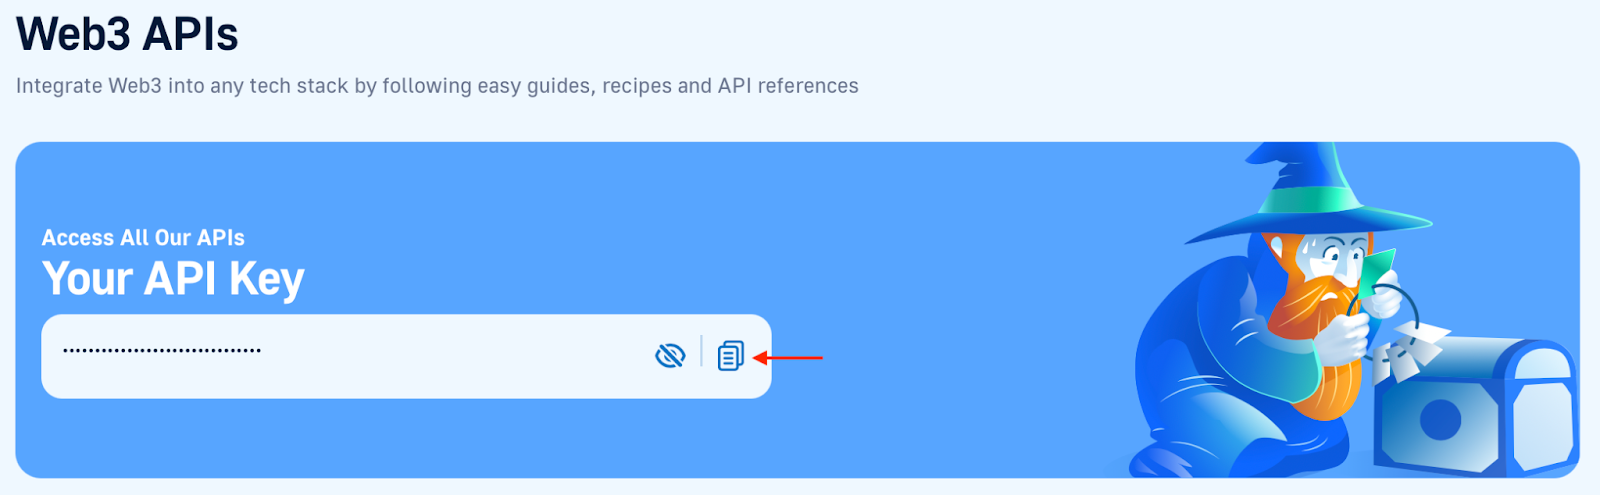
Save the important thing for now, as you will have it within the second step.
However, that covers the stipulations! Let’s soar straight into the second step, the place we present you the best way to add the code for calling the ”getNFTTransfers” endpoint!
Step 2: Name Moralis’ ”getNFTTransfers” Endpoint
On this second step, we are going to present you the code we use to get all transfers of an NFT by calling the ”getNFTTransfers” endpoint. To start with, open your built-in improvement setting (IDE) and arrange a brand new JavaScript undertaking. From there, create a brand new ”index.js” file and add the next contents:
const Moralis = require(‘moralis’).default;
const { EvmChain } = require(‘@moralisweb3/common-evm-utils’);
const runApp = async () => {
await Moralis.begin({
apiKey: “YOUR_API_KEY”,
// …and every other configuration
});
const handle=”0xbc4ca0eda7647a8ab7c2061c2e118a18a936f13d”;
const tokenId = 1;
const chain = EvmChain.ETHEREUM;
const response = await Moralis.EvmApi.nft.getNFTTransfers({
handle,
tokenId,
chain,
});
console.log(response.toJSON());
}
runApp();
Above, you’ll find the whole code to get all transfers from an NFT. Nevertheless, you must make a number of configurations earlier than operating this program. First, you could add your API key to the code by changing ”YOUR_API_KEY”. Subsequent, you must take into account the ”handle”, ”tokenId”, and ”chain” variables.
Within the code snippet above, we added default values to those three variables. As such, you must enter the token handle of the NFT you need to question. Furthermore, you additionally want to alter the token ID and chain to suit the token accordingly.
The code then makes use of these three variables as parameters when calling the ”getNFTTransfers” endpoint. The outcomes returned are then saved within the ”response” object, which is lastly console-logged. As soon as you might be happy together with your configurations, all that is still is operating the code. We are going to present you the way to take action within the closing step!
Step 3: Run the Program
On this final step of the ”Find out how to Get All Transfers of an NFT” tutorial, we are going to present you the best way to run the code and take a look at what the responses appear to be. Nevertheless, earlier than doing so, you must open a brand new terminal and set up the Moralis SDK in your undertaking utilizing the npm command beneath:
npm set up moralis @moralisweb3/common-evm-utils
From there, all that is still to execute this system is operating the next terminal enter:
node index.js
When you run the command above, this system will log the ends in the console. Accordingly, you need to obtain a response much like the one proven beneath:
{
“whole”: 2,
“web page”: 0,
“page_size”: 100,
“cursor”: null,
“consequence”: [
{
“block_number”: “12344148”,
“block_timestamp”: “2021-04-30T21:11:46.000Z”,
“block_hash”: “0xa367b094366bc68de295ae6167797afc55eeb8383869363a6d7eb143c31d8274”,
“transaction_hash”: “0xe93e858f9330afa4581e260198195623aa7f5cd2809012440ea291d317be9f2f”,
“transaction_index”: 154,
“log_index”: 328,
“value”: “0”,
“contract_type”: “ERC721”,
“transaction_type”: “Single”,
“token_address”: “0xbc4ca0eda7647a8ab7c2061c2e118a18a936f13d”,
“token_id”: “1”,
“from_address”: “0xaba7161a7fb69c88e16ed9f455ce62b791ee4d03”,
“to_address”: “0x46efbaedc92067e6d60e84ed6395099723252496”,
“amount”: “1”,
“verified”: 1,
“operator”: null
},
In the code snippet, we only included information regarding one of the transfers. However, as you can see from the ”total” parameter at the very top, there are two transfers in total. Moreover, every transaction is returned to you in the ”results” array, and you will receive the same information regarding all NFT transfers associated with the token address provided.
As such, you get parsed data such as the block number, block hash, ”to” and ”from” addresses, and much more. From here, you can use this information directly in your Web3 projects to, among other things, improve the user experience!
That covers the entirety of this tutorial. If you want more information about this process, check out the documentation page on how to get all transfers of a non-fungible token!
Summary – Get All Transfers of an NFT
If you want to create NFT-related projects, you will quickly come to realize that you can highly benefit from accessing real-time on-chain data. For instance, if you want to create an NFT marketplace, you can improve the UX by displaying the transaction history of NFTs directly in your app’s UI. However, getting this information has been quite difficult from a traditional perspective. Fortunately, this is no longer the case, thanks to Web3 infrastructure providers such as Moralis!

This tutorial taught you how to get all transfers of an NFT using Moralis. Thanks to Moralis’ NFT API and the ”getNFTTransfers” endpoint, you were able to do so in only three quick steps:
PrerequisitesCall Moralis’ ”getNFTTransfers” EndpointRun the Program
If you found this tutorial helpful, you might want to learn more about Moralis’ NFT API. If this is the case, check out our articles on how to get NFT collection data or get all NFTs from a contract! In addition, if you’re interested in storage solutions, explore metadata for NFT storage in Moralis’ NFT metadata article!
Nevertheless, no matter what on-chain NFT data you want to query, sign up with Moralis to access a more seamless developer experience. With an account, you can fully leverage the power of blockchain technology in all future development endeavors!


 and Zilliqa (ZIL) Dual-Mining on Nvidia")


 Bulls Target alt=")


