

Because of Moralis’ Python SDK, integrating blockchain performance into Python initiatives is a simple course of! Wish to learn the way to make the most of the SDK so as to add this performance? Observe alongside as this Web3 py tutorial explores your complete course of from begin to end! Briefly, with the assistance of Moralis and the SDK, you possibly can combine Web3 into Python in two steps:
Set up the Python SDK from Moralis by working the next command in your terminal: pip set up moralis Make a Moralis API name. Within the code snippet under, one can find an instance of what the code would possibly seem like for fetching the native stability of a pockets: from moralis import evm_api
api_key = “YOUR_API_KEY”
params = {
“handle”: “0xd8da6bf26964af9d7eed9e03e53415d37aa96045”,
“chain”: “eth”,
}
end result = evm_api.stability.get_native_balance(
api_key=api_key,
params=params,
)
print(end result)
Take a look at Moralis’ official Web3 Python SDK documentation for added details about the event equipment! Furthermore, by signing up with Moralis, you can begin using the code instantly. Nonetheless, should you want additional steerage on using the above code snippet, full this Web3 py tutorial!
Overview
On this tutorial, you’ll learn to combine blockchain performance into your Python initiatives. Particularly, the tutorial will educate you create an easy software that includes two central parts: a Python Flask backend app and a frontend React software. Nonetheless, the core focus is directed towards the backend, as that is the place you’ll be taught the basic rules of mixing Web3 and Python!
Furthermore, because of Moralis and the Python SDK, you possibly can create this app in solely three simple steps:
Create the Python Flask ApplicationStart the AppSet Up the React Utility
If this sounds attention-grabbing, stick with us via this Web3 py tutorial!
Now, the Python SDK is just one of Moralis’ glorious growth instruments, and in case you are critical about entering into blockchain growth, we suggest you discover extra examples. For example, take a look at the Streams API – one among Moralis’ many Web3 APIs. With this instrument, you possibly can simply stream on-chain information into the backend of your initiatives by way of Moralis webhooks!
Nonetheless, should you plan on following alongside throughout this Web3 py tutorial, be part of Moralis by creating an account, as you want an account to finish the journey herein!
Exploring Web3 Py – What’s it?
Python is a general-purpose, object-oriented programming language that includes an abundance of various use circumstances. The overall-purpose attribute of Python makes the language versatile. Which means builders can use it to create every little thing from machine studying initiatives to extra simple net functions. As well as, Python has an easy-to-learn syntax, making this a best choice for rising builders as that is a simple language to undertake.
The earlier paragraph briefly summarizes what Python entails; nevertheless, what does it imply within the context of Web3? First, there are a lot of similarities between Web2 and Web3 Python growth, and the language doesn’t change all that a lot. However, should you come straight from conventional Web2 growth, there are a couple of minor variations it’s best to contemplate.
First up, you would possibly need to turn into aware of the ”Web3.py” library. This can be a Web3 Python library enabling you to work together extra seamlessly with the Ethereum community. Moreover, it facilitates a extra accessible developer course of, permitting you to make use of Python for Ethereum growth.
Aside from libraries, there are extra Web3 growth instruments and platforms you need to take a look at in case you are entering into Web3 py. For example, you could reap the benefits of Moralis, an industry-leading Web3 infrastructure supplier. With Moralis, you achieve entry to Web3 APIs, SDKs, and way more, offering a extra simple developer expertise. Amongst Moralis’ options, one can find the Python SDK. With this growth equipment, you possibly can simply combine Web3 performance into any of your Python functions. If you wish to be taught extra about this wonderful growth instrument, be part of us within the following sections of this Python and Web3 tutorial!
Utility Demo – Web3 Py Tutorial Outcomes
Throughout this Web3 py tutorial, you’ll learn to create an software permitting customers to sign up with MetaMask. Nonetheless, earlier than breaking down this tutorial, we are going to present a fast software demo. In doing so, you’ll achieve a extra profound understanding of what you can be working towards, making it simpler to acknowledge what the underlying code ultimately does. So, with no additional ado, here’s a print display screen of the app’s touchdown web page:

As you possibly can see from the picture, the app’s person interface (UI) options two core parts: a heading and a button with a ”Login” label. By clicking on this button, it autonomously triggers your MetaMask, prompting you to attach your pockets. As quickly as you join your pockets, the app sends a request to the Python backend, asking Moralis’ API to create a brand new Web3 login problem.
Subsequent up, the app sends one other request liable for validating the signature. In the event that they match, a brand new person ID is generated after which displayed on the UI:
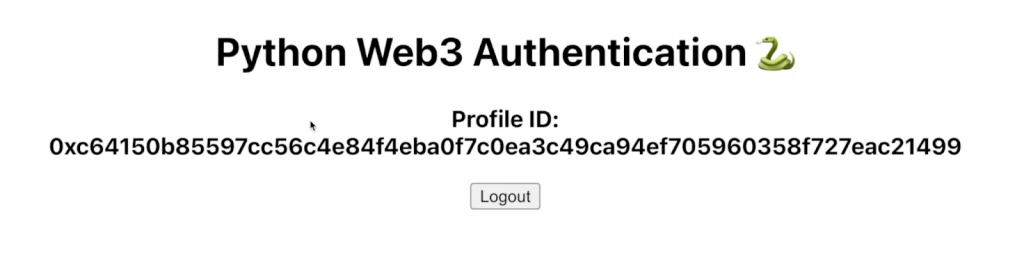
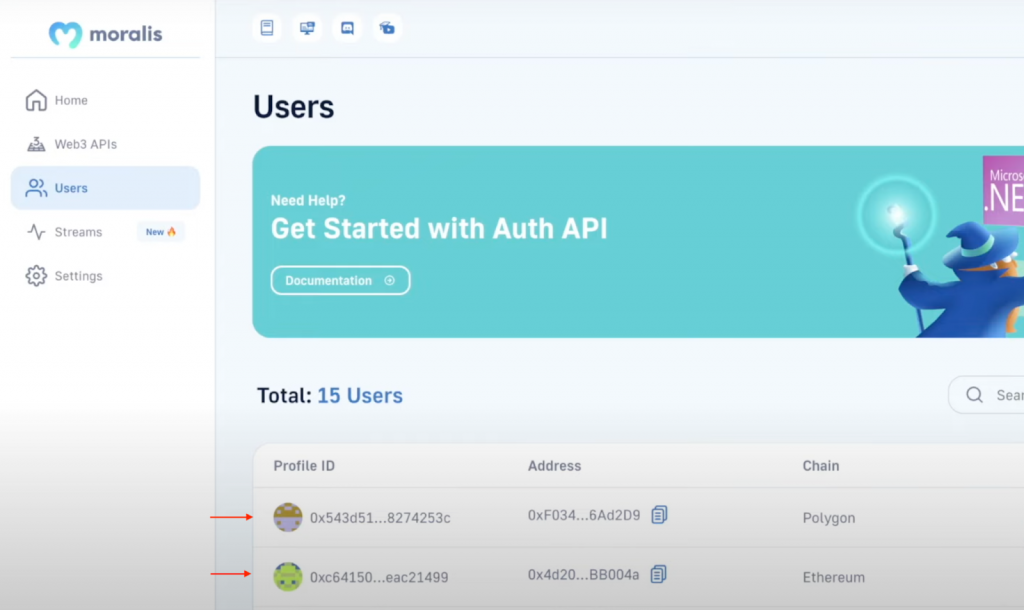
Whenever you efficiently authenticate, the app makes use of the ID to generate a brand new person and provides it to Moralis. Consequently, you possibly can log in to the Moralis admin panel and consider all customers which have signed in below the ”Customers” tab:
Now that’s it for this temporary demo! Allow us to now leap straight into the Web3 py tutorial to indicate you create this software!
Web3 Py Tutorial
Now that you’ve familiarized your self with what you’ll work in direction of, the next sections will educate you create the appliance from the earlier part utilizing Moralis and the Python SDK. As talked about earlier, this app consists of two core parts: a Python Flask backend software and a React frontend app.
The central a part of this Web3 py tutorial is the Python Flask app. This app takes care of the logic for dealing with a Web3 authentication circulation, permitting customers to sign up with their MetaMask wallets. That is additionally the place most of our focus is directed all through the tutorial. Nonetheless, to check out the backend, additionally, you will learn to arrange the frontend app. From it, we are going to name the endpoints and take a look at the Web3 authentication mechanism.
Though we outlined the steps earlier on full this challenge, here’s a temporary reminder of them:
Create the Python Flask ApplicationStart the AppSet Up the React Utility
By finishing the three steps of this Web3 py tutorial, you’ll learn to arrange a Web3 Python backend software for dealing with Web3 authentication flows! Nonetheless, with no additional ado, allow us to leap straight into step one and intently study create the Python Flask software!
Step 1: Create the Python Flask Utility
Earlier than leaping into the Python Flask software code, this preliminary a part of the Web3 py tutorial illustrates arrange the barebones state of the challenge. As such, to start with, open your built-in growth setting (IDE) and create a Python folder.
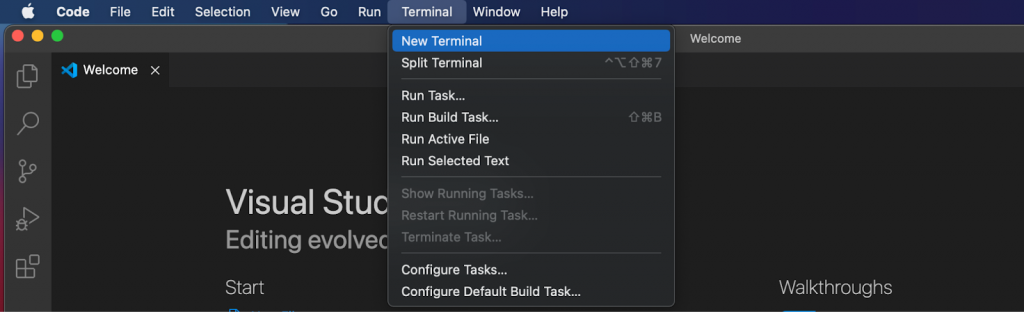
Moreover, all through this Web3 py tutorial, we are going to make the most of Visible Studio Code (VSC). As such, should you desire utilizing one other IDE, keep in mind that the method would possibly differ typically. Nonetheless, with an empty challenge folder at your disposal, go forward and launch a brand new terminal. Should you, like us, are utilizing VSC, click on on the ”Terminal” tab on the prime, adopted by ”New Terminal”:
Subsequent up, it’s worthwhile to ”cd” into the challenge’s root folder and run the next:
python3 -m venv venv
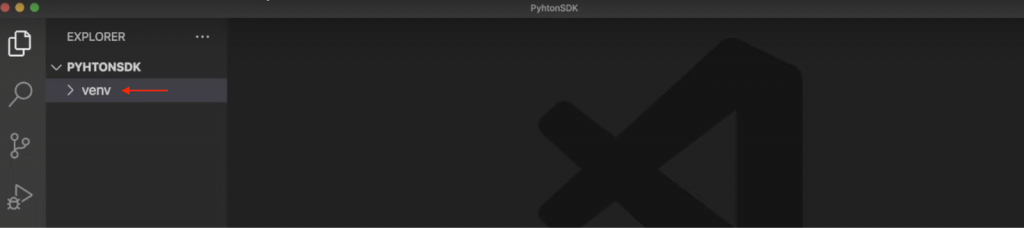
It will arrange a digital setting, and it’s best to now discover a folder referred to as ”venv” in your native listing:
From there, initialize this digital setting by inputting the command under into the terminal and hitting enter:
supply venv/bin/activate
As soon as the setting has been initialized, just remember to have the newest variations of ”pip” via this terminal enter:
pip set up –upgrade pip
Lastly, to conclude the preliminary setup of the barebones state of the challenge, it’s worthwhile to set up the required dependencies. There are three in complete, and you’ll set up them by working the instructions under in consecutive order:
pip set up flaskpip set up flask_corspip set up moralis
With the essential template on your challenge at hand, the subsequent sub-section breaks down the code it’s worthwhile to implement to make the backend software work as supposed!
Utility Code
With the challenge all arrange, we are going to take this sub-section of the Web3 py tutorial to discover the appliance code. As such, create a brand new ”app.py” file within the challenge’s root folder. Then, begin by importing the mandatory dependencies on the prime:
from flask import Flask
from flask import request
from moralis import auth
from flask_cors import CORS
From there, initialize the app and wrap the app in ”CORS”. To take action, add this snippet of code under the imports:
app = Flask(__name__)
CORS(app)
Subsequent up, create a brand new variable on your Moralis API key:
api_key = “xxx”
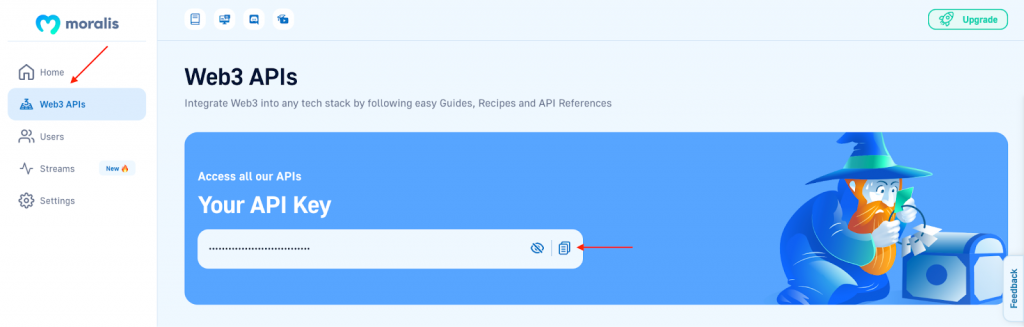
Nonetheless, as you might need figured, it’s worthwhile to change ”xxx” along with your key. To get it, enroll with Moralis and log in to the admin panel. You may then discover the important thing by navigating to the ”Web3 APIs” tab:
From there, you now must create two routes which can be liable for dealing with the backend software logic!
Route – “/requestChallenge”
This preliminary route is liable for requesting a problem every time a person desires to authenticate. The central a part of this route is the ”reqChallenge()” operate. Additional, this operate initially fetches the request arguments, units up a brand new ”physique” variable, acquires the outcomes from the ”/requestChallenge” endpoint, and eventually delivers the outcomes to the consumer:
@app.route(‘/requestChallenge’, strategies=[“GET”])
def reqChallenge():
args = request.args
physique = {
“area”: “my.dapp”,
“chainId”: args.get(“chainId”),
“handle”: args.get(“handle”),
“assertion”: “Please affirm login”,
“uri”: “https://my.dapp/”,
“expirationTime”: “2023-01-01T00:00:00.000Z”,
“notBefore”: “2020-01-01T00:00:00.000Z”,
“sources”: [‘https://docs.moralis.io/’],
“timeout”: 30,
}
end result = auth.problem.request_challenge_evm(
api_key=api_key,
physique=physique,
)
return end result
Route – “/verifyChallenge”
The second route is liable for verifying the messages signed by customers. This route comprises the ”verifyChallenge()” operate, which is liable for getting the arguments from the requests, creating new ”physique” variables, fetching the outcomes from Moralis’ Auth API, and returning the outcomes to the purchasers:
@app.route(‘/verifyChallenge’, strategies=[“GET”])
def verifyChallenge():
args = request.args
physique={
“message”: args.get(“message”),
“signature”: args.get(“signature”),
}
end result = auth.problem.verify_challenge_evm(
api_key=api_key,
physique=physique
)
return end result
Lastly, after the 2 routes, it’s worthwhile to specify the place you need to run the appliance. To take action, enter the next:
if __name__ == “__main__”:
app.run(host=”127.0.0.1″, port=3000, debug=True)
Nonetheless, that’s it for the appliance code! It’s best to now have a file with code much like the one proven under:
from flask import Flask
from flask import request
from moralis import auth
from flask_cors import CORS
app = Flask(__name__)
CORS(app)
api_key = “xxx”
@app.route(‘/requestChallenge’, strategies=[“GET”])
def reqChallenge():
args = request.args
physique = {
“area”: “my.dapp”,
“chainId”: args.get(“chainId”),
“handle”: args.get(“handle”),
“assertion”: “Please affirm login”,
“uri”: “https://my.dapp/”,
“expirationTime”: “2023-01-01T00:00:00.000Z”,
“notBefore”: “2020-01-01T00:00:00.000Z”,
“sources”: [‘https://docs.moralis.io/’],
“timeout”: 30,
}
end result = auth.problem.request_challenge_evm(
api_key=api_key,
physique=physique,
)
return end result
@app.route(‘/verifyChallenge’, strategies=[“GET”])
def verifyChallenge():
args = request.args
physique={
“message”: args.get(“message”),
“signature”: args.get(“signature”),
}
end result = auth.problem.verify_challenge_evm(
api_key=api_key,
physique=physique
)
return end result
if __name__ == “__main__”:
app.run(host=”127.0.0.1″, port=3000, debug=True)
Step 2: Begin the App
With all of the code added to the challenge, that concludes the preliminary step of this Web3 py tutorial. Now, on this second step, we are going to present you run the appliance. Working the app is straightforward, simply open a brand new terminal, enter the next command, and hit enter:
python3 app.py
When you run the command above, it autonomously spins up your software on “localhost 3000” since that is what you laid out in step one. Consequently, you now know the way Web3 py works and may create a backend software dealing with the logic for a Web3 authentication circulation! Nonetheless, allow us to additionally take a more in-depth take a look at the third step of this Web3 py tutorial, the place we are going to illustrate simply arrange a React software for testing the endpoints and utilizing the Web3 authentication circulation in follow!
Step 3: Set Up the React Utility
Now that you’ve accomplished the preliminary two steps of the Web3 py tutorial and know create a Web3 backend Python software, allow us to leap straight into the third step. This part will present you arrange an easy React software for calling the endpoints and implementing the Web3 authentication circulation in follow!
To make this extra accessible, we now have already constructed a React software that you may make the most of. Therefore, you solely want to go to the GitHub repo under and clone the challenge to your system:
Full Web3 Py Tutorial Documentation – https://github.com/MoralisWeb3/youtube-tutorials/tree/most important/Web3AuthPython
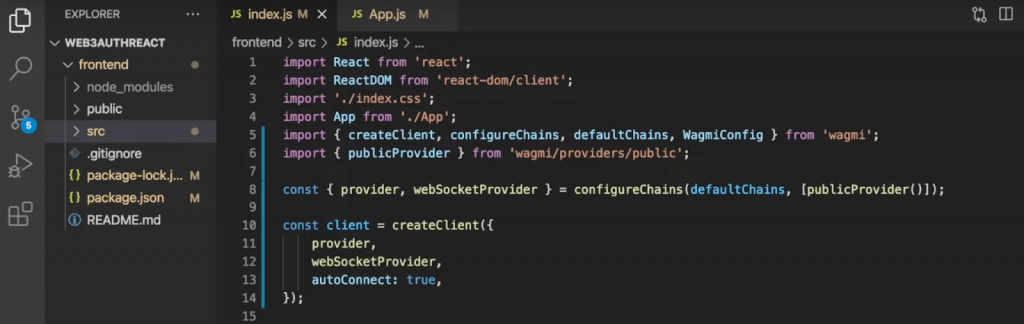
With a neighborhood copy of the repository, it’s best to now have the same file construction in your IDE because the one within the print display screen under:
Lastly, all that continues to be from right here is beginning the app. So as to take action, open a terminal and run this command:
npm run begin
That’s it! Congratulations! You have got now accomplished the three steps of this Web3 py tutorial! From right here, it’s best to now be capable to launch the React frontend software and try it out to verify every little thing works as supposed!
In case you are in search of a extra detailed breakdown of your complete course of and frontend code, take a look at the video under from the Moralis YouTube channel. On this clip, one among Moralis’ software program engineers gives an much more intensive walkthrough of your complete Web3 py tutorial from begin to end:
Moreover, you may as well take a look at the official Web3 Python SDK documentation for extra info on the event equipment’s capabilities!
Final Web3 Py Tutorial – Abstract
On this Web3 py tutorial, we taught you create an software permitting customers to sign up with their MetaMask wallets. The appliance consisted of two core parts: a backend Python software and a frontend React software. What’s extra, because of Moralis’ Python SDK, you have been capable of create this app in solely three steps:
Create the Python Flask ApplicationStart the AppSet Up the React Utility
When you’ve got adopted alongside this far, you now know implement Web3 performance into Python functions!

If this tutorial for py growth was useful, contemplate trying out extra Moralis articles right here on the Web3 weblog. For example, be taught to get NFT collections utilizing Python or arrange automated Web3 notification emails! What’s extra, don’t forget to enroll with Moralis in case you are seeking to turn into a Web3 developer. Creating an account is free and solely takes a few seconds, so you don’t have anything to lose!


 and Zilliqa (ZIL) Dual-Mining on Nvidia")


 Bulls Target alt=")


