[ad_1]
Whether or not you’re constructing a pockets tracker or another dapp (decentralized software), integrating the “Ethereum get transaction particulars” characteristic – the place you will get particulars by transaction hashes – is essential. Due to the ability of Moralis, we are able to accomplish this utilizing a easy code snippet:
const response = await Moralis.EvmApi.transaction.getTransaction({
transactionHash,
chain,
});
As well as, the identical line of code lets you question different EVM-compatible chains. For instance, you will get transaction particulars for BNB Chain, Polygon, Avalanche, and lots of others. In any case, Moralis is all about cross-chain interoperability. So, if you’re able to grasp the “Ethereum get transaction particulars” subject, create your free Moralis account and comply with our lead.
Overview
Shifting ahead, we’ll first be sure to’re all caught up with the fundamentals. As such, we’ll clarify what Ethereum transaction particulars are on the whole and what “transaction particulars by hash” really imply. Then, we’ll get extra sensible and present you how one can get Ethereum transaction particulars and discover a number of the must-have instruments for that activity. Moreover, we’ll tackle a simple tutorial to show you how one can construct a easy “Ethereum get transaction particulars” dapp. Then, we’ll use that dapp to fetch particulars for an Ethereum transaction instance. Moreover, though we checked out it earlier, the center of right now’s tutorial is the next snippet of code:
const response = await Moralis.EvmApi.transaction.getTransaction({
transactionHash,
chain,
});
Trying on the above code, you possibly can see that the “getTransaction” Ethereum API endpoint – supplied by Moralis – would be the major protagonist of the upcoming tutorial. Even so, we’ll even be utilizing NodeJS and NextJS to construct our instance dapp. Nonetheless, since Moralis is totally cross-platform interoperable, you may use different well-liked Web2 dev frameworks and programming languages. For instance, you may use Python and Web3 py. Basically, Moralis bridges the event hole between Web2 and Web3. In flip, Moralis is among the main blockchain infrastructure corporations.
What are Ethereum Transaction Particulars
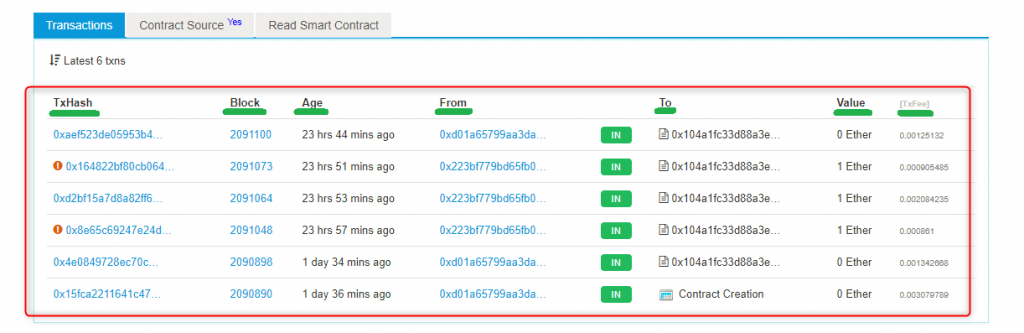
Ethereum transaction particulars are simply that – the small print of any explicit transaction on the Ethereum chain. So, the actual query is, “what do Ethereum transaction particulars entail?”. As it’s possible you’ll know, Etherscan is Ethereum’s devoted blockchain explorer. As such, the latter lets you discover all Ethereum transactions and their particulars. Furthermore, as indicated by the above picture, each Ethereum transaction instance contains the next particulars:
Transaction hash (txhash)Block quantity (block)Timestamp of the transaction (age)Handle that initiated the transaction (from)Handle that obtained the transaction (to)Worth of transactionTransaction payment (txfee)
Everytime you seek for any explicit transaction or click on on any explicit transaction hash on Etherscan, you possibly can see that transaction’s “Transaction Particulars” web page. Actually, right here’s an Ethereum transaction instance:
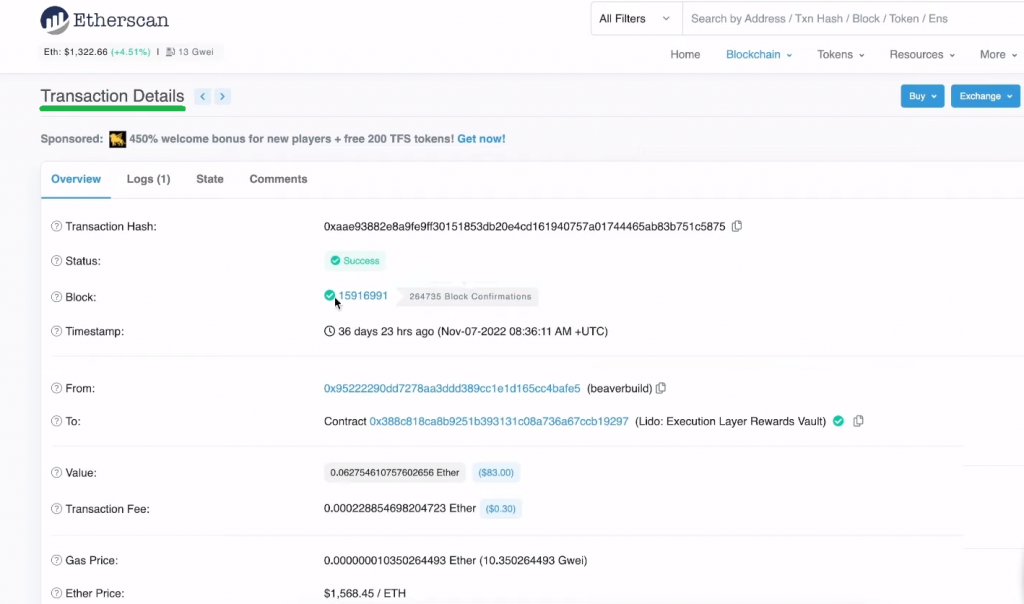
Other than the above-listed particulars, Ethereum transaction particulars might be much more particular. They might additionally embody gasoline restrict and “utilization by transaction” (txn), gasoline charges, burnt and txn financial savings charges, and different attributes (txn kind, nonce, and place in block):

What are Transaction Particulars by Hash?
Now that you already know what items of knowledge can be found within the first place, the “Ethereum get transaction particulars” activity begins to make extra sense. In any case, you possibly can in all probability think about numerous use instances the place together with all or a few of these particulars may add worth and be a vital a part of particular functionalities. The transaction hash is principally the transaction’s fingerprint. It’s distinctive for each transaction, which is why we seek for transaction particulars by txn hashes.
Moreover, with a robust device similar to Moralis’ EVM API, you possibly can even seek for transactions by tackle. Furthermore, you possibly can embody a number of the above-presented particulars as non-obligatory parameters to focus on these particular transactions, and at any time when you could have a number of transactions, you possibly can’t deal with their particulars. That stated, the one method to get Ethereum transaction particulars of their full scope is to go looking by transaction hash.
Ethereum Get Transaction Particulars – How one can Get Particulars for an ETH Transaction?
On this part, we’re beginning right now’s “Ethereum get transaction particulars” tutorial. Nonetheless, earlier than we invite you to roll up your sleeves, we need to do a fast demo of our instance dapp. That approach, you’ll know what to anticipate shifting ahead, which is able to enable you determine whether or not or not you need to construct your individual occasion of our dapp.
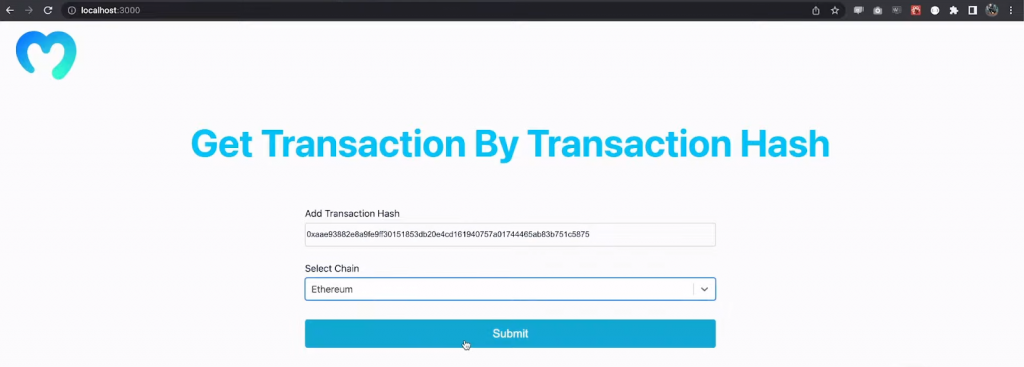
So, right here’s a screenshot of our dapp:
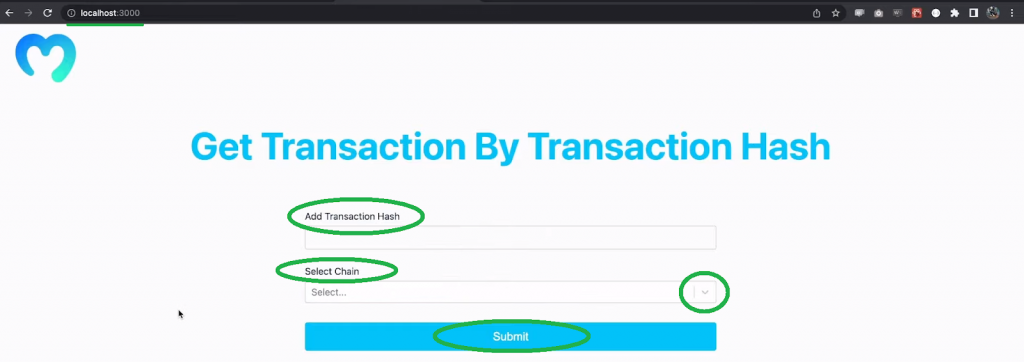
As you possibly can see, we’re working our dapp on “localhost 3000“. Moreover, our dapp contains the “Get Transaction By Transaction Hash” title, the “Add Transaction Hash” entry subject, the “Choose Chain” drop-down menu, and the “Submit” button.
If we now deal with an Ethereum transaction instance, we should paste that transaction’s hash within the entry subject. Subsequent, we choose the Ethereum community and hit the submit button:
By hitting the “Submit” button, our dapp returns transaction particulars that we determined to deal with and clears the entry subject and chain choice:
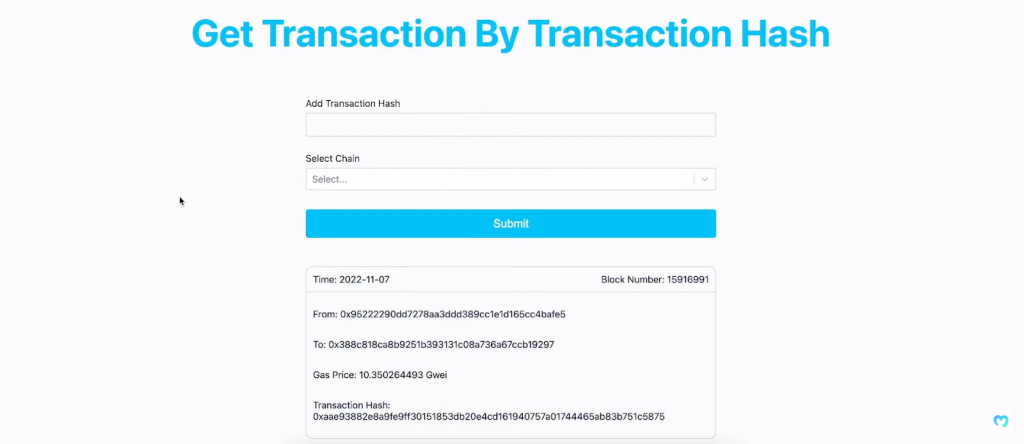
Trying on the above screenshot, you possibly can see that the outcomes embody transaction time, block quantity, “from” and “to” addresses, gasoline worth in gwei, and transaction hash. The latter matches the hash we looked for utilizing the small print of that Ethereum transaction instance.
That’s the gist of our dapp! Now, if you wish to construct it following our lead, it’s essential to make the most of appropriate instruments. Thus, let’s briefly take a look at these!
Instruments
When discussing Ethereum transaction particulars above, we already talked about Etherscan. One other highly effective device that’s extraordinarily helpful is the Moralis API references. These kind of Moralis documentation pages allow you to run all of Moralis’ Web3 API endpoints to see what outcomes they supply. Furthermore, since our goal is to get Ethereum transaction particulars, let’s collectively take a look at the documentation web page to get transaction by hash:
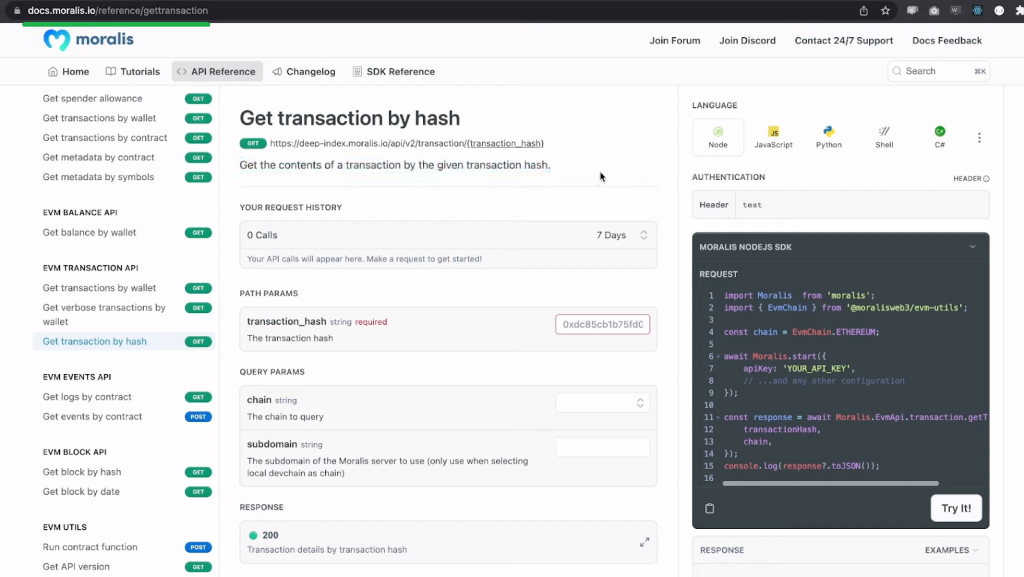
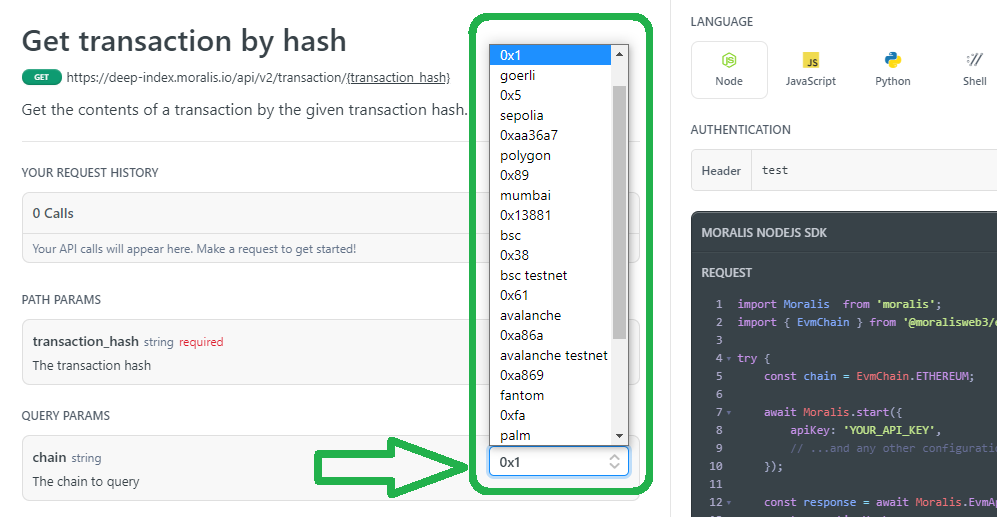
The “get transaction by hash” endpoint contains one required parameter – a transaction hash. Furthermore, this endpoint has non-obligatory “chain” and “subdomain” parameters. Though the default chain choice is Ethereum, the previous parameter lets you question different supported EVM-compatible chains. As well as, it’s possible you’ll use the “subdomain” parameter when deciding on native devchain networks.
Moreover, should you take a look at the top-right aspect of the above documentation web page, you’ll see the “language” part. That is the place you possibly can choose the programming language or framework you like to work with. As you possibly can see, we chosen the “NodeJS” choice, which is the setting we are going to use as our backend for our instance dapp. Nonetheless, if we enter a transaction hash, we are able to hit the “Strive It!” button on the backside of the “REQUEST” window. Then, we get to see the leads to the “RESPONSE” part beneath:
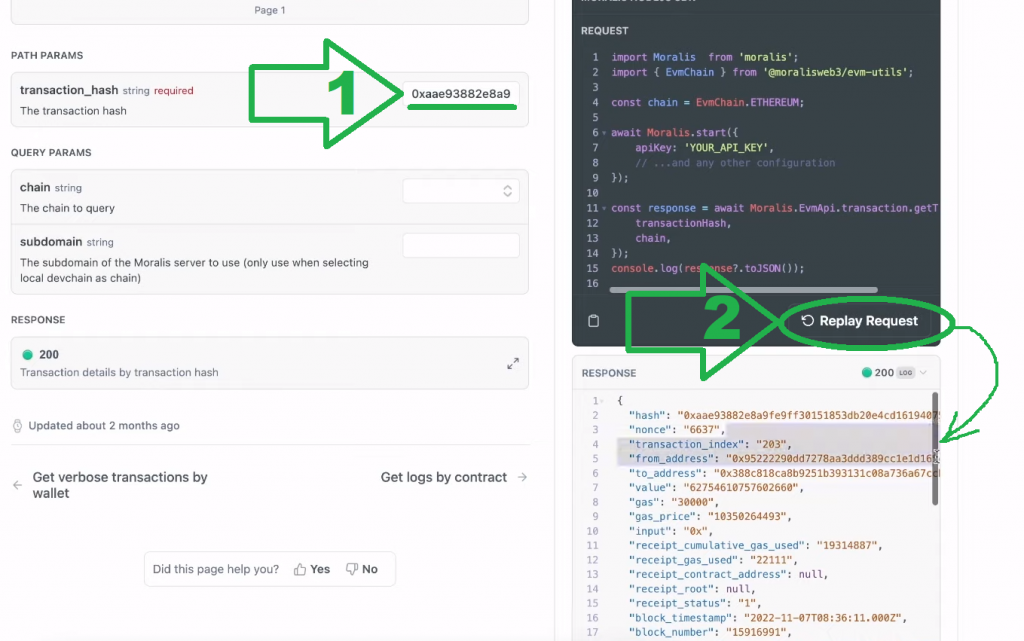
If you happen to examine the response, you’ll see that it incorporates all the small print of that Ethereum transaction instance.
Nonetheless, listed below are different instruments you’ll be utilizing in right now’s tutorial:
Moralis’ SDK, NodeJS,NextJS,Visible Studio Code (or your favourite code editor),Categorical, andseveral frontend and backend dependencies.

How one can Get Ethereum Transaction Particulars by Hash
You now know which you could get Ethereum transaction particulars by hash utilizing Etherscan and Moralis. You can too construct your individual occasion of the above-presented dapp that may full the “Ethereum get transaction particulars” activity. In fact, right now’s tutorial goals to show you how one can work with the “get transaction by has” endpoint. Then, you’ll be capable of use this talent to create distinctive dapps that incorporate transaction particulars in any approach you like. So, if you’re able to get your fingers soiled, comply with our lead all through the upcoming sections. We’ll first deal with the backend after which on the frontend code of our dapp.
Observe: You’ll be able to entry our full frontend and backend code on GitHub.
Preliminary Setup
Begin by making a route folder and name it “get-transaction-by-hash”. Inside that folder, create the “backend” and “frontend” folders. First, open the “backend” folder and set up the required dependencies. These embody “cors“, “dotenv“, “specific“, and “moralis” (you possibly can see that within the “package deal.json” file). Furthermore, the precise command line will rely on the package deal supervisor you’re utilizing.
Observe: If you happen to’ve by no means initiated a NodeJS mission earlier than, make sure that to comply with our “NodeJS” tutorial within the “Your First Dapp” part of the Moralis documentation.
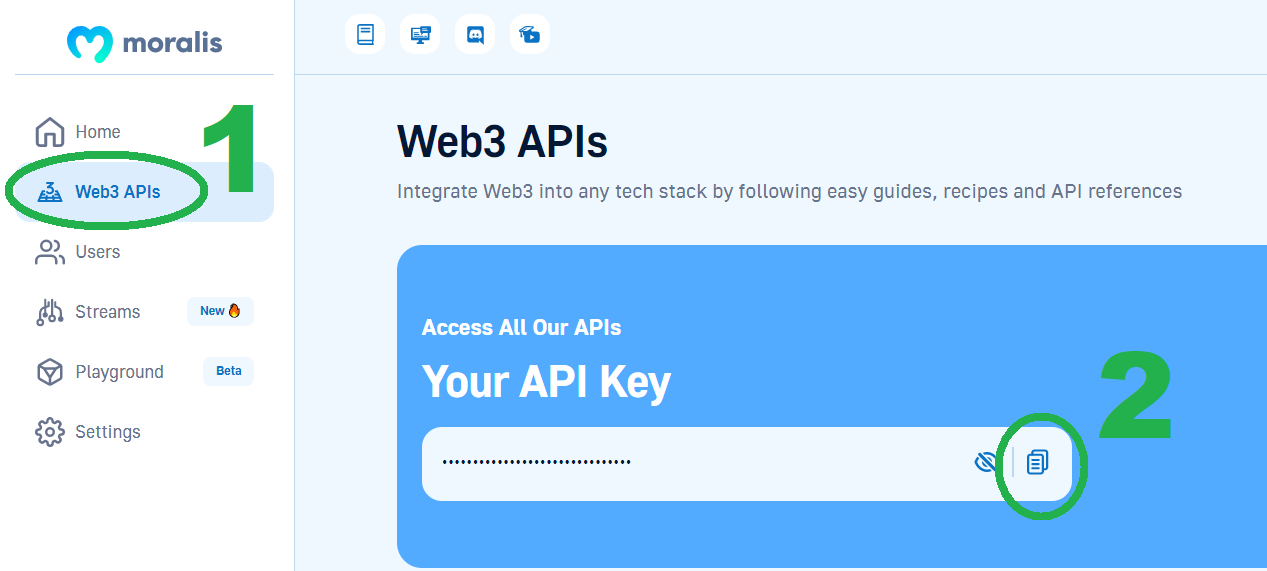
The following important step revolves round your Moralis Web3 API key. The latter is your gateway to the ability of Moralis. Furthermore, since it is a personal key, we encourage you to retailer it in a separate “.env” file contained in the “backend” folder. Nonetheless, it’s essential to first get hold of your API key out of your Moralis admin space. You want your Moralis account to take action. Thus, in case you haven’t created it but, achieve this now. Then, copy your API key from the “Web3 APIs” web page:
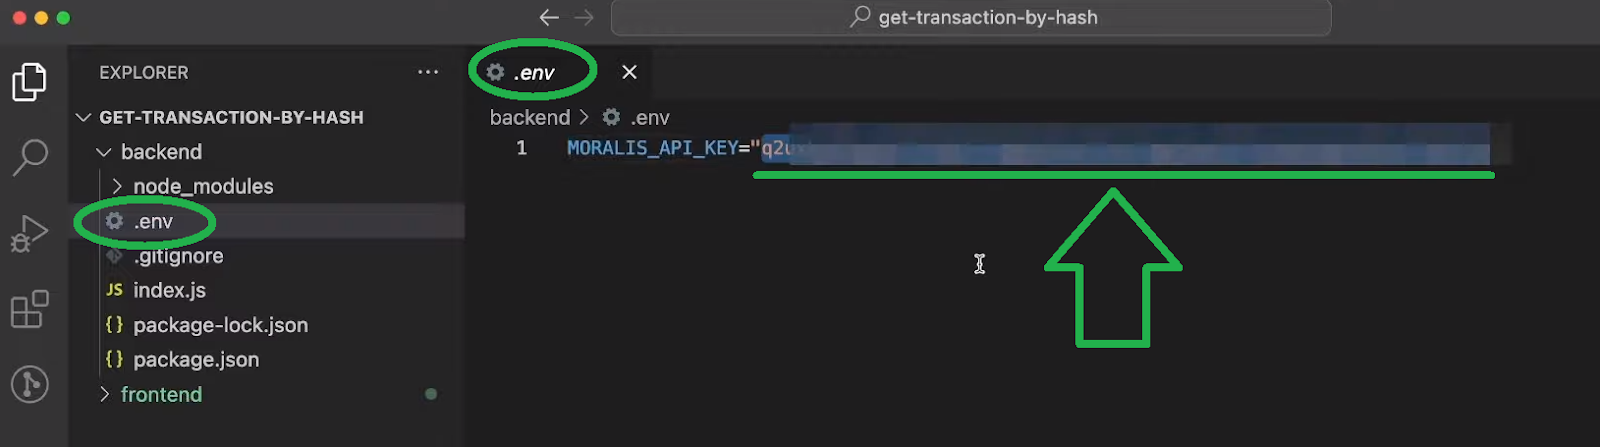
Subsequent, paste the above-copied key into your “.env” file subsequent to the “MORALIS_API_KEY” variable:
Ethereum Get Transaction Particulars – Backend Script
With all of the dependencies put in and your Moralis Web3 API key in place, you possibly can deal with the core backend script (“index.js”). On the prime of that script, you could import a number of the dependencies:
const specific = require(“specific”);
const app = specific();
const port = 5001;
const Moralis = require(“moralis”).default;
const cors = require(“cors”);
Subsequent, you additionally need to require your “.env” file, use “cors” and “specific“, and introduce your API key into that script. These are the traces of code that must comply with the above ones:
require(“dotenv”).config({ path: “.env” });
app.use(cors());
app.use(specific.json());
const MORALIS_API_KEY = course of.env.MORALIS_API_KEY;
Then comes the half that features the snippet of code introduced on the outset and within the “Overview” part. That is the place you implement the “get transaction by hash” endpoint:
app.get(“/txhash”, async (req, res) => {
strive {
const { question } = req;
const response = await Moralis.EvmApi.transaction.getTransaction({
transactionHash: question.txHash,
chain: question.chain,
});
return res.standing(200).json(response);
} catch (e) {
console.log(`One thing went fallacious ${e}`);
return res.standing(400).json();
}
});
Trying on the above traces of code, you possibly can see that the strategy queries its “transactionHash” and “chain” parameters from the frontend. Furthermore, if there’s an error, the code “consoles” the “One thing went fallacious” message. Nonetheless, if all goes easily, it passes the response to the frontend.
Lastly, you could begin Moralis by including the next traces of code on the backside of your backend script:
Moralis.begin({
apiKey: MORALIS_API_KEY,
}).then(() => {
app.pay attention(port, () => {
console.log(`Listening for API Calls`);
});
});
Observe: You’ll be able to entry the whole backend “index.js” file within the “backend” listing of our GitHub repo.

Ethereum Get Transaction Particulars – Frontend Script
Now that you just’ve completed your backend, it’s essential to first “cd” into your “frontend” folder and set up the next dependencies: “axios” and “react-select“. The “subsequent“, “react“, and “react-dom” dependencies ought to mechanically set up as you initialize your NextJS mission.
Observe: If you happen to’ve by no means initiated a NextJS mission earlier than, make sure that to comply with our “NextJS” tutorial within the “Your First Dapp” part of Moralis’ docs.
Furthermore, the homepage of your occasion of our “Get Transaction By Transaction Hash” dapp is one other “index.js” file (frontend). The latter renders two parts: “Header” and “Important“. The primary one is coded within the “header.js” file and incorporates the brand and the title. Nonetheless, it’s the second element (“major.js“) the place the motion occurs. As such, make sure that to discover this file in additional element by clicking on the “major.js” hyperlink or watching the video beneath (5:04).
One factor that we need to level out is the “Choose Chain” drop-down menu. The traces of code representing the choices this menu affords are as follows:
const valueOptions = [
{ value: “0x1”, label: “Ethereum” },
{ value: “0x5”, label: “Goerli” },
{ value: “0x13881”, label: “Mumbai” },
];
So, should you determined to incorporate different supported chains, you’d want so as to add them to the above traces of code. Furthermore, yow will discover chain IDs on the documentation web page:
Moreover, beneath is one other snippet of code that we’d wish to level out:
const response = await axios.get(`http://localhost:5001/txhash`, {
params: { txHash, chain },
});
As you possibly can see, we’re utilizing “axios” to ship the “txHash” and “chain” parameters to the backend. That approach, any Ethereum transaction instance reaches the “Moralis.EvmApi.transaction.getTransaction” technique within the backend “index.js” script.
Lastly, right here’s the video model of right now’s tutorial:
Transaction Particulars by Hash – How one can Get Ethereum Transaction Particulars – Abstract
In right now’s article, you had been in a position to discover ways to get Ethereum transaction particulars in a number of methods. As such, you now know which you could take any Ethereum transaction instance hash and fetch its particulars with Etherscan or with the assistance of Moralis’ “Get transaction by hash” API reference web page. Nonetheless, you additionally had an opportunity to follow your NodeJS and NextJS abilities and create a easy dapp. Alongside the best way, you additionally realized the fundamentals relating to Ethereum transaction particulars and why you could seek for them utilizing transaction hashes. Nonetheless, you realized how one can get hold of your Moralis Web3 API key, which implies you now have entry to all Moralis Web3 APIs.
With that energy at your disposal, you’re in all probability keen to construct some killer dapps. You probably have your individual concepts and the required abilities, by all means, begin “BUIDLing” straight away! Nonetheless, should you want extra follow, make sure that to discover our different tutorials. As an illustration, you possibly can discover ways to fetch NFT assortment information, use AWS Lambda Web3, run Web3 contract strategies on Ethereum, and way more. Furthermore, we encourage you to dive into the content material that awaits you on the Moralis YouTube channel and the Moralis weblog. In any case, these two shops will help you turn into a Web3 developer free of charge. Moreover, you possibly can take a extra skilled strategy to your crypto training by enrolling in Moralis Academy. You’ll discover a variety of programs when you enroll. Nonetheless, we advocate you begin with blockchain and Bitcoin fundamentals.
[ad_2]
Source link
