[ad_1]
This sensible contract programming tutorial will educate you find out how to incorporate present sensible contract performance into your dapps. Because of wagmi and Moralis – the instruments we use on this tutorial – your dapp will have the ability to set off “learn” and “write” Web3 contract strategies or capabilities. The next snippets of code will do all of the heavy lifting:
To run “learn” sensible contract capabilities:const response = await Moralis.EvmApi.utils.runContractFunction({
abi,
functionName,
tackle,
chain,
}); To run “write” sensible contract capabilities:const { config } = usePrepareContractWrite({})const { write } = useContractWrite()
Alongside the way in which, you’ll even have an opportunity to learn to get a pockets’s ERC20 token stability. That is the place Moralis’ Ethereum API for tokens will do the trick through the next snippet of code:
const response = await Moralis.EvmApi.token.getWalletTokenBalances({
tackle,
chain,
});
If you happen to’re already a proficient developer aware of Moralis, go forward and implement the above code snippets immediately! If not, be certain that to finish at present’s sensible contract programming tutorial and degree up your sport. Simply create your free Moralis account and comply with our lead!

Overview
The core of at present’s article might be our sensible contract programming tutorial. The latter will encompass two sub-tutorials – one instructing you to run “learn” sensible contract capabilities and the opposite to run “write” capabilities. If you happen to’d like to start the tutorial immediately, click on right here.
For at present’s tutorial, your JavaScript (NodeJS and ReactJS) proficiency will get you to the end line. Take into account that we’ll offer you the first traces of code herein and hyperlinks to the entire code that awaits you on GitHub. Consequently, we’ve ensured that there are not any obstacles in your approach and that you may simply full this sensible contract programming tutorial.
After you’ve rolled up your sleeves and efficiently accomplished the tutorial, we’re going to offer you some fundamentals associated to sensible contract programming. As such, we’ll clarify what sensible contracts are and what sensible contract programming is. We’ll additionally listing the main sensible contract programming languages in case a few of you wish to begin creating your individual sensible contracts.
If you happen to’d prefer to develop your abilities even additional after at present, be certain that to take a look at Moralis Academy and enroll within the Ethereum Sensible Contract Programming 101 course!
Sensible Contract Programming Tutorial
As you proceed, you’ll have a possibility to finish two sub-tutorials. One will present you find out how to run sensible contract capabilities out of your dapp, and the opposite find out how to write them. The primary sub-tutorial will give attention to finishing the duty inside your terminal, with out truly making a frontend dapp. Nonetheless, the second sensible contract programming tutorial may also present you find out how to create a easy frontend dapp. Right here’s the gist of that dapp:

The above screenshot reveals that the dapp you’ll have an opportunity to construct within the second sub-tutorial allows customers to attach their wallets. As soon as customers join their wallets, they get to ship their Chainlink (LINK) tokens by getting into the quantity and pasting a recipient tackle:

To be able to incorporate present sensible contracts in dapps, you additionally wish to learn to discover their particulars. That is the place blockchain explorers enter the image. Since we’ll be specializing in the Ethereum and Polygon (Mumbai) chains, Etherscan and PolygonScan will do the trick. Fortuitously, each of those explorers are fairly comparable. Basically, that you must enter a wise contract’s tackle or mission’s/token’s identify. Then, you scroll down the place you see a menu bar and click on on the “Contract” choice. By doing so, you’ll get to discover a wise contract’s code, together with the ABI (through “Code”), and the contract’s “learn” and “write” capabilities (through “Learn Contract” and “Write Contract”):

You will need to even have your Moralis Web3 API key to finish the upcoming challenges. To get it, be certain that to create your free Moralis account. Then, you possibly can entry your admin space and procure your API key:

Run Sensible Contract Features
One of many methods to include sensible contracts into dapps is to run sensible contract capabilities. Because of Moralis’ “runContractFunction” endpoint, it turns into extremely simple. You simply must create a NodeJS dapp and incorporate the right endpoint.
Begin by making a “ContractFunctions” folder and open it in Visible Studio Code (VSC). Subsequent, use your terminal to initialize NodeJS by operating the next command:
npm init -y
The above command will end in a “package deal.json” file in your file tree:

Then, set up the required dependencies with this command:
npm i moralis dotenv
Additionally, create your “.env” file, by which that you must paste your above-obtained Web3 API key:
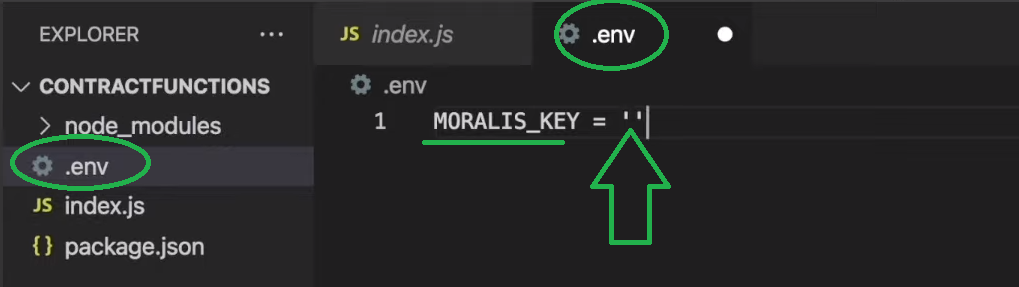
Shifting ahead, create an “index.js” file. The latter will comprise the logic required to finish this sensible contract programming tutorial. Open this file, and on the prime, import Moralis and require “.env”:
const Moralis = require(“moralis”).default;
require(“dotenv”).config();
Then that you must outline the ABI of the sensible contract that you just wish to give attention to. We’ll use the “Cool Cats” contract on the Ethereum chain. Through the use of the ideas supplied within the earlier part, you already know find out how to get any contract’s ABI:
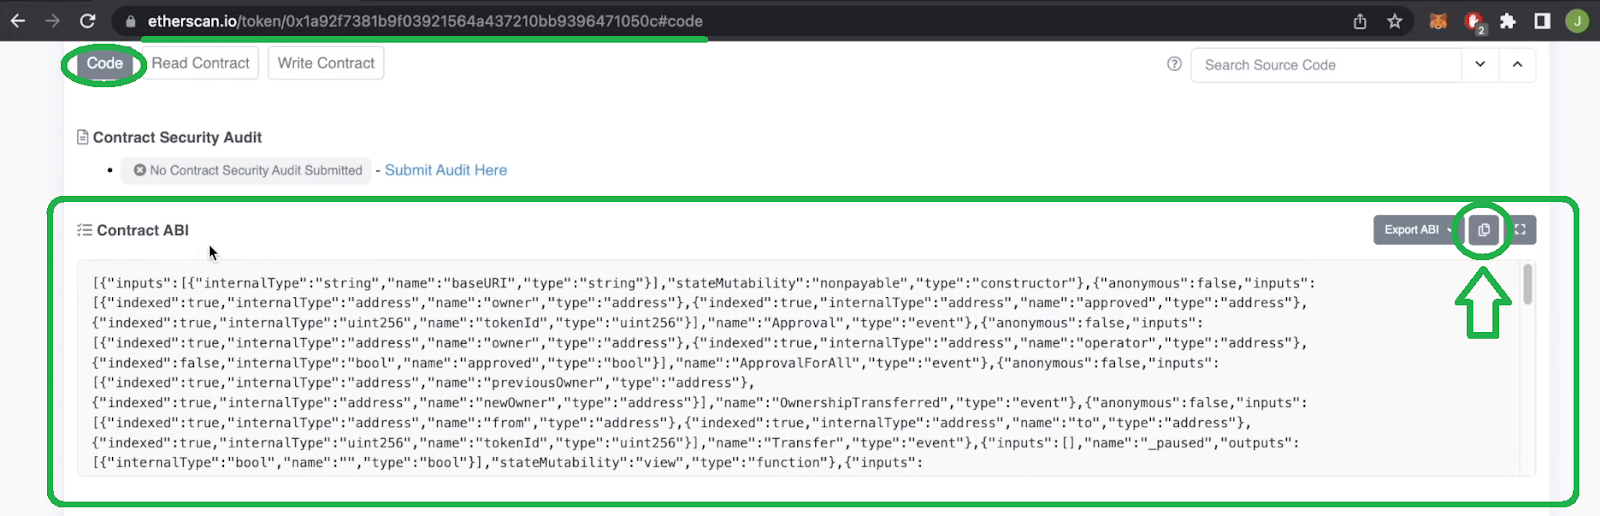
With the ABI copied, return to VSC and create a brand new “abi.json” file. Open it and paste the contract’s ABI. Subsequent, use “Shift+Choice+F” on Mac (or Home windows/Linux equal) to correctly rearrange the content material. This contract has a number of “learn” capabilities; nonetheless, we are going to give attention to operating “getPrice” with the “runContractFunction” endpoint.
Using the “runContractFunction” Methodology
Reopen your “index.js” file and require the above-created “abi.json” file:
const ABI = require(“./abi.json”);
You’ll be able to then initialize Moralis by using your API key and implementing the “Moralis.EvmApi.utils.runContractFunction” technique. You additionally want to make use of the sensible contract’s particulars as parameters. When specializing in “Cool Cats”, these are the traces of code that do the trick:
Moralis.begin({
apiKey: course of.env.MORALIS_KEY
}).then(async()=>{
const response = await Moralis.EvmApi.utils.runContractFunction({
tackle: “0x1A92f7381B9F03921564a437210bB9396471050C”,
functionName: “getPrice”
abi: ABI
});
console.log(response.uncooked)
})
Lastly, you possibly can run your “index.js” script with the next command:
node index.js
When you have adopted our lead to this point, your terminal ought to return the next outcomes:

Word: The costs in ETH use 18 decimal locations. Therefore, the above outcome signifies that the preliminary value for the “Cool Cats” NFT was 0.02 ETH.
You could find the video model of this sub-tutorial under. That is additionally the place you possibly can apply operating sensible contract capabilities on one other “learn” operate (“tokenURI“). As well as, you should use the video under to learn to mix the outcomes of operating the “getPrice” operate with Moralis’ “getNFTLowestPrice” NFT API endpoint.
Write Sensible Contract Features
When operating “learn” sensible contract capabilities, you don’t change the state of the blockchain (you don’t execute on-chain transactions). Nonetheless, whenever you write sensible contract capabilities, you execute blockchain transactions. Thus, that you must have your MetaMask pockets prepared for this sensible contract programming tutorial. Shifting ahead, we’ll give attention to an instance sensible contract dapp that runs on the Polygon testnet (Mumbai). We’ll stroll you thru the core parts of the backend and frontend scripts of our instance “Ship ChainLink” dapp.
Word: You could find the entire code behind our instance dapp on GitHub. There you’ll see the “write” (frontend) and “backend” folders.
With our code cloned, be sure to have the content material of the “write” folder in your “frontend” folder. Then, open that folder in VSC and set up the required dependencies with this command:
npm i
Contained in the “index.js” frontend script, you possibly can see all required functionalities imported on the prime, together with wagmi:
import React from ‘react’;
import ReactDOM from ‘react-dom/consumer’;
import ‘./index.css’;
import App from ‘./App’;
import { configureChains, mainnet, WagmiConfig, createClient } from ‘wagmi’
import { publicProvider } from ‘wagmi/suppliers/public’
import { polygonMumbai } from ‘@wagmi/chains’;
Subsequent, this script allows the Mumbai chain:
const { supplier, webSocketProvider } = configureChains(
[mainnet, polygonMumbai],
[publicProvider()],
)
That is the place we create a wagmi consumer:
const consumer = createClient({
autoConnect: true,
supplier,
webSocketProvider,
})
Lastly, this script wraps all the app in “wagmiConfig”:
const root = ReactDOM.createRoot(doc.getElementById(‘root’));
root.render(
<WagmiConfig consumer={consumer}>
<App />
</WagmiConfig>
);
Implementing the MetaMask Pockets Connector
With the traces of code above, you’ve arrange your frontend. Subsequent, you should use wagmi to attach the MetaMask pockets to your dapp contained in the “App.js” script. For an in depth code walkthrough, use the video under, beginning at 5:03. Nonetheless, so far as connecting pockets performance goes, the next “import” traces are a prerequisite:
import { useConnect, useAccount, usePrepareContractWrite, useContractWrite } from “wagmi”;
import { MetaMaskConnector } from “wagmi/connectors/metaMask”;
import { useEffect, useState } from “react”;
The next traces of code contained in the “App()” operate finalizes the method:
const { tackle, isConnected } = useAccount();
const { join } = useConnect({
connector: new MetaMaskConnector(),
});
Getting the Pockets Stability
One of many code snippets from this text’s introduction focuses on getting a pockets stability. To implement this function, you will need to use the “backend” folder. In it, you will discover the backend “index.js” script (08:15). This script solely comprises one endpoint: “/getBalance“. On the core of this endpoint is the “Moralis.EvmApi.token.getWalletTokenBalances” technique. The latter fetches the related pockets tackle through “question.tackle” for the LINK token (through “tokenAddresses“) on the Mumbai chain (through chain ID). Listed here are the traces of code for this:
const response = await Moralis.EvmApi.token.getWalletTokenBalances({
tackle: question.tackle,
chain: “80001”,
tokenAddresses: [“0x326C977E6efc84E512bB9C30f76E30c160eD06FB”]
})
Identical to you probably did within the above “run” sensible contract programming tutorial, you will need to initialize Moralis along with your API key:
Moralis.begin({
apiKey: course of.env.MORALIS_KEY,
}).then(() => {
app.pay attention(port, () => {
console.log(`Listening for reqs`);
});
});
Word: Once more, be certain that to retailer your key inside your “.env” file.
Don’t forget to “cd” into your “backend” folder and set up all required dependencies with the “npm i” command. Then, you’ll have the ability to run your backend dapp with the next command:
node index.js
Together with your backend operating, your frontend (App.js) will get to show the stability with the next “async” operate:
async operate getBalance() {
const response = await axios.get(“http://localhost:3000/getBalance”, {
params: {
tackle: tackle,
},
});
setUserBal(response.information.stability);
}
The script makes use of “useEffect” to name the above “getBalance” operate when wallets connect with our dapp. Make sure that to open a brand new terminal on your frontend as a result of that you must maintain your backend operating. Then, “cd” into your “frontend” folder and run the next command:
npm run begin
Word: Use the video under (14:10) to discover how your dapp’s enter fields work.
The “write” Perform
With the above functionalities in place, we’ve reached the core facet of this sensible contract programming tutorial. That is the place we’ll take a better take a look at the traces of code that allow your dapp to set off a wise contract’s “write” capabilities.
As you may need observed earlier, the “App.js” script imports “usePrepareContractWrite” and “useContractWrite“. This allows your code to arrange the information and truly set off the “write” contract capabilities. Utilizing the video under, beginning at 16:00, you possibly can see how we use PolygonScan to get the “ChainLink Token” sensible contract particulars. This consists of inspecting all “write” capabilities this sensible contract consists of and copying its ABI. You have already got the latter prepared within the “abi.json” file. Now, since our dapp goals to switch LINK tokens, we wish to give attention to the “switch” operate of the “ChainLink Token” contract.
Word: You’ll be able to be taught the aim of the “useDebounce.js” script within the video under (17:27).
In the end, the “App.js” script first prepares the small print of the contract we’re specializing in by using “usePrepareContractWrite“. Then, it makes use of “useContractWrite” primarily based on these particulars. These are the traces of code that allow our instance dapp to set off a “write” sensible contract operate:
const { config } = usePrepareContractWrite({
tackle: ‘0x326C977E6efc84E512bB9C30f76E30c160eD06FB’,
abi: ABI,
chainId: 80001,
functionName: ‘switch(tackle,uint256)’,
args: [debouncedReceiver, debouncedSendAmount],
enabled: Boolean(debouncedSendAmount)
})
const { write } = useContractWrite(config)
The above “write” operate is triggered when customers hit the “Ship” button:
<button disabled={!write} onClick={()=>write?.()}>Ship</button>
Lastly, right here’s the video that we’ve been referencing on this second sub-tutorial:
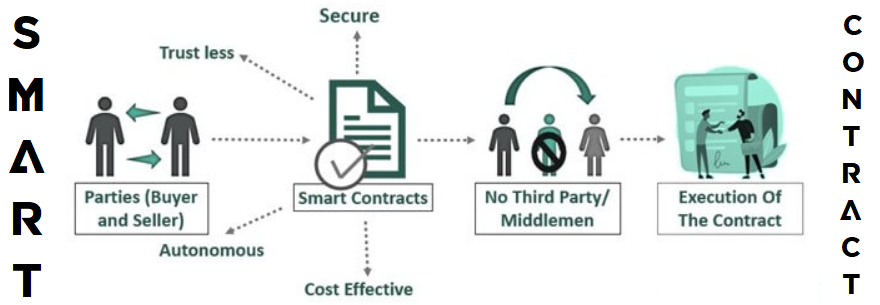
What are Sensible Contracts?
Sensible contracts are on-chain packages – items of software program that run on improvement blockchains (e.g., Ethereum). As such, sensible contracts automate and information on-chain processes. They accomplish that by executing particular predefined actions each time sure predefined situations are met. It’s due to this automation that these on-chain packages are “sensible”. Moreover, sensible contracts are cost-effective, autonomous, trustless, and safe. Plus, the code behind each sensible contract is totally clear – everybody can view it with blockchain explorers.
Thanks to those properties, Web3 contracts have monumental potential to transform all industries within the upcoming years. They’ve the facility to eradicate intermediaries and make the world extra environment friendly and honest. In fact, that’s the long-term aim. Nonetheless, Web3 remains to be in its early stage; subsequently, now’s one of the best time to be taught Web3 programming. What higher approach to try this than to tackle a wise contract programming tutorial?

What’s Sensible Contract Programming?
So, what is sensible contract programming? At its core, sensible contract programming is the method of writing, compiling, deploying, and verifying sensible contracts. Nonetheless, because the first half – writing a wise contract – is the trickiest, sensible contract programming primarily focuses on that activity. In any case, you possibly can compile, deploy, and confirm Web3 contracts with a few clicks when utilizing the appropriate instruments. Alternatively, writing a correct sensible contract from scratch is a slightly superior feat, particularly in the event you intention to implement some authentic functionalities.
To create a wise contract, that you must be proficient in one of many programming languages for sensible contracts. Furthermore, there isn’t one common sensible contract language that targets all fashionable blockchains, no less than not but. As a substitute, that you must resolve which blockchain you wish to give attention to after which select among the many supported languages for that chain. All in all, if you wish to grasp sensible contract programming, that you must be ready to place in fairly some effort and time.
Nonetheless, to begin working with sensible contracts is slightly easy. As an example, if you wish to deploy your sensible contract on Ethereum that offers with already identified duties, you should use one in every of many verified sensible contract templates and apply minor tweaks. Then, you possibly can compile, deploy, and confirm it with the Remix IDE and MetaMask. Moreover, you can begin incorporating sensible contract functionalities into decentralized purposes (dapps). An amazing instance of that might be to name a wise contract operate from JavaScript. You should utilize a Web3 JS name contract operate or take heed to sensible contract occasions utilizing ethers.js.
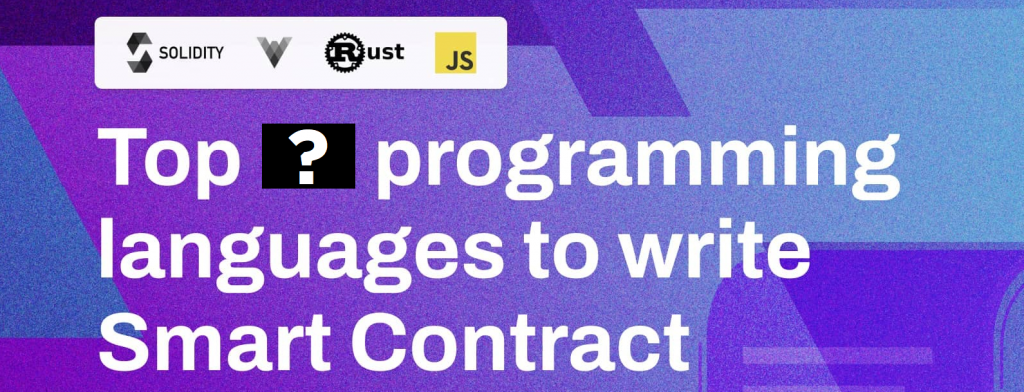
Languages for Sensible Contract Programming
Under, you possibly can see the listing of the six hottest sensible contract coding languages and the main chains they give attention to:
Solidity for Ethereum and different EVM-compatible chainsVyper for Ethereum and different EVM-compatible chainsYul (and Yul+) as an intermediate language for the Solidity compiler Rust for Solana, Polkadot, NEAR, and several other different chainsC++ for EOSJavaScript (NodeJS) for Hyperledger Material and NEAR
Different note-worthy programming languages that you should use to write down sensible contracts embrace Readability (Bitcoin), Golang/Go (Ethereum), Marlowe (Cardano), Cadence (Circulate), LIGO (Tezos), Transfer (Aptos), TEAL (Algorand), and Python (Hyperledger Material).
Word: If you wish to be taught extra particulars about Solidity, Vyper, and Yul, be certain that to make use of the “programming languages for sensible contracts” hyperlink above.
On the subject of incorporating sensible contract functionalities into dapps, you should use any of your favourite programming languages due to Moralis’ cross-platform interoperability.
Sensible Contract Programming Tutorial for Blockchain Builders – Abstract
In at present’s sensible contract programming tutorial, we coated fairly some floor. You had an opportunity to comply with our lead and full at present’s sensible contract programming tutorial. First, you discovered to create a NodeJS dapp that runs “learn” sensible contract capabilities utilizing the Moralis “runContractFunction” endpoint. And within the second tutorial, you had a possibility to clone our dapp and use it to set off “write” sensible contract capabilities. As soon as we completed the tutorial, we addressed among the fundamentals. As such, you had an opportunity to refresh your understanding of sensible contracts and sensible contract programming. You additionally discovered what the main sensible contract coding languages are.
If you happen to loved at present’s tutorial, be certain that to dive into Moralis’ docs and deal with the “Tutorials” part. Don’t neglect to bolster your blockchain improvement information by visiting the Moralis YouTube channel and the Moralis weblog. These two retailers cowl a variety of subjects. As an example, among the newest articles will allow you to perceive blockchain-based information storage, find out how to get contract logs, find out how to get Ethereum transaction particulars, and rather more. If you wish to tackle the sensible contract programming course talked about within the “Overview” part, be certain that to enroll in Moralis Academy.
[ad_2]
Source link
