[ad_1]
Are you in search of a straightforward technique to authenticate customers on Supabase? In that case, you might be precisely the place it is advisable to be, as this text covers the ins and outs of Supabase authentication! With Moralis and the Auth API, you possibly can authenticate customers by merely requesting a message and verifying the problem!
Request message:
const consequence = await Moralis.Auth.requestMessage({
tackle:””,
chain:””,
community:””,
area:””,
assertion””:,
uri:””,
expirationTime:””,
timeout:””,
});
Confirm problem:
const verifiedData = Moralis.Auth.confirm({
message:””,
signature:””,
community:””,
});
Due to Moralis, Web3 authentication doesn’t need to be extra sophisticated than that! By familiarizing your self with the Auth API’s ”requestMessage” and ”confirm” endpoints, you possibly can combine Web3 authentication flows for all future blockchain initiatives!
In order for you a extra detailed breakdown of how this works with Supabase particularly, try Moralis’ Web3 Supabase documentation. You can even be a part of us all through this tutorial as we cowl the ins and outs of authenticating customers on Supabase.
However earlier than persevering with, don’t forget to enroll with Moralis, as you want an account to comply with alongside!

Overview
On this tutorial, we’ll present you methods to authenticate customers on Supabase utilizing Moralis in 5 steps:
Establishing SupabaseCloning the venture and including setting variables Creating the Web3 authentication flowVerifying the message Making the client-side implementing the auth stream
For those who full the steps talked about above, you’ll learn to authenticate customers on Supabase. From there, you possibly can implement blockchain-based authentication into any future venture. If you wish to get going instantly, soar straight into the Supabase authentication tutorial by clicking right here!
By following alongside on this article, you’ll familiarize your self with Moralis’ Auth API. This software gives a dynamic Web3 authentication workflow, which means that it doesn’t restrict you to MetaMask.

Together with industry-leading Web3 APIs, Moralis additionally gives different Web3 improvement assets. For example, the weblog options wonderful guides to assist your blockchain improvement endeavors. For instance, be taught what a Sepolia testnet faucet is, or try our sensible contract programming tutorial.
In order for you entry to those enterprise-grade improvement assets, keep in mind to enroll with Moralis. Creating an account is fully free and solely takes a few seconds, so you don’t have anything to lose! What’s extra, if you’re unfamiliar with Supabase, you possibly can replace your information base within the ”What’s Supabase?” part beneath the fifth and remaining step of the tutorial!
Moralis Supabase Authentication
We are going to kickstart this text by leaping straight into the Supabase authentication tutorial. Within the upcoming sections, we’ll present you methods to arrange a NodeJS utility for combining Web3 authentication with Supabase!
The Web3 authentication stream is managed utilizing Moralis’ Auth API, permitting customers to sign up with their MetaMask wallets. As soon as authenticated, the app creates a JSON Internet Token (JWT) to verify whether it is an present person. If this isn’t the case, the app generates a brand new person and provides it to Supabase.
If this sounds attention-grabbing and also you need to learn to authenticate customers on Supabase, be a part of us all through this tutorial as we cowl the method from begin to end!
You even have the choice to take a look at the video beneath should you favor watching YouTube clips to be taught. On this video, one in every of Moralis’ software program engineers breaks down the complete course of, offering an in-depth evaluation of the appliance code:
In any other case, be a part of us right here as we start by overlaying the required stipulations earlier than leaping into step one of this Supabase authentication tutorial!
Conditions
Earlier than getting began with this Supabase authentication tutorial, it is advisable to take care of the next stipulations:
Set up the Moralis and Supabase SDKs – Open a brand new terminal and run the next command: yarn add moralis @supabase/supabase-js jsonwebtoken
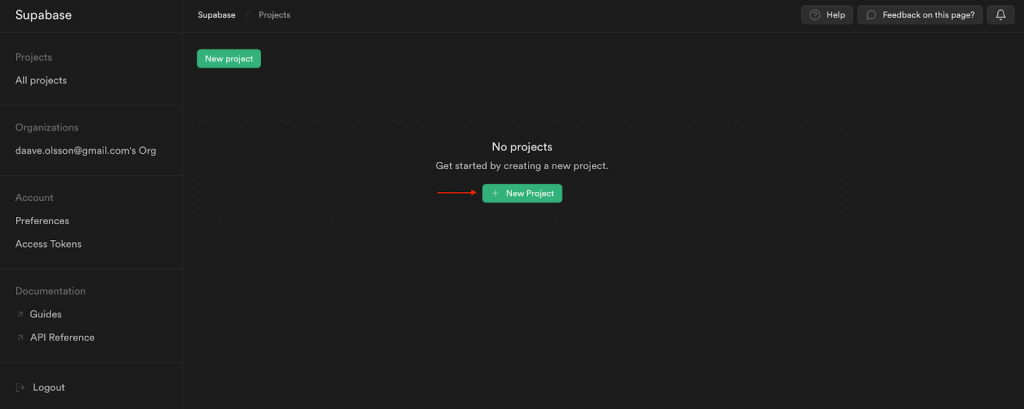
Step 1: Setting Up Supabase
Step one is to arrange a brand new Supabase venture. To take action, log in to Supabase and click on on the ”+ New Mission” button:
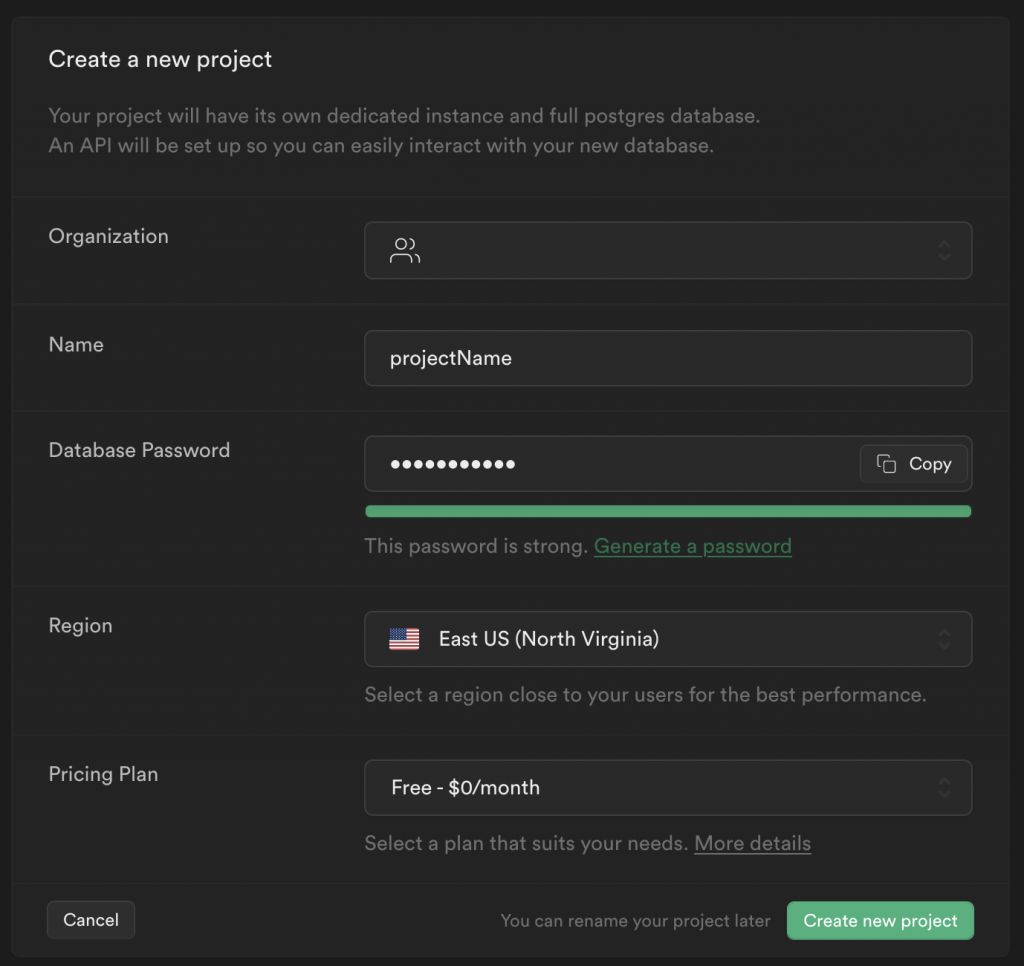
Fill in a reputation, choose a password, area, and pricing plan:
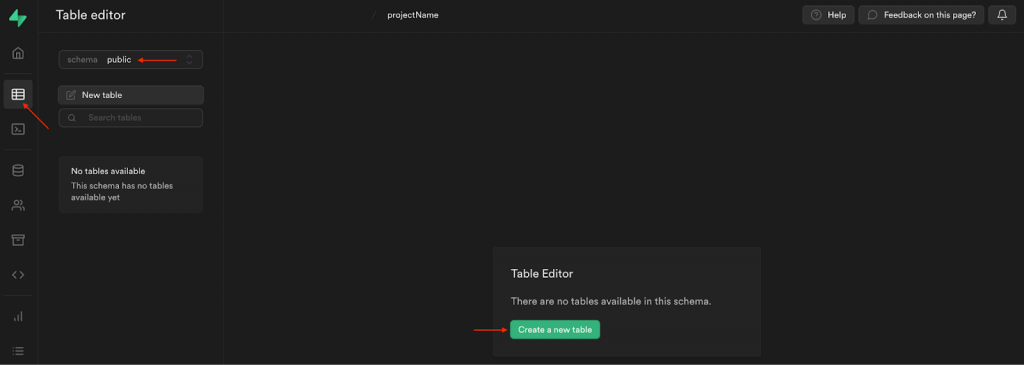
Subsequent, go to ”Desk editor”, select ”public” for the schema, and hit the ”Create a brand new desk” button:
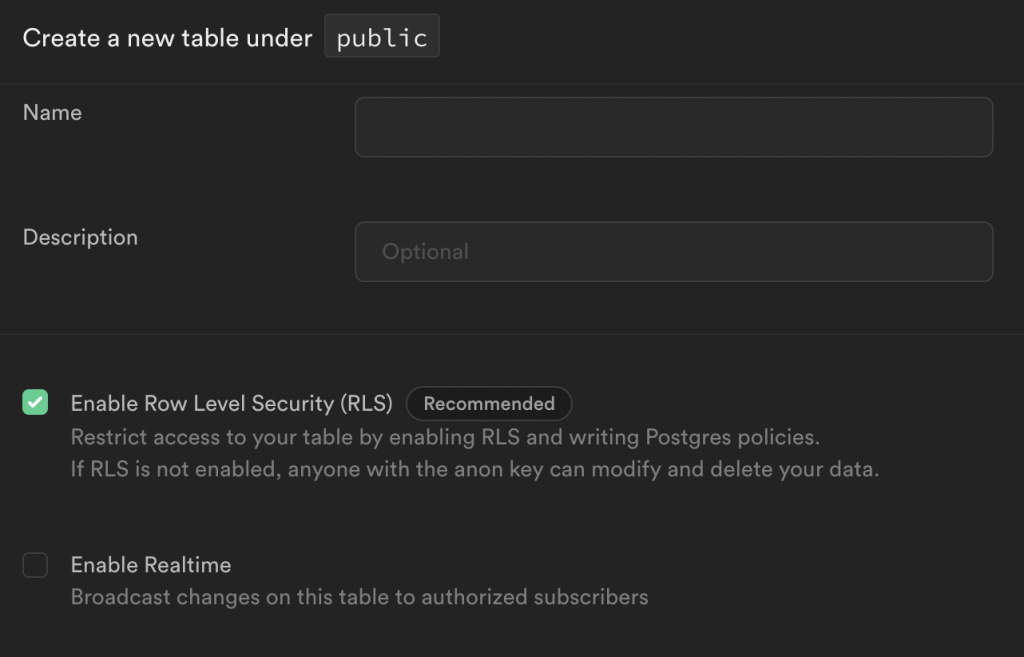
Add a reputation and outline, and make sure you verify the ”Allow Row Degree Safety (RLS)” field:
From there, it is advisable to add two extra columns: ”moralis_provider” set to ”varchar” and ”metadata” set to ”json”:
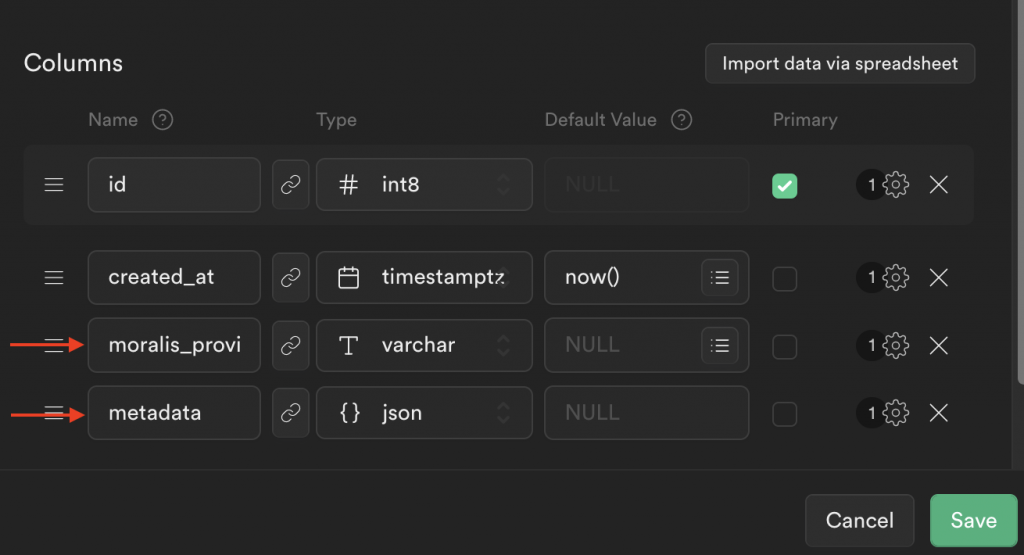
When you hit ”Save”, it is best to now have a brand new desk trying one thing like this:

Lastly, the ultimate factor it is advisable to do is configure the RLS coverage for the desk. As such, click on on ”No energetic RLS insurance policies” on the high proper, adopted by ”New Coverage”:


You possibly can then go for the ”For full customization” choice:

Add a coverage title, choose the ”SELECT” choice, add ”authenticated” to the goal roles, and set the expression to ”true”:

While you click on on ”Assessment”, your coverage ought to now look one thing like this:

Step 2: Cloning the Mission and Including Surroundings Variables
Now that you’ve got configured your Supabase database, allow us to dive into the precise venture. To make this Supabase authentication tutorial as easy as potential, we’ll use a pre-made app. So, the primary order of enterprise is visiting the GitHub repository beneath and cloning the venture to your native listing:
Full Supabase Authentication Docs – https://github.com/MoralisWeb3/Moralis-JS-SDK/tree/foremost/demos/supabase-auth
Subsequent, with a neighborhood copy of the venture, it is advisable to make a number of configurations to the code. Begin by renaming the ”.env.instance” file to ”.env”. While you open this file, you’ll shortly discover that it is advisable to add a number of setting variables:
SUPABASE_PUBLIC_ANON_KEY = ”
SUPABASE_SERVICE_KEY = ”
SUPABASE_URL = ”
# Your Moralis API key that may be discovered within the dashboard. Hold this secret!
MORALIS_API_KEY = ”
PORT = 3000
APP_NAME = ‘supabase-demo’
SUPABASE_JWT = ”
First, go to the Supabase dashboard, and click on on ”Mission Settings”, adopted by ”API”. Right here you will discover the venture URL, API keys, and the JWT secret:

Allow us to copy every worth and add them to the code. It ought to now look one thing like this:
SUPABASE_PUBLIC_ANON_KEY = ‘eyJhb…’
SUPABASE_SERVICE_KEY = ‘eyJhb…’
SUPABASE_URL = ‘https://cscaffczpobedyxjwujy.supabase.co’
# Your Moralis API key that may be discovered within the dashboard. Hold this secret!
MORALIS_API_KEY = ”
PORT = 3000
APP_NAME = ‘supabase-demo’
SUPABASE_JWT = ‘o5+4…’
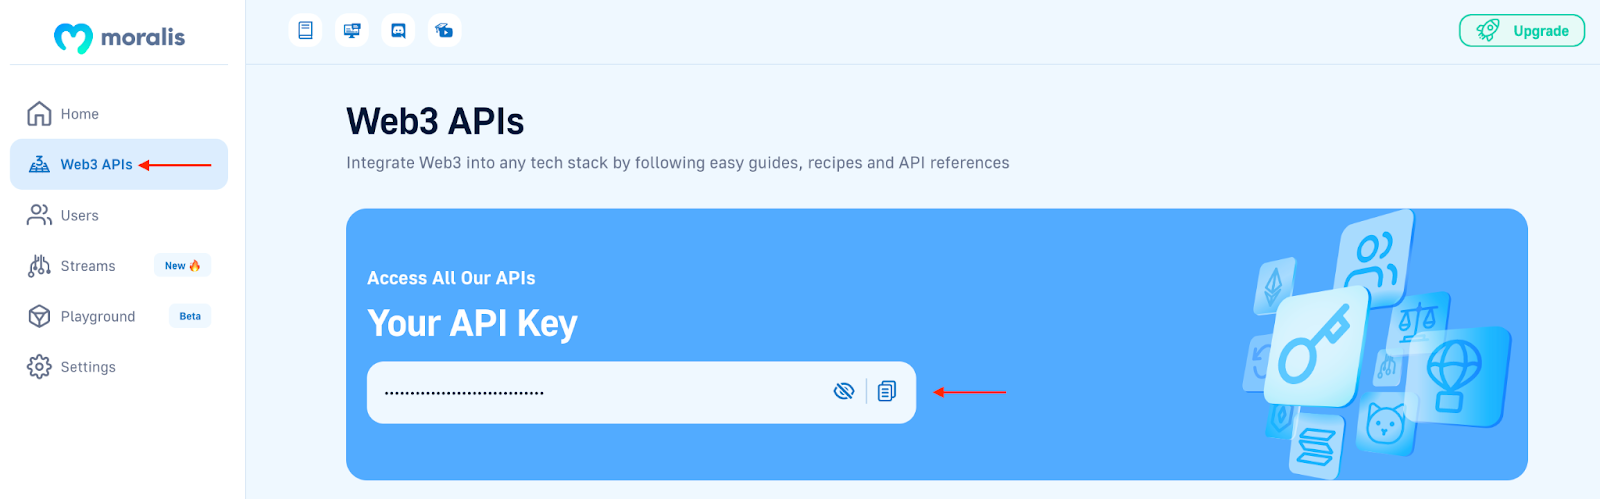
Lastly, you additionally want so as to add your Moralis API key to the ”MORALIS_API_KEY” variable. To seek out your key, log in to Moralis and click on on the ”Web3 APIs” tab:
Because you copied the complete venture to your native listing, you’ve got all of the required code. Nonetheless, to make this extra comprehensible, the remaining steps will break down the important components!
Step 3: Creating the Web3 Authentication Circulation
To start this code breakdown, allow us to begin by navigating to the ”authServices.ts” file, the place you will discover the primary operate for the Web3 Supabase authentication stream:
export async operate requestMessage({ tackle, chain, community }: { tackle: string; chain: string; community: ‘evm’ }) {
const consequence = await Moralis.Auth.requestMessage({
tackle,
chain,
community,
area: ‘defi.finance’,
assertion: ‘Please signal this message to verify your id.’,
uri: ‘https://defi.finance’,
expirationTime: ‘2023-01-01T00:00:00.000Z’,
timeout: 15,
});
const { message } = consequence.toJSON();
return message;
}
This operate is liable for requesting a message from Moralis’ Auth API. It permits us to ship a message to the customers, prompting them to signal it utilizing their MetaMask pockets.
Step 4: Verifying the Message
Since we’re asking customers to signal a message, verification of the signature have to be established. For this, we create the ”verifyMessage()” operate:
export async operate verifyMessage({ community, signature, message }: VerifyMessage) {
const consequence = await Moralis.Auth.confirm({
community,
signature,
message,
});
const authData = consequence.toJSON();
let { knowledge: person } = await supabase.from(‘customers’).choose(‘*’).eq(‘moralis_provider_id’, authData.profileId).single();
if (!person) {
const response = await supabase
.from(‘customers’)
.insert({ moralis_provider_id: authData.profileId, metadata: authData })
.single();
person = response.knowledge;
}
const token = jwt.signal(
{
…person,
aud: ‘authenticated’,
function: ‘authenticated’,
exp: Math.flooring(Date.now() / 1000) + 60 * 60 * 24 * 7,
},
config.SUPABASE_JWT,
);
return { person, token };
}
This operate makes use of the ”confirm()” operate from Moralis’ Auth API, passing ”community”, ”signature”, and ”message” as parameters. If the message is efficiently verified, the operate creates a JWT token and sends it to the frontend utility. As well as, earlier than issuing the token, the operate checks for a present person. If none exists, it creates a brand new one.
Step 5: Making the Consumer-Facet Implementing the Auth Circulation
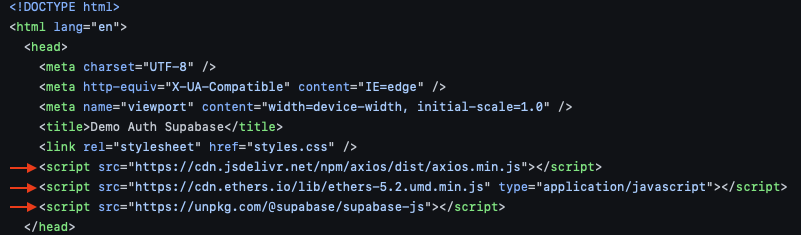
Now, allow us to take a more in-depth take a look at the client-side implementing the authentication stream, beginning with the ”index.html” file. On this file, we start by including dependencies utilizing CDN for “axios“, ethers.js, and the Supabase SDK:
Subsequent, go to ”script.js” so as to add your Supabase URL and anon key (go to Supabase, click on on ”Mission Settings”, and choose the ”API” tab to get these values):

Additional down in ”script.js”, we add the ”connectToMetamask()” operate:
const connectToMetamask = async () => {
const supplier = new ethers.suppliers.Web3Provider(window.ethereum, ‘any’);
const [accounts, chainId] = await Promise.all([
provider.send(‘eth_requestAccounts’, []),
supplier.ship(‘eth_chainId’, []),
]);
const signer = supplier.getSigner();
return { signer, chain: chainId, account: accounts[0] };
};
This operate makes use of a regular ethers.js supplier to attach with MetaMask. What’s extra, it fetches primary knowledge concerning the person’s pockets.
That covers the required features wanted for the complete Supabase authentication stream. From right here, we put all of it collectively within the ”handleAuth()” operate, which may look one thing like this:
const handleAuth = async () => {
// Hook up with MetaMask
const { signer, chain, account } = await connectToMetamask();
if (!account) {
throw new Error(‘No account discovered’);
}
if (!chain) {
throw new Error(‘No chain discovered’);
}
const { message } = await requestMessage(account, chain);
const signature = await signer.signMessage(message);
const { person } = await verifyMessage(message, signature);
_supabaseAuthenticated = supabase.createClient(SUPABASE_URL, SUPABASE_PUBLIC_ANON_KEY, {
world: {
headers: {
Authorization: `Bearer ${person.token}`,
},
},
});
renderUser(person);
};
After a person authenticates with this Supabase consumer, we are able to now entry the customers’ desk utilizing the token returned after verification:
const getUser = async (token) => {
const { knowledge } = await _supabaseAuthenticated.from(‘customers’).choose(‘*’);
renderUser(knowledge);
};
Congratulations! That’s it for this Supabase authentication tutorial. If in case you have adopted alongside this far, you now know methods to mix Web3 authentication with Supabase! For those who at any level skilled hassle, try the video on the high of the tutorial or learn the Web3 Supabase documentation.
Now, earlier than concluding this tutorial, allow us to take a more in-depth take a look at the outcomes of the Supabase authentication tutorial!
Tips on how to Authenticate Customers on Supabase – Remaining Supabase Authentication App
Now that you’ve got accomplished the required configurations and know the way the code works, allow us to take a more in-depth take a look at the top outcomes. You’ll find the app’s touchdown web page down beneath:
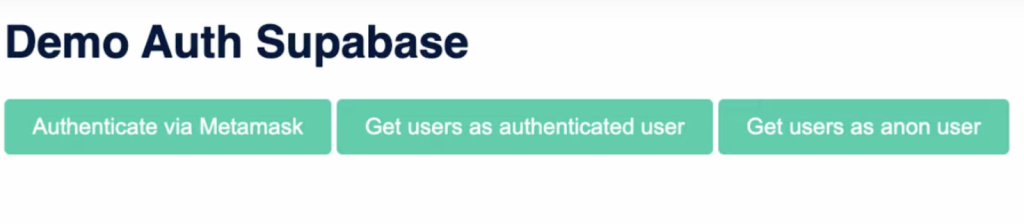
The app options three buttons: ”Authenticate by way of MetaMask”, ”Get customers as authenticated person”, and ”Get customers as anon person”. For those who click on on the previous, it’ll routinely set off your MetaMask pockets, requiring you to signal a message:
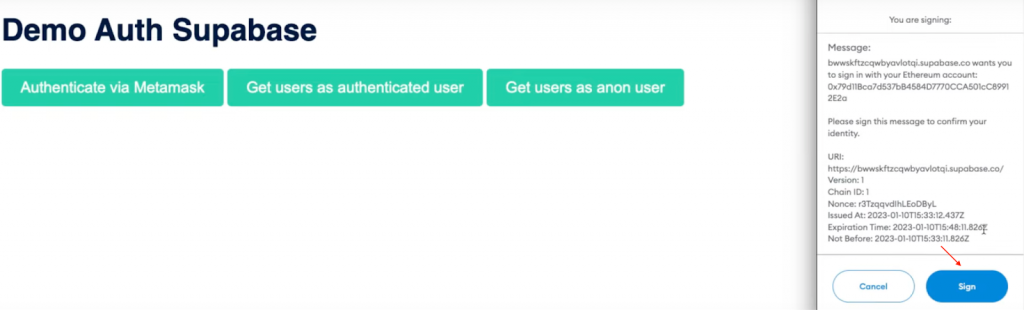
When you signal the message, the code creates a JWT to confirm if a person exists. If the person is nonexistent, we create a brand new one and add it to the Supabase database:
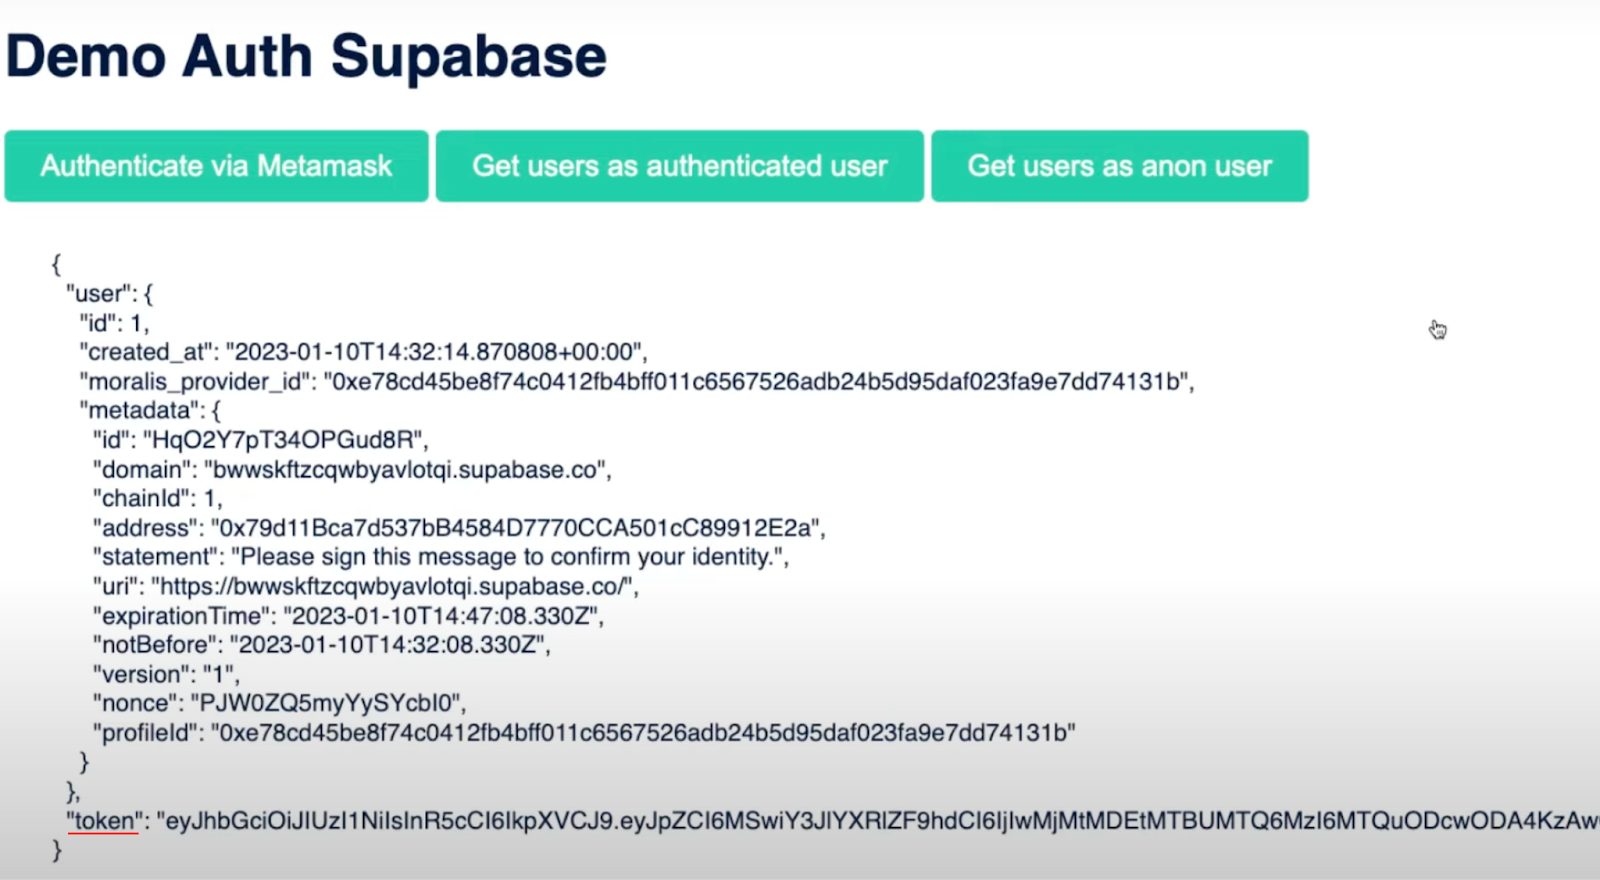
With the ”Get customers as authenticated person” button, solely authenticated customers will have the ability to get info concerning all customers of the database:

Lastly, the ”Get customers as anon person” choice illustrates that nameless customers will be unable to get the identical info. As a substitute, it will solely show an empty array:

That’s it for this Supabase authentication tutorial! Now you can comply with the identical steps to implement comparable performance into future Web3 initiatives!
What’s Supabase? – Supabase Authentication
Supabase was launched in 2020 and is an open-source Firebase various. The platform guarantees to supply all of the backend performance required to construct subtle initiatives. As such, you possibly can provoke initiatives with authentication, instantaneous APIs, real-time subscriptions, storage, Postgres database, and extra by way of Supabase!

Supabase is commonly praised for offering an intuitive and user-friendly person interface (UI). With Supabase, it’s straightforward to arrange and handle servers, particularly if you’re a Firebase person preferring to make the most of tables. In conclusion, Supabase is a “backend-as-a-service” (BaaS) resolution just like Firebase.
However, with a quick introduction to Supabase, allow us to take a more in-depth take a look at what it’s used for!
What’s Supabase Used For?
To grasp what Supabase is used for, allow us to take a more in-depth take a look at among the platform’s core options. Listed below are 4 distinguished examples:
Database – All Supabase initiatives are full Postgres databases. Postgres is likely one of the world’s most trusted relational databases. Storage – With Supabase, you possibly can manage, retailer, and serve massive information. This consists of any media, equivalent to movies and pictures. Authentication – Supabase allows you to seamlessly add signups and logins. What’s extra, this knowledge is secured with row stage safety (RLS). Edge Capabilities – Via edge features, Supabase allows you to write customized code with out the necessity for scaling or deploying servers.
Via these providers, the platform allows you simply handle your backend wants. To summarize, Supabase is used to simplify the setup and administration of the backend infrastructure!
What’s Supabase Authentication?
All Supabase initiatives include a full person administration system that works independently of some other instruments. As such, Supabase gives providers permitting builders to seamlessly handle utility customers and supply safe choices for creating accounts and authenticating themselves.
When implementing authentication into your initiatives, Supabase makes use of a “field” technique, making this course of comparatively easy. Furthermore, listed below are three key options of Supabase authentication:
Social Suppliers – Supabase authentication allows social logins with the clicking of a button. Some examples are Fb, Google, Azure, and so forth. Integrations – Supabase options easy auth with built-in authorization, authentication, and person administration. Personal the Knowledge – You possibly can retailer knowledge in your Supabase database, which means you shouldn’t have to fret about third-party privateness considerations.
Auth Alternate options
On this tutorial, we taught you methods to authenticate customers with MetaMask. Nonetheless, MetaMask is just one of many auth alternate options so that you can select from. Listed below are 5 different examples:

Magic.LinkPhantomRainbowKitWalletConnectCoinbase Pockets
You can even be taught extra about totally different pockets suppliers for the Solana community by trying out the next article: ”What’s a Solana Pockets?”.
However, if you wish to combine these Web3 auth alternate options with Supabase, you want a seamless workflow and instruments from a blockchain infrastructure supplier like Moralis!
Final Auth Resolution
Moralis gives the last word auth resolution within the type of the Web3 Auth API! It doesn’t matter if you’re constructing a brand new Web3 utility, you need to join an present database utilizing Web3 auth, or leverage aggregators like Auth0, Moralis has you coated!
Moralis solves the Web3 authentication problem as you not must redirect customers to third-party auth interfaces, perceive Web3 authentication flows, find out how wallets signal or confirm messages, and so forth. As a substitute, Moralis gives a unified API for all Web3 authentication strategies. What’s extra, the software incorporates a complete SDK for seamless integrations and is appropriate with authentication aggregators equivalent to Auth0!
So, if you wish to effortlessly authenticate Web3 customers, join with Moralis proper now to leverage the complete energy of blockchain know-how!
Abstract – Supabase Authentication with Moralis
On this article, we taught you methods to authenticate customers on Supabase with Moralis. Due to the Auth API, you had been ready to take action in 5 easy steps:
Establishing SupabaseCloning the venture and including setting variables Creating the Web3 authentication flowVerifying the message Making the client-side implementing the auth stream
If in case you have adopted alongside this far, you possibly can implement comparable performance into future blockchain improvement initiatives!
Take into account trying out different content material right here at Moralis’ Web3 weblog. For instance, examine what a BNB faucet is, find out how MetaMask authentication with Django works, or try our article answering the query, ”what’s Web3 know-how?”. You must also contemplate enrolling in Moralis Academy if you’re seeking to change into a more adept Web3 developer. For example, if you’re new to the house, try the Moralis Academy course on blockchain and Bitcoin fundamentals.

Lastly, it doesn’t matter if you’re seeking to authenticate customers on Supabase or some other platform; keep in mind to enroll with Moralis. With Moralis, you possibly can leverage the ability of blockchain know-how in all future initiatives and authenticate customers with a single line of code!
[ad_2]
Source link
