[ad_1]
How do I get the most recent block in Web3? If this can be a query you might have been asking your self, then you might be precisely the place you might want to be! This Web3 tutorial will present you how one can get the present block by timestamp utilizing Moralis. In truth, because of Moralis’ EVM API, all it takes is a single name to the ”get_date_to_block” endpoint whereas passing a date and chain as parameters:
from moralis import evm_api
api_key = “YOUR_API_KEY”
params = {
“date”: “”,
“chain”: “eth”,
}
end result = evm_api.block.get_date_to_block(
api_key=api_key,
params=params,
)
print(end result)
When working with the primary Web3 infrastructure supplier, it doesn’t need to be tougher to get the present block primarily based on a timestamp than the above! If you wish to study extra in regards to the ”get_date_to_block” endpoint, take a look at Moralis’ get block by date Web3 documentation.
For a extra detailed breakdown of how one can implement this performance into an app, learn on as we present you ways to take action via an Ethereum Python implementation. What’s extra, keep in mind to register with Moralis if you happen to plan to hitch us all through this tutorial. Signing up is free, and also you want an account to observe alongside!
Overview
In right now’s Web3 tutorial, we’ll illustrate how one can get any block by constructing a Python utility in three steps:
Utilizing a Web3 get block perform – Moralis’ ”get_date_to_block” endpointSetting up the Web3 get block by timestamp backendBuilding the Web3 get block frontend
By the top of this tutorial, you’ll have your individual Python app finalized, enabling you to constantly get blocks primarily based on timestamps. If this sounds fascinating and also you need to get going instantly, click on right here to leap straight into the Web3 get block function tutorial!
When constructing decentralized functions (dapps), platforms, and different Web3 tasks, you’ll shortly understand that you simply want entry to on-chain information. Because the Web3 business is blockchain-based, you’ll be able to think about that one piece of such info is block numbers. Getting this information will help you to, for example, entry transactional information at given instances. For that reason, this Web3 tutorial will present you how one can get a block by a timestamp utilizing Moralis!
To make this course of as accessible as attainable, we will likely be using Moralis’ EVM API and the ”get_date_to_block” endpoint. That is certainly one of many Web3 APIs supplied by Moralis, and in case you are critical about stepping into the area, take into account trying out extra Moralis instruments. For example, an important instance is the Web3 Streams API, permitting you to stream on-chain information into your tasks by way of Moralis webhooks!

Right here on the weblog, you can even discover matters past getting blocks primarily based on timestamps. For example, examine BNB testnet taps or take a look at our information on Web3.py vs Web3.js!
Now, earlier than you proceed, keep in mind to enroll with Moralis, as you might want to have an lively account to observe alongside. Setting one up is free and solely takes a number of seconds!
Web3 Get Block Function Tutorial
Within the subsequent sections, we’ll kickstart this Web3 tutorial illustrating how one can get a block quantity from any chain. Extra particularly, we’ll present you how one can create a Python utility enabling you to get the present block primarily based on a timestamp!
As an example what you can be working in the direction of, yow will discover a print display of the app’s touchdown web page down under:
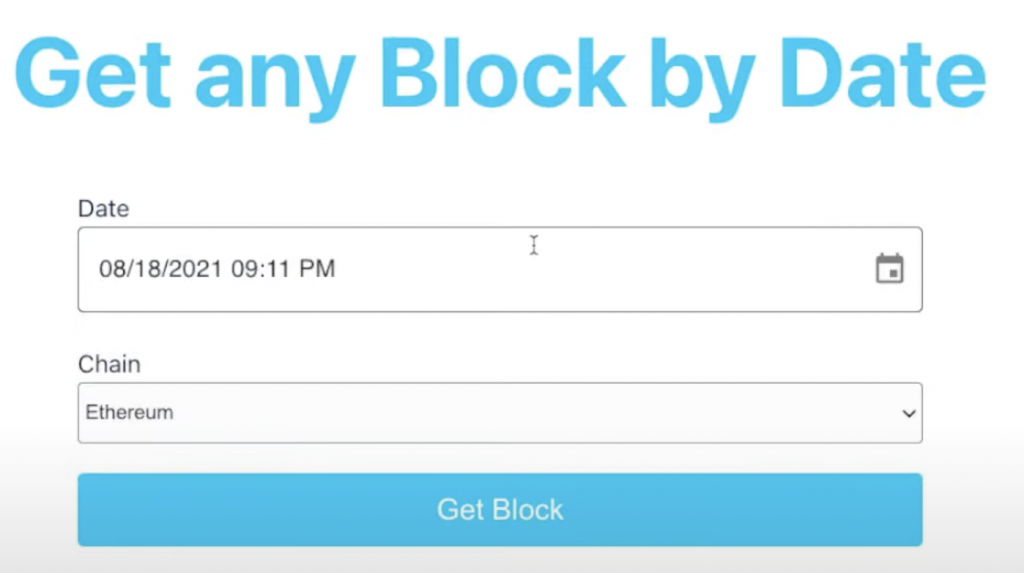
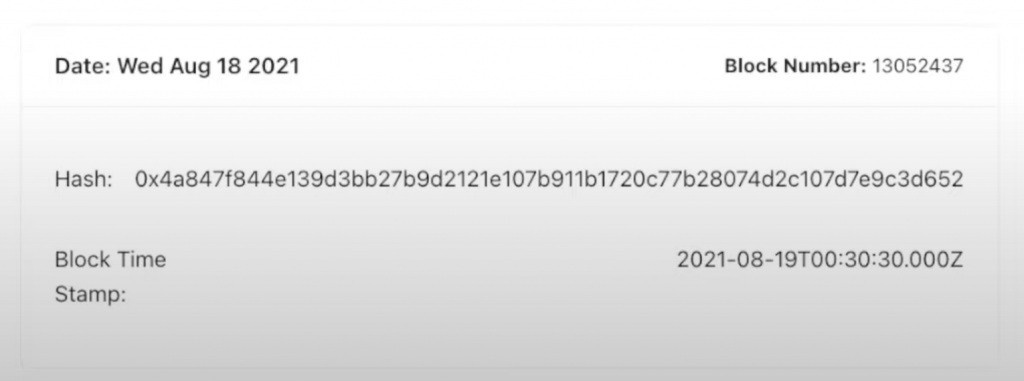
The app options three core components: two enter fields and a ”Get Block” button. To make use of the app, all you might want to do is choose a time, date, and chain, adopted by hitting the button. In return, you need to obtain a response much like the one proven under:
To have the ability to seamlessly get the present Web3 block, we will likely be utilizing Moralis’ EVM API and the ”get_date_to_block” endpoint to create this app. If this sounds thrilling, be part of us as we cowl the whole course of from begin to end!
If you happen to desire watching movies to study, you can even take a look at the clip under from Moralis’ YouTube channel. Within the video, certainly one of our Web3 builders offers a complete walkthrough of every step:
Now, let’s say you might be not sure what a Web3 get block function is. In that case, you’ll be able to learn extra about Moralis’ ”get_date_to_block” endpoint under the third step. In any other case, be part of us as we begin by masking the required stipulations within the following sub-section!
Conditions
Earlier than diving into this Web3 tutorial on how one can get the present block by timestamp, you will need to have the next prepared:
Set up Moralis – Open a brand new terminal and set up Moralis by working the next command:pip set up moralis Set up Django and the Relaxation Framework – Run the terminal inputs under to put in Django and Relaxation: pip set up djangopip set up djangorestframework django-cors-headers
Step 1: Utilizing a Web3 Get Block Operate – Moralis’ ”get_date_to_block” Endpoint
On this preliminary step, we’ll present a fast demo of Moralis’ ”get_date_to_block” endpoint. This can present you how one can seamlessly use a Web3 perform to get a block by timestamp!
To get going, begin by establishing a brand new Django Python venture. Subsequent, create a ”providers.py” file and add the code under:
from moralis import evm_api
api_key = “YOUR_API_KEY”
params = {
“date”: “”,
“chain”: “eth”,
}
end result = evm_api.block.get_date_to_block(
api_key=api_key,
params=params,
)
print(end result)
From there, you might want to configure the code by changing ”YOUR_API_KEY” together with your Moralis API key:

You possibly can fetch your key by logging in to the Moralis admin panel and navigating to the ”Web3 APIs” tab:
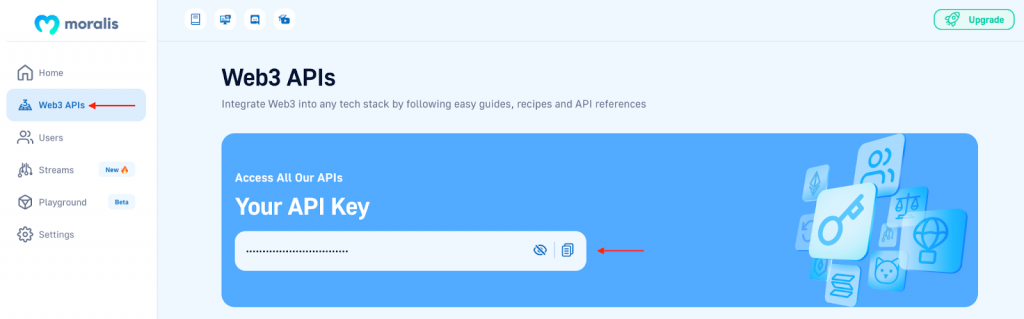
Copy your key and enter it into the code. Lastly, you additionally want so as to add a date to the ”date” parameter. This should be a “Unix date” in milliseconds or a date string. For example, it may well look one thing like this: ”1667823435”.
As soon as you might be performed configuring the code, all that is still is working the script. To take action, open a brand new terminal, enter ”python providers.py”, and hit enter. This could return a response much like the one proven under. Amongst different issues, the response incorporates the variety of the block closest to the timestamp, which is the second parameter:
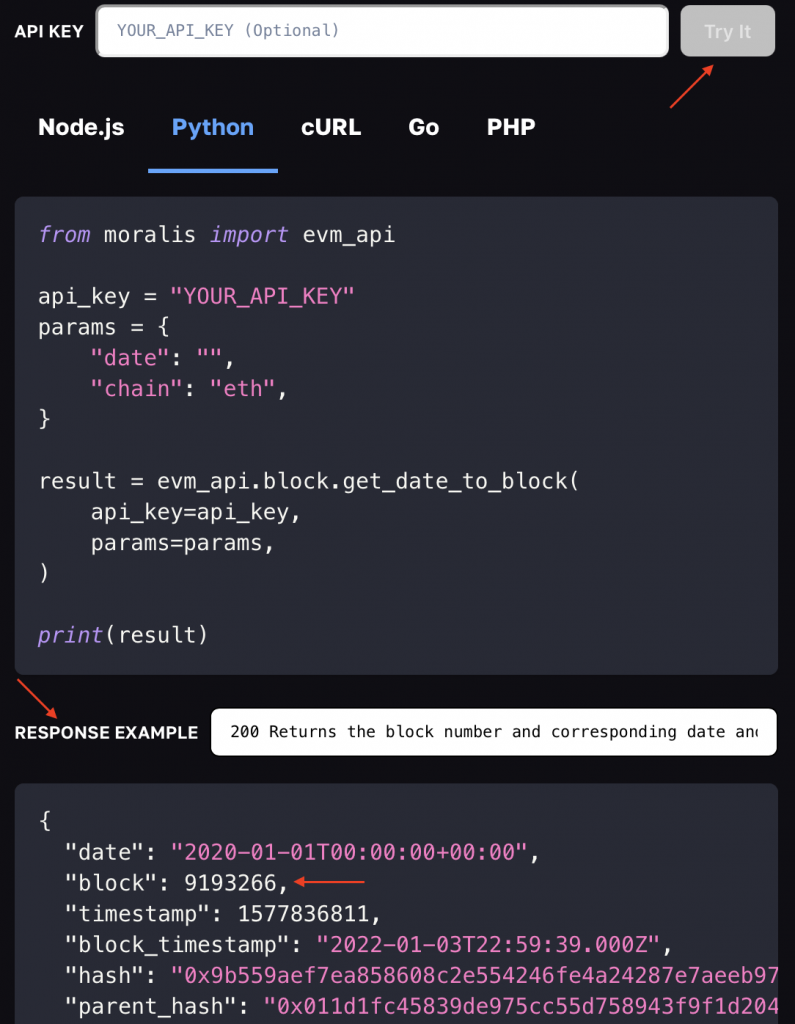
{
“date”: “2020-01-01T00:00:00+00:00”,
“block”: 9193266,
“timestamp”: 1577836811,
“block_timestamp”: “2022-01-03T22:59:39.000Z”,
“hash”: “0x9b559aef7ea858608c2e554246fe4a24287e7aeeb976848df2b9a2531f4b9171”,
“parent_hash”: “0x011d1fc45839de975cc55d758943f9f1d204f80a90eb631f3bf064b80d53e045”
}
That’s it! Congratulations, you now know to make use of a Web3 perform to get a block by timestamp!
Within the remaining two steps, we’ll present you how one can implement this performance into an utility. If this sounds fascinating, be part of us within the subsequent part as we cowl the backend code!
Step 2: Setting Up the Web3 Get Block By Timestamp Backend
To create the Web3 app used to get a block by timestamp, we will likely be utilizing an already-developed Python utility template. So, the very first thing you might want to do is go to the GitHub repository down under and clone the venture:
Full Web3 Get Block App Documentation – https://github.com/MoralisWeb3/youtube-tutorials/tree/most important/get-block-by-date
With a replica of the venture in your native listing, allow us to break down the backend code! First, we are able to go to ”providers.py” to see how the code differs from the preliminary step:
from moralis import evm_api
from dotenv import load_dotenv
import os
load_dotenv()
api_key = os.getenv(“MORALIS_API_KEY”)
def get_block_by_date(date, chain):
params = {
“date”: date,
“chain”: chain,
}
end result = evm_api.block.get_date_to_block(
api_key=api_key,
params=params,
)
return end result
The code in ”providers.py” continues to be liable for calling Moralis’ ”get_date_to_block” endpoint. Nevertheless, we modify it by defining the ”get_block_by_date()” perform, making the code extra dynamic.
The ”get_block_by_date()” perform takes two variables as arguments: ”date” and ”chain”. As such, we are able to implement logic enabling app customers to specify each these parameters.
We additionally take away the API key from this file, as displaying this worth is a safety danger. As such, you might want to arrange a ”.env” file in your listing and create a brand new surroundings variable:
export MORALIS_API_KEY = ”REPLACE_ME”
Within the snippet above, Don’t forget to switch ”REPLACE_ME” together with your precise key.
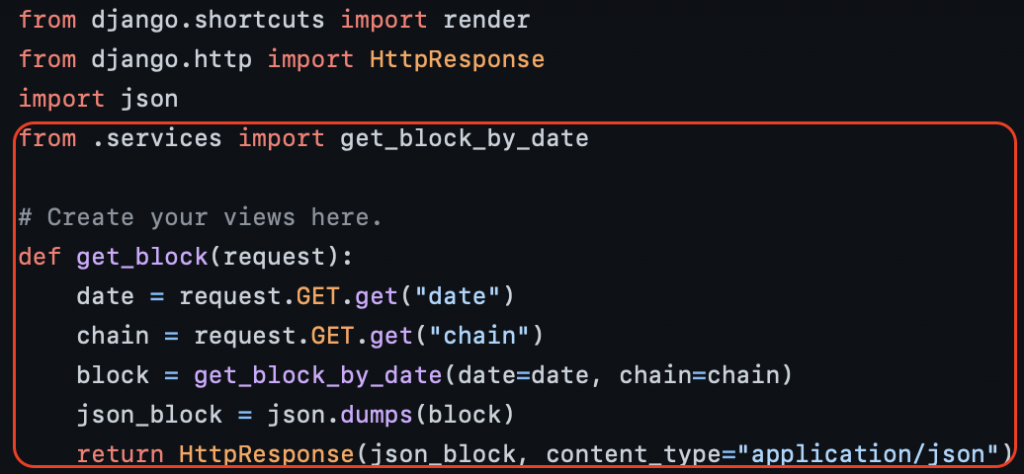
With the ”providers.py” script prepared, we additionally ensure that so as to add it to ”views.py”:
Lastly, from there, we open the ”urls.py” file and at last add a brand new path:

However, that covers the important elements of the backend code! Allow us to transfer on to the third step of this Web3 get block tutorial and look nearer on the frontend!
Step 3: Constructing the Web3 Get Block Frontend
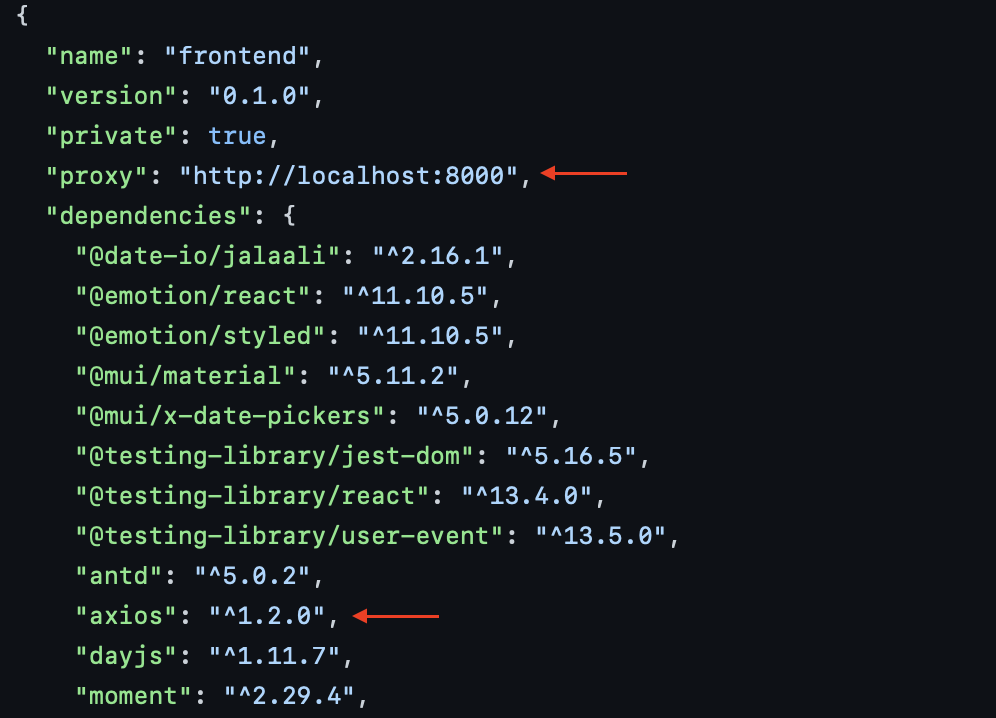
The very first thing we do is open the ”bundle.json” file, the place we ensure that so as to add ”proxy” and ”axios”:
Subsequent, allow us to look at the code in ”App.js”. Right here, the central perform is ”refreshBlockByDate()”:
const refreshBlockByDate = async () => {
await axios
.get(`/get_block?chain=${params.chain}&date=${date}`)
.then((res) => {
setBlockByDate(res.information);
})
.catch((err) => console.log(err));
};
First, we use “axios” to hook up with the backend, enabling us to name the ”get_block” endpoint whereas passing the chain and date as parameters. These two variables are fetched from the app’s UI, permitting customers to pick out a series and date. From there, the rest of the code is liable for calculating the Unix time, rendering the response and presenting it to the customers, and so on.
Lastly, earlier than launching and testing your Web3 get block app, you might want to open a brand new terminal, ”cd” into the frontend folder, and set up the “axios” dependencies with the next command:
npm axios
Congratulations! You’ve now created a Web3 Python utility that may get a block by timestamp!
If you happen to at any level throughout this Web3 get block tutorial skilled any hassle, please take a look at the video at the beginning of the article, as this may reply any of your questions. You can even take a look at Moralis’ get block by date Web3 documentation, explaining the ”get_date_to_block” endpoint in additional element!
What’s a Web3 Get Block Function?
As we briefly mentioned within the introduction, you usually want on-chain information when growing dapps and different tasks. One such piece of knowledge is block numbers, which might be advantageous in a number of methods. For example, block numbers will help you get transaction information at particular closing dates.
Nevertheless, querying the block quantity at a time limit is a difficult job, which is why builders profit from “Web3 get block” options. A Web3 get block function will help you to simply fetch any block primarily based on a timestamp, and the perfect various is Moralis’ ”get_date_to_block” endpoint.
When working with Moralis, you solely want a single API name to the ”get_date_to_block” endpoint. By visiting the official get block by date Web3 documentation, you’ll be able to attempt it out your self immediately within the browser, and it appears to be like like this:
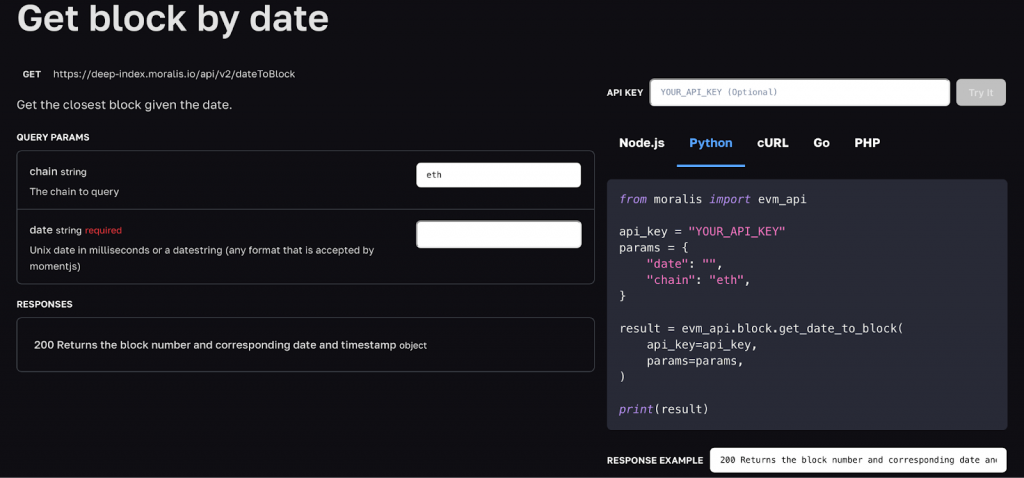
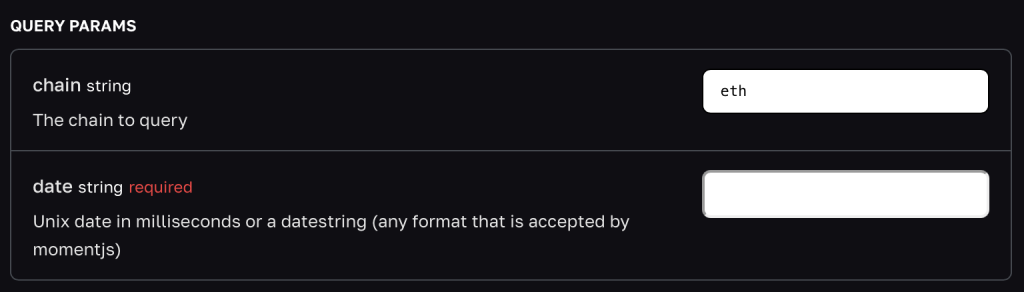
All you might want to do is enter a series and a date:
From there, you’ll be able to click on on the ”Strive It” button and obtain a response in return:
If you happen to preferred this Web3 get block tutorial and what to take a look at related content material, we have now a few articles only for you. Learn to get Ethereum transaction particulars, or learn our ENS resolver tutorial! Additionally, discover how one can implement Supabase authentication or learn to use the perfect Polygon Mumbai faucet to execute check transactions earlier than launching on the mainnet!
Abstract – Web3 Get Block Function
How do you get the most recent block on Ethereum? The reply to this query is Moralis’ EVM API and the ”get_date_to_block” endpoint! Thanks to those growth assets, you’ll be able to create a Web3 Python utility permitting you to get any block in three easy steps:
Utilizing a Web3 get block perform – Moralis’ ”get_date_to_block” endpointSetting up the Web3 get block by timestamp backendBuilding the Web3 get block frontend
On this tutorial, we lined the steps above. Consequently, when you have adopted alongside this far, you now know how one can get any block by a timestamp and implement this performance right into a Web3 app. From right here, now you can use your newly acquired information to implement related performance into any future venture!
If you happen to loved this Web3 tutorial, take a look at different excellent guides right here on Moralis’ Web3 weblog. For example, take into account studying our NodeJS Telegram bot tutorial or our glorious information answering the query, ”what’s a Solana pockets?”. Moreover, in case you are new to the business and need to study extra in regards to the underlying expertise, the next is the information for you: ”What’s Web3 expertise?”.
Additionally, take into account enrolling in Moralis Academy, as that is the easiest way to change into a more adept Web3 developer. The academy affords glorious blockchain programs on all ranges. As such, it doesn’t matter in case you are new to the area or have prior expertise; Moralis Academy has you lined. For example, take a look at the newbie course on Ethereum fundamentals to kickstart your journey!

Lastly, earlier than concluding this text, in case you are critical about turning into a blockchain developer, join with Moralis now. With an account, you’ll be able to leverage the complete energy of Web3 expertise to construct smarter and sooner!
[ad_2]
Source link
