[ad_1]
Constructing a decentralized cryptocurrency change might sound fairly cumbersome. Nonetheless, you’ll be able to truly create a DEX in about 90 minutes for those who depend on the precise instruments. For those who observe alongside on this article’s tutorial, you’ll use React, NodeJS, and two Web3 instruments which can be the spine of right now’s article: the Moralis Web3 Information API and the 1inch aggregator. Thanks to those instruments, you’ll be able to discover ways to construct a decentralized cryptocurrency change with out breaking a sweat! Now, let’s have a look at the core code snippets that may make it easier to fetch costs of two crypto property concerned in a swap:
const responseOne = await Moralis.EvmApi.token.getTokenPrice({
handle: question.addressOne
})
const responseTwo = await Moralis.EvmApi.token.getTokenPrice({
handle: question.addressTwo
})
So far as the precise change performance goes, the 1inch API allows you to implement it with the next strains of code:
const allowance = await axios.get(`https://api.1inch.io/v5.0/1/approve/allowance?tokenAddress=${tokenOne.handle}&walletAddress=${handle}`)
const approve = await axios.get(`https://api.1inch.io/v5.0/1/approve/transaction?tokenAddress=${tokenOne.handle}`)
const tx = await axios.get(`https://api.1inch.io/v5.0/1/swap?fromTokenAddress=${tokenOne.handle}&toTokenAddress=${tokenTwo.handle}&quantity=${tokenOneAmount.padEnd(tokenOne.decimals+tokenOneAmount.size, ‘0’)}&fromAddress=${handle}&slippage=${slippage}`)
In case you are fascinated by studying the best way to implement the above snippets of code, create your free Moralis account and dive into the tutorial on the best way to construct a decentralized cryptocurrency change beneath!

Overview
The primary a part of right now’s article is all about exhibiting you the best way to construct a decentralized cryptocurrency change. That is the place you’ll be able to observe our lead, use our code snippets, and create the backend and frontend parts of your DEX dapp.
Beneath the tutorial, you’ll be able to meet up with the idea behind right now’s subject and get your fundamentals of constructing a DEX for cryptocurrencies so as. That is the place we’ll clarify what a decentralized change (DEX) is, the way it works, and the way it compares to a centralized change. We’ll additionally study the instruments you want when constructing a decentralized cryptocurrency change.

Tutorial: Easy methods to Construct a Decentralized Cryptocurrency Trade
On this tutorial, you’ll mix your JavaScript proficiency with the facility of Moralis and the 1inch aggregator to construct your personal occasion of our instance cryptocurrency DEX. To make the method as simple as attainable, we determined to interrupt it down into a number of phases and substages. First, we’ll stroll you thru the preliminary venture setup. Then, we’ll present you the best way to construct your decentralized cryptocurrency change’s header. Subsequent, we’ll concentrate on making a swap web page, which would be the frontend of all exchange-related functionalities. With the frontend in place, we’ll information you thru the method of implementing your backend of the crypto change. That is the place you’ll lastly discover ways to implement the above-outlined snippets of code.
Setting Up Your Undertaking
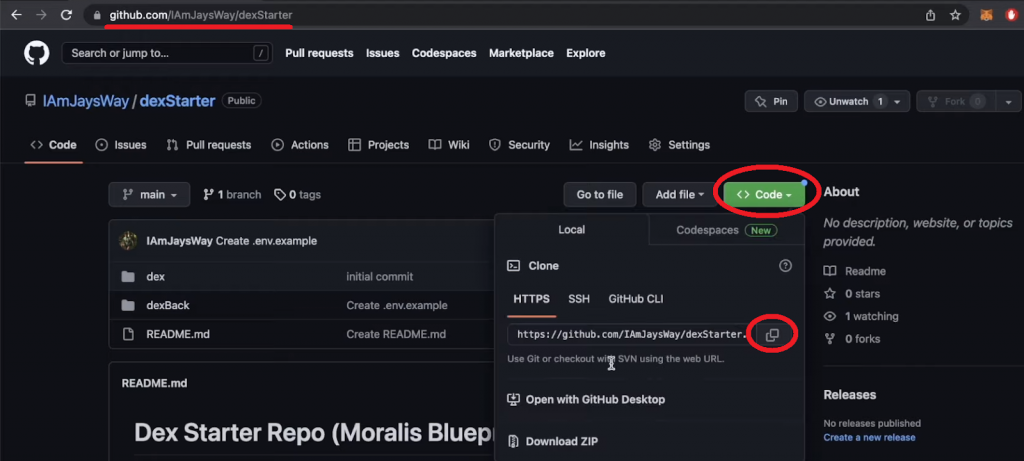
As an alternative of ranging from scratch, go to the “dexStarter” GitHub repo and replica the URL handle as proven within the picture above. By cloning our code, you don’t have to fret about styling and can be capable of dedicate your most consideration to implementing Web3 performance.
After copying the above GitHub URL, open a brand new venture in Visible Studio Code (VSC). Then, use VSC’s terminal to clone the code with this command:
git clone https://github.com/IAmJaysWay/dexStarter
Subsequent, entry the “dexStarter” folder manually or use the “cd dexStarter” command. Contained in the folder, you’ll be able to see the “dex” and “dexBack” folders. The previous holds the frontend elements and the latter the backend scripts. By cloning our code, you’re beginning with easy React and NodeJS apps. To make them work correctly, you could set up all of the required dependencies. Beginning with the frontend, “cd” into “dex” and enter the next command that may set up all of the frontend dependencies:
npm set up
With the dependencies in place, you can begin your React app:
npm run begin
For those who go to “localhost:3000”, you will note this:

Constructing the Header of the Decentralized Cryptocurrency Trade
From the “dex/src” folder, open “App.js” and import the “Header.js” element on the prime:
import Header from “./elements/Header”;
Subsequent, use that element in your “App” operate:
operate App() {
return (
<div className=”App”>
<Header />
</div>
)
}
Then, go to “dex/src/elements” and open the “Header.js” file so as to add a emblem, web page choices, and the “Join” button. On the prime of the script, import the brand and icon pictures:
import Brand from “../moralis-logo.svg”;
import Eth from “../eth.svg”;
Add the next strains of code to make sure that the “Header” operate shows the brand, web page choices, and the “Join” button:
operate Header(props) {
const {handle, isConnected, join} = props;
return (
<header>
<div className=”leftH”>
<img src={Brand} alt=”emblem” className=”emblem” />
<div className=”headerItem”>Swap</div>
<div className=”headerItem”>Tokens</div>
</div>
<div className=”rightH”>
<div className=”headerItem”>
<img src={Eth} alt=”eth” className=”eth” />
Ethereum
</div>
<div className=”connectButton” onClick={join}>
{isConnected ? (handle.slice(0,4) +”…” +handle.slice(38)) : “Join”}
</div>
</div>
</header>
);
}
With the above additions to “App.js” and “Header.js”, your frontend ought to replicate these adjustments:

Transferring on, you could activate the “Swap” and “Tokens” choices. To take action, return to “App.js” and import “Swap”, “Tokens”, and “Routes”:
import Swap from “./elements/Swap”;
import Tokens from “./elements/Tokens”;
import { Routes, Route } from “react-router-dom”;
Subsequent, concentrate on the “Header” div, the place you could add a “mainWindow” div with the correct routes:
<Header join={join} isConnected={isConnected} handle={handle} />
<div className=”mainWindow”>
<Routes>
<Route path=”/” component={<Swap isConnected={isConnected} handle={handle} />} />
<Route path=”/tokens” component={<Tokens />} />
</Routes>
</div>
Return to “Header.js” and import “Hyperlink”:
import { Hyperlink } from “react-router-dom”;
You additionally must wrap your “Swap” and “Tokens” divs of their hyperlink elements:
<Hyperlink to=”/” className=”hyperlink”>
<div className=”headerItem”>Swap</div>
</Hyperlink>
<Hyperlink to=”/tokens” className=”hyperlink”>
<div className=”headerItem”>Tokens</div>
</Hyperlink>
Now, the “Swap” and “Token” choices take you to their matching routes:

Creating the Swap Web page
Open “Swap.js” and import a number of Ant Design UI framework elements:
import React, { useState, useEffect } from “react”;
import { Enter, Popover, Radio, Modal, message } from “antd”;
import {
ArrowDownOutlined,
DownOutlined,
SettingOutlined,
} from “@ant-design/icons”;
Then, concentrate on the “Swap” operate the place you need to add a “tradeBox” div. By using Ant Design, it’s straightforward to incorporate a slippage setting possibility:
operate Swap() {
const [slippage, setSlippage] = useState(2.5);
operate handleSlippageChange(e) {
setSlippage(e.goal.worth);
}
const settings = (
<>
<div>Slippage Tolerance</div>
<div>
<Radio.Group worth={slippage} onChange={handleSlippageChange}>
<Radio.Button worth={0.5}>0.5%</Radio.Button>
<Radio.Button worth={2.5}>2.5%</Radio.Button>
<Radio.Button worth={5}>5.0%</Radio.Button>
</Radio.Group>
</div>
</>
);
return (
<div className=”tradeBox”>
<div className=”tradeBoxHeader”>
<h4>Swap</h4>
<Popover
content material={settings}
title=”Settings”
set off=”click on”
placement=”bottomRight”
>
<SettingOutlined className=”cog” />
</Popover>
</div>
</div>
</>
);
}
Because of the above strains of code, your “Swap” web page ought to have a “Swap” body with a gear icon that opens the slippage tolerance setting:

Including Trade Enter Fields
Your change should embrace correct enter fields if you wish to swap tokens. These fields ought to permit customers to pick the tokens they need to swap and their quantities. Therefore, you could apply some tweaks to your “tradeBox” div. So, create an “inputs” div beneath the “tradeBoxHeader” div:
<div className=”inputs”>
<Enter
placeholder=”0″
worth={tokenOneAmount}
onChange={changeAmount}
disabled={!costs}
/>
<Enter placeholder=”0″ worth={tokenTwoAmount} disabled={true} />
<div className=”switchButton” onClick={switchTokens}>
<ArrowDownOutlined className=”switchArrow” />
</div>
<div className=”assetOne” onClick={() => openModal(1)}>
<img src={tokenOne.img} alt=”assetOneLogo” className=”assetLogo” />
{tokenOne.ticker}
<DownOutlined />
</div>
<div className=”assetTwo” onClick={() => openModal(2)}>
<img src={tokenTwo.img} alt=”assetOneLogo” className=”assetLogo” />
{tokenTwo.ticker}
<DownOutlined />
</div>
You additionally want so as to add applicable state variables. So, add the next strains beneath the “Slippage” state variable:
const [tokenOneAmount, setTokenOneAmount] = useState(null);
const [tokenTwoAmount, setTokenTwoAmount] = useState(null);
const [tokenOne, setTokenOne] = useState(tokenList[0]);
const [tokenTwo, setTokenTwo] = useState(tokenList[1]);
const [isOpen, setIsOpen] = useState(false);
const [changeToken, setChangeToken] = useState(1);
Subsequent, add correct features to deal with the altering of quantities of tokens and the “from/to” switching of the tokens. Add the next snippets of code beneath the “handleSlippageChange” operate:
operate changeAmount(e) {
setTokenOneAmount(e.goal.worth);
if(e.goal.worth && costs){
setTokenTwoAmount((e.goal.worth * costs.ratio).toFixed(2))
}else{
setTokenTwoAmount(null);
}
}
operate switchTokens() {
setPrices(null);
setTokenOneAmount(null);
setTokenTwoAmount(null);
const one = tokenOne;
const two = tokenTwo;
setTokenOne(two);
setTokenTwo(one);
fetchPrices(two.handle, one.handle);
}
To supply a correct choice of tokens, you want a very good checklist. Fortuitously, you need to use our “tokenList.json” file for that objective. The latter is mainly an array of tokens that features tickers, icons, names, addresses, and decimals:
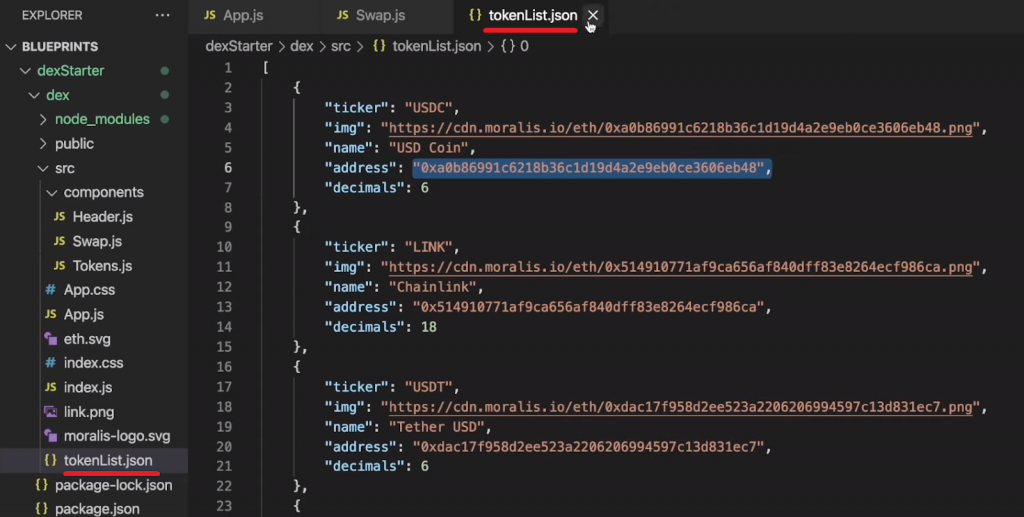
So, add the next line beneath the prevailing imports inside “Swap.js”:
import tokenList from “../tokenList.json”;
Including Token Choice Modals
You most likely seen that the above-implemented “inputs” div consists of two “openModal” features. As a way to make these features work, you could equip your “tradeBox” div on the prime of “return” with the next strains:
return (
<>
{contextHolder}
<Modal
open={isOpen}
footer={null}
onCancel={() => setIsOpen(false)}
title=”Choose a token”
>
<div className=”modalContent”>
{tokenList?.map((e, i) => {
return (
<div
className=”tokenChoice”
key={i}
onClick={() => modifyToken(i)}
>
<img src={e.img} alt={e.ticker} className=”tokenLogo” />
<div className=”tokenChoiceNames”>
<div className=”tokenName”>{e.title}</div>
<div className=”tokenTicker”>{e.ticker}</div>
</div>
</div>
);
})}
</div>
</Modal>
Additionally, be sure to add the “openModal” and “modifyToken” features as properly:
operate openModal(asset) {
setChangeToken(asset);
setIsOpen(true);
}
operate modifyToken(i){
setPrices(null);
setTokenOneAmount(null);
setTokenTwoAmount(null);
if (changeToken === 1) {
setTokenOne(tokenList[i]);
fetchPrices(tokenList[i].handle, tokenTwo.handle)
} else {
setTokenTwo(tokenList[i]);
fetchPrices(tokenOne.handle, tokenList[i].handle)
}
setIsOpen(false);
}
To finish the “Swap” web page, add the “Swap” button. You are able to do this by including the next line of code beneath the “inputs” div:
<div className=”swapButton” disabled= onClick={fetchDexSwap}>Swap</div>
For those who efficiently carried out all the above, you must have your “Swap” web page prepared:
With the frontend beneath your belt, it’s time to implement the backend performance. For the reason that backend is the principle focus of right now’s article, that is the place you’ll lastly discover ways to construct a decentralized cryptocurrency change.
Construct a Decentralized Cryptocurrency Trade
Earlier than shifting ahead, acquire your Moralis Web3 API key. To take action, create your free Moralis account. Along with your account up and operating, you’ll be capable of entry your admin space. From there, you get to repeat your API key in two clicks:
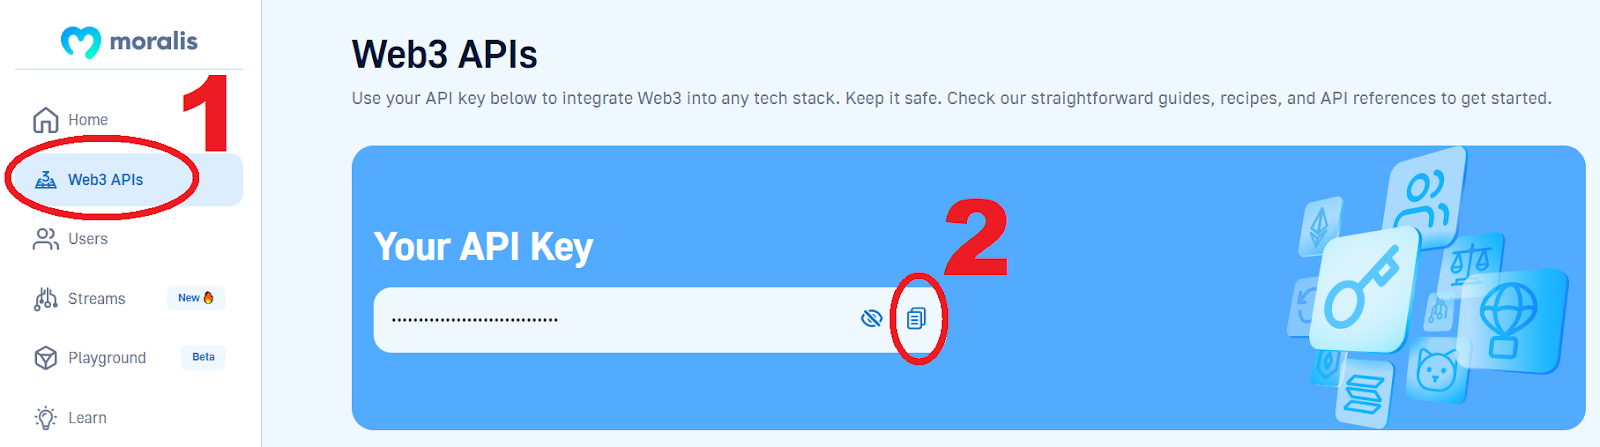
Subsequent, paste your key into the “.env.instance” file that awaits you contained in the “dexBack” folder. Then, rename that file to “.env”.
The core of your NodeJS backend dapp is the “index.js” script. That is the file you could tweak to fetch token costs. Nonetheless, first, use a brand new terminal and “cd” into the “dexBack” folder. Then, set up the backend dependencies by coming into the “npm set up” command.
With the dependencies in place, open “index.js” and implement the “getTokenPrice” strains of code from the intro. Moreover, you could replace the “app.get” operate, which fetches token costs in USD and supplies them to the “/tokenPrice” endpoint:
app.get(“/tokenPrice”, async (req, res) => {
const {question} = req;
const responseOne = await Moralis.EvmApi.token.getTokenPrice({
handle: question.addressOne
})
const responseTwo = await Moralis.EvmApi.token.getTokenPrice({
handle: question.addressTwo
})
const usdPrices = {
tokenOne: responseOne.uncooked.usdPrice,
tokenTwo: responseTwo.uncooked.usdPrice,
ratio: responseOne.uncooked.usdPrice/responseTwo.uncooked.usdPrice
}
return res.standing(200).json(usdPrices);
});
With the above strains of code in place, save your “index.js” file, and run your backend with the next command:
node index.js
Be aware: The ultimate “index.js” backend file is offered on GitHub.

Getting Token Costs to the Frontend
At this level of the “the best way to construct a decentralized cryptocurrency change” feat, we’ll concentrate on getting token costs from the above-presented backend to the “Swap” web page. As such, you could refocus on the “swap.js” file. Beneath the prevailing imports, import Axios – a NodeJS promise-based HTTP shopper:
import axios from “axios”;
Then, go to the a part of “swap.js” the place different state variables are positioned and add the next:
const [prices, setPrices] = useState(null);
To fetch the costs out of your backend, it’s essential to additionally add the “fetchPrices” async operate beneath the “modifyToken” operate:
async operate fetchPrices(one, two){
const res = await axios.get(`http://localhost:3001/tokenPrice`, {
params: {addressOne: one, addressTwo: two}
})
setPrices(res.knowledge)
}
Beneath the “fetchPrices” operate, additionally add a corresponding “useEffect”:
useEffect(()=>{
fetchPrices(tokenList[0].handle, tokenList[1].handle)
}, [])
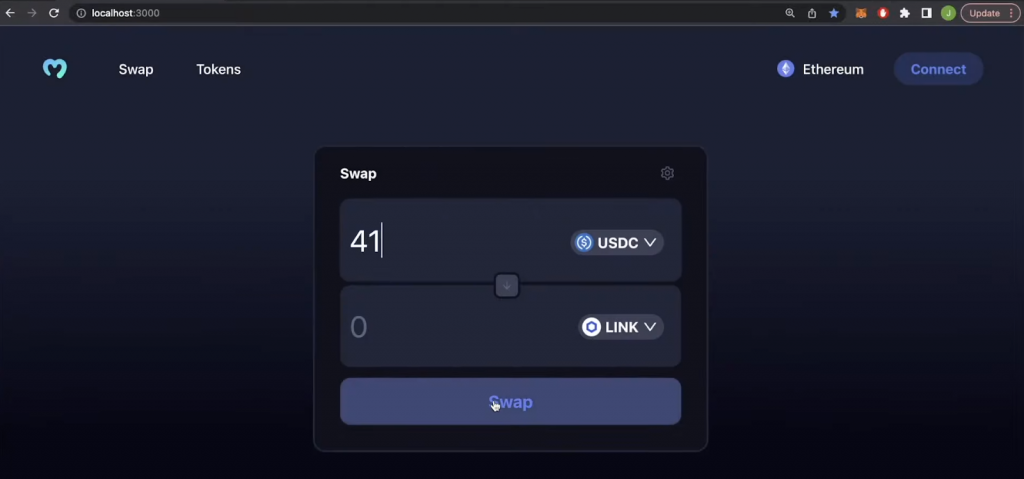
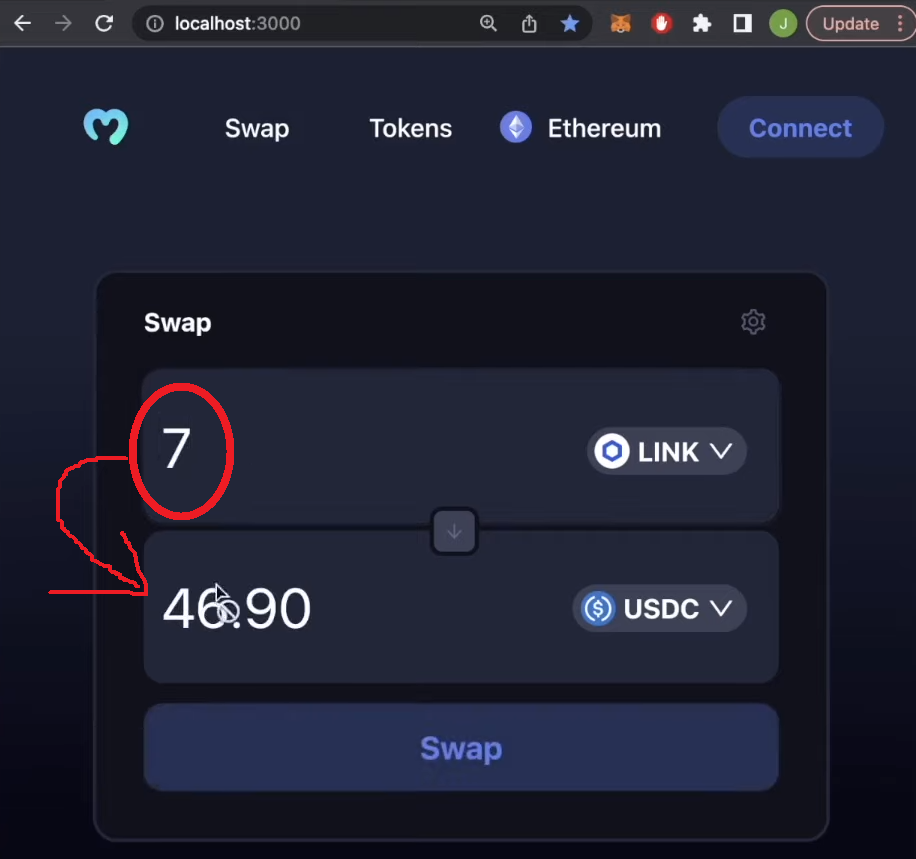
When you implement the above strains of code, your “Swap” field will be capable of use token costs and their ratios. As such, as soon as customers enter the quantity of the primary token, it would robotically populate the quantity of the opposite token:
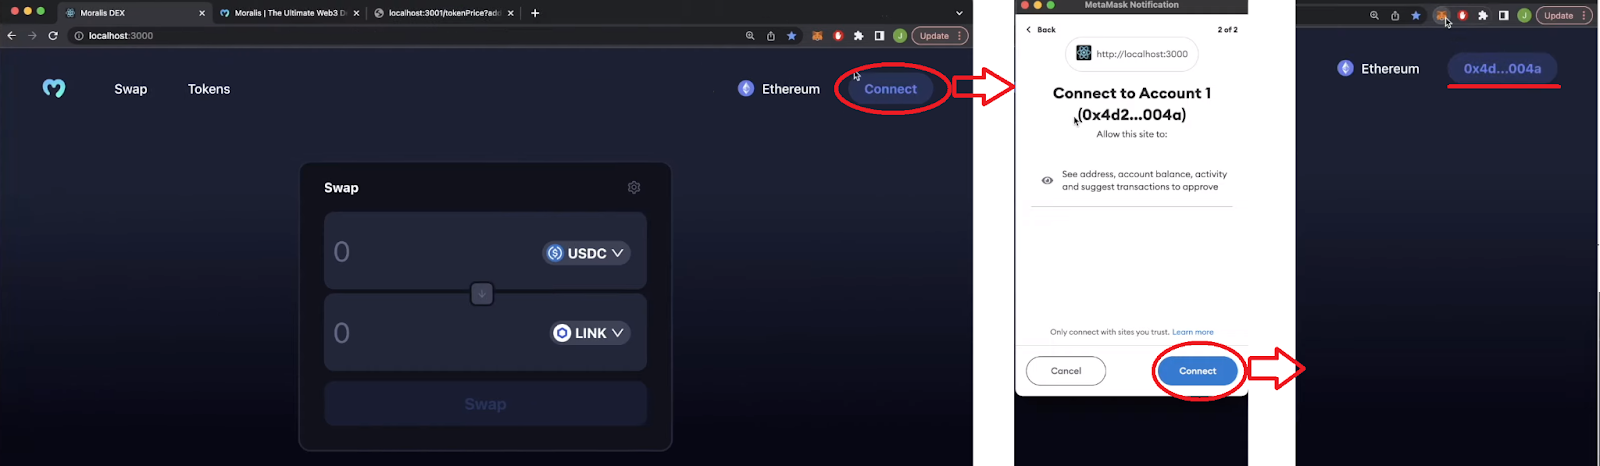
Web3 Authentication: Connecting MetaMask
Your decentralized change is coming alongside properly; nevertheless, its “Join” button continues to be inactive. Fortuitously, you need to use the wagmi library so as to add the required Web3 login performance. To that finish, open your frontend “index.js” file positioned within the “dex/src” folder. On the prime of that script, import a number of wagmi elements and a public supplier beneath the prevailing imports:
import { configureChains, mainnet, WagmiConfig, createClient } from “wagmi”;
import { publicProvider } from “wagmi/suppliers/public”;
Then, you could configure the chains and create a shopper. You are able to do that by including the next code snippet beneath the above imports:
const { supplier, webSocketProvider } = configureChains(
[mainnet],
[publicProvider()]
);
const shopper = createClient({
autoConnect: true,
supplier,
webSocketProvider,
});
Subsequent, wrap your app with “WagmiConfig”:
<React.StrictMode>
<WagmiConfig shopper={shopper}>
<BrowserRouter>
<App />
</BrowserRouter>
</WagmiConfig>
</React.StrictMode>
Be aware: The ultimate frontend “index.js” script awaits you on GitHub.
To make sure that the “Join” button does its factor, reopen “App.js” and import the MetaMask connector and wagmi elements beneath the prevailing imports:
import { useConnect, useAccount } from “wagmi”;
import { MetaMaskConnector } from “wagmi/connectors/metaMask”;
Subsequent, add the next strains of code contained in the “App” operate (above “return“) to destructure the handle and join a brand new person:
const { handle, isConnected } = useAccount();
const { join } = useConnect({
connector: new MetaMaskConnector(),
});
Be aware: The “App.js” and “Header.js” strains of code offered within the preliminary phases of this tutorial already embrace these variables, so your scripts must be so as. In case you desire a extra detailed code walkthrough behind the “Join” button performance, watch the video on the prime, beginning at 57:25.
After tweaking “App.js”, the “Join” button triggers MetaMask:
Including the Trade Performance by way of the 1inch Aggregator
At this level, your decentralized change is ready to authenticate customers and join their MetaMask wallets, permit customers to pick tokens, and supply token quantities. Nonetheless, it’s not but capable of execute the precise change of tokens. So as to add this last piece of the “the best way to construct a decentralized cryptocurrency change” puzzle, you could implement the 1inch aggregator.
Basically, you simply want so as to add the 1inch API endpoints offered within the introduction to “Swap.js”. All in all, beneath are the strains of code that you could add to “Swap.js”:
Import wagmi hooks beneath the prevailing imports:import { useSendTransaction, useWaitForTransaction } from “wagmi”; Contained in the “Swap” operate, add “props” :operate Swap(props) {
const { handle, isConnected } = props; Add new state variables that may retailer transaction particulars and await transactions to undergo: const [txDetails, setTxDetails] = useState({
to:null,
knowledge: null,
worth: null,
});
const {knowledge, sendTransaction} = useSendTransaction({
request: {
from: handle,
to: String(txDetails.to),
knowledge: String(txDetails.knowledge),
worth: String(txDetails.worth),
}
})
const { isLoading, isSuccess } = useWaitForTransaction({
hash: knowledge?.hash,
}) Beneath the “fetchPrices” operate, add the “fetchDexSwap” async operate: async operate fetchDexSwap(){
const allowance = await axios.get(`https://api.1inch.io/v5.0/1/approve/allowance?tokenAddress=${tokenOne.handle}&walletAddress=${handle}`)
if(allowance.knowledge.allowance === “0”){
const approve = await axios.get(`https://api.1inch.io/v5.0/1/approve/transaction?tokenAddress=${tokenOne.handle}`)
setTxDetails(approve.knowledge);
console.log(“not accredited”)
return
}
const tx = await axios.get(`https://api.1inch.io/v5.0/1/swap?fromTokenAddress=${tokenOne.handle}&toTokenAddress=${tokenTwo.handle}&quantity=${tokenOneAmount.padEnd(tokenOne.decimals+tokenOneAmount.size, ‘0’)}&fromAddress=${handle}&slippage=${slippage}`)
let decimals = Quantity(`1E${tokenTwo.decimals}`)
setTokenTwoAmount((Quantity(tx.knowledge.toTokenAmount)/decimals).toFixed(2));
setTxDetails(tx.knowledge.tx);
}
Be aware: For those who want to discover ways to acquire the above 1inch API hyperlinks from the “Swagger” part of the 1inch documentation, use the video on the prime (1:09:10).
Lastly, add three “useEffect” features beneath the prevailing “useEffect“. They’ll cowl transaction particulars and pending transactions: useEffect(()=>{
if(txDetails.to && isConnected){
sendTransaction();
}
}, [txDetails])
useEffect(()=>{
messageApi.destroy();
if(isLoading){
messageApi.open({
sort: ‘loading’,
content material: ‘Transaction is Pending…’,
period: 0,
})
}
},[isLoading])
useEffect(()=>{
messageApi.destroy();
if(isSuccess){
messageApi.open({
sort: ‘success’,
content material: ‘Transaction Profitable’,
period: 1.5,
})
}else if(txDetails.to){
messageApi.open({
sort: ‘error’,
content material: ‘Transaction Failed’,
period: 1.50,
})
}
},[isSuccess])
Be aware: You may entry the ultimate “Swap.js” script on GitHub.
Fundamentals of Constructing a Decentralized Trade for Cryptocurrency
Understanding the idea about decentralized cryptocurrency exchanges and the instruments to construct them is on no account a should. In any case, you may need already constructed your personal decentralized change following the above tutorial with no extra profound information of the idea. Nonetheless, for those who want to study what decentralized exchanges are, how they work, how they evaluate to centralized exchanges, and the gist of the instruments to construct a decentralized change for crypto, dive into the next sections.
What’s a Decentralized Trade?
A decentralized change (DEX) is a peer-to-peer market the place customers get to commerce cryptocurrency with none middlemen. A majority of these exchanges are decentralized as a result of there’s no central entity concerned and, thus, no single level of failure. In any case, the backends of DEXs exist on the blockchain. So, because of decentralized exchanges, we will execute monetary transactions with out banks, brokers, cost processors, or some other sort of conventional middleman.

How Does a Decentralized Cryptocurrency Trade Work?
DEXs’ choices and levels of decentralization might differ; nevertheless, good contracts are the core tech behind their clear and trustless operations. A decentralized change depends on “liquidity swimming pools” – stacks of cryptocurrency property that sit beneath the change’s floor. So, adequate liquidity swimming pools are required to meet purchase or promote orders. The property within the liquidity swimming pools come from traders, who revenue from transaction charges charged to “pooling” customers.
When utilizing a decentralized cryptocurrency change, customers want to attach their Web3 wallets, corresponding to MetaMask. This allows them to be in full management of their property. As soon as linked, customers can change their property, spend money on liquidity swimming pools, and carry out different DeFi (decentralized finance) actions. The precise choices differ; nevertheless, the only choices are DEXs with token swaps, identical to the one you had an opportunity to construct within the above tutorial.
The important thing elements to safe exchanging of property with out intermediates are good contracts. These on-chain items of software program are programmed to robotically execute predefined actions when particular predefined circumstances are met. As such, transactions both undergo or are reverted. It’s necessary to notice that token swaps contain on-chain transactions. Consequently, customers must cowl the transaction gasoline charges, which differ relying on the blockchain community and present demand.
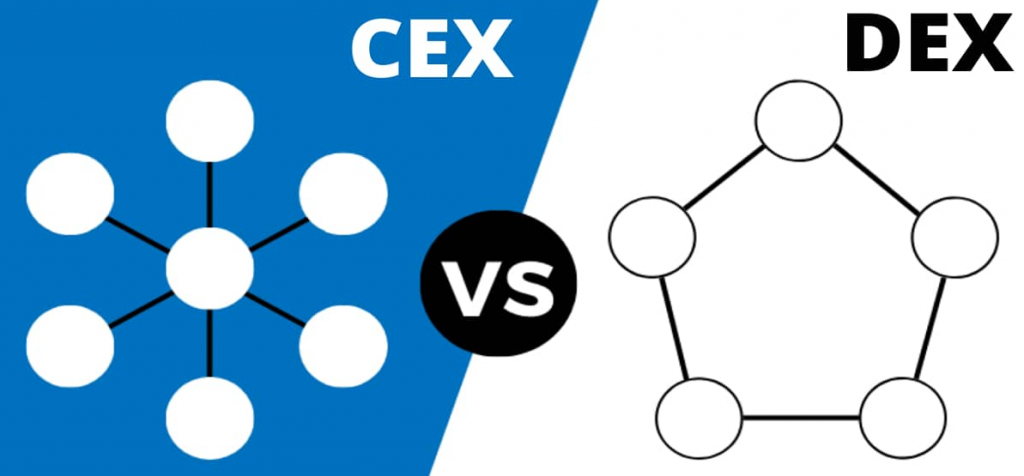
Decentralized vs Centralized Trade
The next checklist outlines the principle variations between DEXs and CEXs:
Decentralization: CEXs: Operated by centralized organizations.DEXs: Operated by customers and liquidity suppliers – no central authority and management. Custody of property: CEXs: The change totally controls entry to crypto property. DEXs: Customers have unique management over their property. Impermanent loss: CEXs: No considerations of impermanent loss on account of excessive liquidity.DEXs: Impermanent loss is a extremely attainable threat within the occasion of market fluctuations. Rules: CEXs: Regulated – not nameless.DEXs: No KYC and AML requirements – nameless. Liquidity: CEXs: Institutional traders and a big person base guarantee greater liquidity.DEXs: Lack of regulatory requirements and competitors from CEXs cut back liquidity. Buying and selling choices: CEXs: Superior instruments – a number of buying and selling choices, together with spot buying and selling, futures buying and selling, and others. DEXs: Fundamental options – usually restricted to swaps, crypto lending and borrowing, and speculative investments; nevertheless, DEXs are evolving, and new buying and selling choices are launched usually. Safety: CEXs: Larger threat of hacks and server downtime.DEXs: Decrease safety dangers. Comfort: CEXs: Simple to make use of.DEXs: It may be tough for newcomers. Supply of funding: CEXs: Banks and bank cards.DEXs: Crypto wallets (e.g., MetaMask). Buying and selling: CEXs: Order e-book by way of a centralized middleman.DEXs: Peer-to-peer buying and selling primarily based on an automatic market maker. Tradable tokens: CEXs: Restricted alternatives of tokens.DEXs: Quite a few choices.

Instruments to Construct a Decentralized Cryptocurrency Trade
For those who additional discover the best way to construct a decentralized cryptocurrency change, you’ll study that the above-covered tutorial is just not the one method. As such, the instruments required to construct a DEX additionally differ. Nonetheless, relating to constructing a neat-looking and totally purposeful DEX with minimal effort, the tactic outlined herein is the best way to go. In that case, you want the next instruments to construct a decentralized cryptocurrency change:
JavaScript: ReactJS framework to cowl the frontend.NodeJS framework to cowl the backend. The Moralis Web3 API to fetch on-chain knowledge.The 1inch aggregator to implement the change options. Axios to effortlessly bridge the info from the backend to the frontend.The wagmi library to simply implement Web3 authentication. CSS for frontend styling.MataMask to hook up with your DEX and take a look at its functionalities.You want testnet crypto taps to get testnet cryptocurrencies and take a look at your DEX with none precise value (e.g., a Goerli faucet, Mumbai faucet, BNB faucet, Aptos testnet faucet, and many others.).
In fact, for those who want to construct extra superior decentralized exchanges and maybe even introduce some distinctive on-chain performance, you’ll want different Ethereum improvement instruments. In that case, you’ll additionally need to find out about good contract programming and good contract safety. You may additionally be fascinated by changing your NodeJS backend with Python, during which case you should discover “Web3 Python” choices.
Now, for those who want to steer away from Ethereum and EVM-compatible chains and, as an example, concentrate on Solana, studying about Solana blockchain app improvement and associated instruments is a should.

Easy methods to Construct a Decentralized Cryptocurrency Trade – Abstract
In right now’s article, you realized the best way to construct a decentralized cryptocurrency change. As such, you had been capable of make the most of your JavaScript proficiency and mix it with the facility of Moralis and the 1inch aggregator to construct a neat DEX. Within the sections above, you additionally had a chance to study the fundamentals of decentralized exchanges.
DEXs are simply one of many numerous dapps you’ll be able to construct with the precise instruments. In actual fact, utilizing JavaScript and the Moralis JS SDK offers you almost limitless choices relating to blockchain app improvement round current good contracts. Other than the Moralis Web3 Information API, Moralis affords many enterprise blockchain options. As an example, you’ll be able to hearken to any pockets and good contract handle with the Moralis Streams API. The latter is a superior Notify API various that makes Web3 libraries out of date in some ways. One other glorious device is its IPFS API – you’ll be able to study extra about it in our IPFS Ethereum tutorial. For those who want to mint NFT from contract, you’ll need to get your gwei to ETH (and vice versa) conversion proper when masking transaction charges.
To study extra about dapp improvement with Moralis, be certain that to discover the Moralis documentation, Moralis YouTube channel, and Moralis weblog. With these assets, you’ll be able to turn out to be a Web3 developer totally free. Nonetheless, for those who want to take a extra skilled strategy to your blockchain improvement schooling, contemplate enrolling in Moralis Academy.
[ad_2]
Source link
