[ad_1]
ChatGPT is a groundbreaking AI device. Nonetheless, can we use this device in Web3 for, let’s say, NFT functions? Completely! We will really mint ChatGPT responses as NFTs, for instance. If that sounds fascinating and also you’d prefer to know how you can use ChatGPT to mint an NFT, learn on! As we transfer ahead, you’ll see how we constructed an instance dapp that makes use of OpenAI’s API to include the facility of ChatGPT. Now, so far as implementing the ChatGPT performance goes, the next code snippet does the trick:
app.get(“/”, async (req, res) => {
const { question } = req;
attempt {
const response = await openai.createCompletion({
mannequin: “text-davinci-003”,
immediate: question.message,
max_tokens: 30,
temperature: 0,
});
return res.standing(200).json(response.knowledge);
} catch (e) {
console.log(`One thing went flawed ${e}`);
return res.standing(400).json();
}
});
To mint a ChatGPT NFT, it’s essential to use a wise contract with a correct “mintNFT” operate:
operate mintNFT(deal with recipient, string reminiscence tokenURI)
For the good contract to deal with the chat in query, we have to retailer the chat in a decentralized method. Thankfully, we will do that simply when utilizing the facility of IPFS and the Moralis IPFS API. Basically, the next traces of code get the job achieved:
app.get(“/uploadtoipfs”, async (req, res) => {
const { question } = req;
attempt {
const response = await Moralis.EvmApi.ipfs.uploadFolder({
abi: [
{
path: “conversation.json”,
content: { chat: query.pair },
},
],
});
console.log(response.end result);
return res.standing(200).json(response.end result);
} catch (e) {
console.log(`One thing went flawed ${e}`);
return res.standing(400).json();
}
});
If you wish to learn to correctly incorporate the entire above-outlined elements to make use of ChatGPT to mint an NFT, create your free Moralis account and comply with our lead!

Overview
In as we speak’s article, we’ll present you how you can use ChatGPT to mint an NFT by taking you thru our Web3 ChatGPT tutorial. This implies you’ll have an opportunity to comply with our directions and create your individual occasion of our ChatGPT NFT minter Web3 app. As such, we’ll present you how you can implement the above-presented code snippets. Additionally, you don’t have to begin from scratch; as a substitute, you’ll be capable to use our repo to clone our scripts. That means, you’ll be capable to get to the end line in a matter of minutes.
Beneath the tutorial, you will discover the part the place we reveal our dapp in its remaining kind. Plus, that is the place we reply the “what’s a ChatGPT NFT?” query. Final however not least, we additionally focus on ChatGPT’s place in evolving Web3.

ChatGPT NFT Tutorial – The way to Use ChatGPT to Mint an NFT
Constructing a dapp that lets you mint ChatGPT NFTs from scratch is a multi-step course of. While you determine to make use of JavaScript and the Moralis JS SDK, the next steps define this course of:
Create and deploy a wise contract that can mint a ChatGPT NFT. Construct your backend with NodeJS and Specific.Set up all required backend dependencies: Specific, Moralis, CORS, dotenv, and OpenAI.Write a correct backend (“index.js”) to include ChatGPT and the Moralis IPFS API.Construct your frontend with NextJS. Set up all required frontend dependencies: NextAuth, Moralis, wagmi, and so on. Write a number of frontend scrips, together with “.jsx” and “.js”.
As a substitute of diving into the above steps, you may take a shortcut by accessing our “moralis-chatgpt” GitHub repo. The latter incorporates all of the frontend and backend scripts, in addition to the good contract template. Therefore, be certain that to clone our code. Then, you’ll be capable to see the “backend”, “hardhat”, and “nextjs_moralis_auth” folders in Visible Studio Code (VSC):

With the above three folders and their contents in place, it’s time you deploy your individual occasion of our ChatGPT NFT minting good contract.

Sensible Contract that Mints ChatGPT NFTs
Because the “hardhat” folder suggests, we used Hardhat to create and deploy our good contract. Nonetheless, there are different Ethereum improvement instruments you should use. In case you are conversant in Remix IDE, merely copy the content material of the “MessageNFT.sol” script and paste it into Remix. You could find our contract template within the “hardhat/contracts” listing:
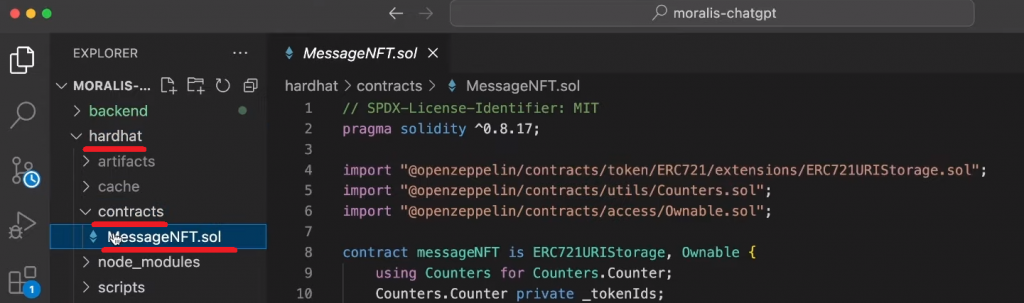
In case that is your first rodeo with Solidity good contracts, let’s shortly undergo the traces of “MessageNFT.sol”. The latter begins with an MIT license and a pragma line:
// SPDX-License-Identifier: MIT
pragma solidity ^0.8.17;
Beneath the pragma line, we’ve got three OpenZeppelin imports that allow our good contract to inherit options from present verified contracts. So, our Web3 contract inherits the ERC-721 normal, the flexibility to rely NFTs and assign NFT IDs, and the “owner-minting” restriction:
import “@openzeppelin/contracts/token/ERC721/extensions/ERC721URIStorage.sol”;
import “@openzeppelin/contracts/utils/Counters.sol”;
import “@openzeppelin/contracts/entry/Ownable.sol”;
Subsequent, we outlined the contract title and sort (ERC-721), the “constructor” and the “mintNFT” operate. The latter will mint ChatGPT NFTs everytime you (the proprietor of the contract) name it. So, to do that, the “mintNFT” operate wants to absorb an NFT recipient’s deal with and token URI:
contract messageNFT is ERC721URIStorage, Ownable {
utilizing Counters for Counters.Counter;
Counters.Counter personal _tokenIds;
constructor() ERC721(“Chapt GPT Dialog”, “CGPTC”) {}
operate mintNFT(deal with recipient, string reminiscence tokenURI)
public
onlyOwner
returns (uint256)
{
_tokenIds.increment();
uint256 newItemId = _tokenIds.present();
_mint(recipient, newItemId);
_setTokenURI(newItemId, tokenURI);
return newItemId;
}
}
So far as the “deal with recipient” parameter goes, the contract will get it from the related pockets’s deal with. To have the ability to mint, the recipient’s deal with must match the contract proprietor’s deal with. Alternatively, the token URI will come out of your backend as soon as the IPFS API uploads a specific ChatGPT dialog.
Word: You’ll be able to deploy the above good contract to Ethereum or every other EVM-compatible chain. Nonetheless, to keep away from any confusion, we urge you to deal with the Goerli testnet. That is the community this tutorial use.

NodeJS Backend of Our ChatGPT NFT Minter Web3 App
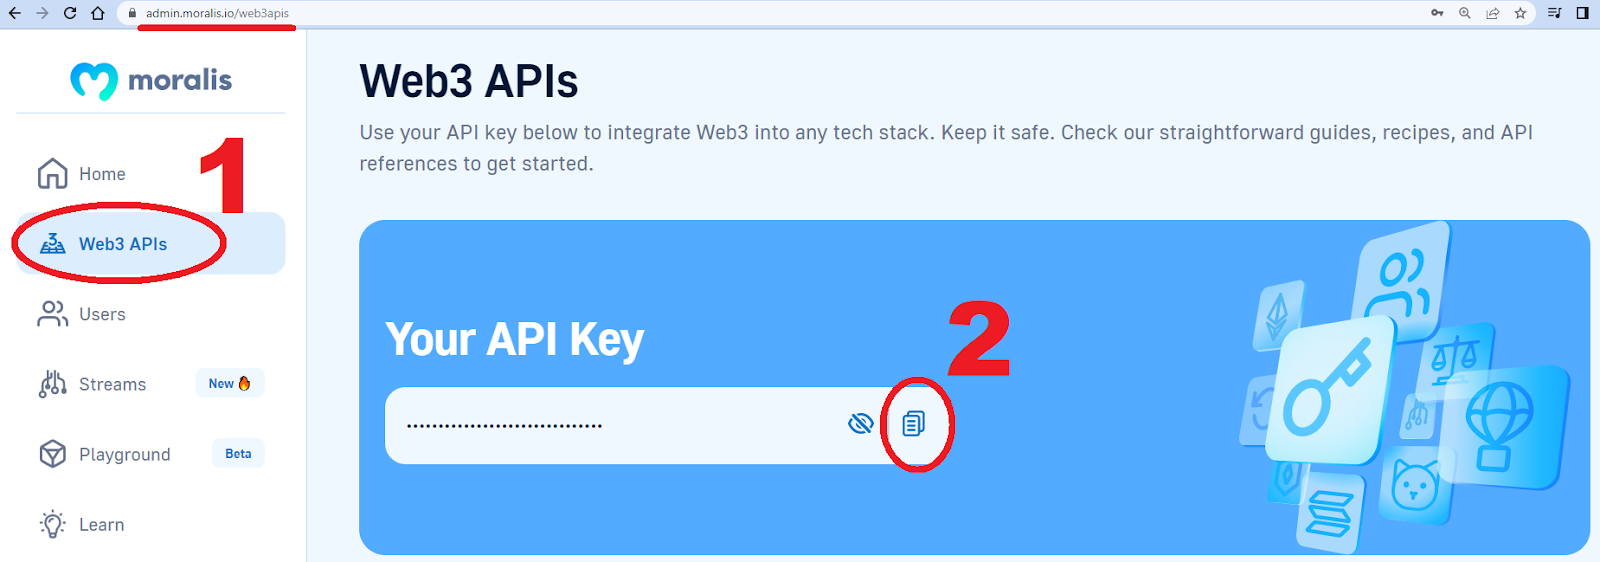
After efficiently deploying your occasion of our “MessageNFT.sol” good contract, deal with the “backend” folder. There, you’ll discover the “index.js”, “package-lock.json”, and “package deal.json” recordsdata. The latter tells you which ones dependencies this challenge makes use of. Furthermore, you may set up them with the “npm i” command. To make your backend operate correctly, create a “.env” file and retailer your Moralis Web3 API key within the “MORALIS_API_KEY” variable.
In case you haven’t created your Moralis account but, accomplish that now. Then, log in to your account to entry your admin space. From there, you’ll be capable to copy your Web3 API key with the next two clicks:
Now that you simply’ve efficiently put in all of the required dependencies and set your API key in place, you may run the backend’s “index.js” script. Nonetheless, since that is the script that does all of the heavy backend lifting, let’s stroll you thru its code.
The highest traces of the script import all dependencies and outline the native port to run on:
const categorical = require(“categorical”);
const app = categorical();
const port = 5001;
const Moralis = require(“moralis”).default;
const cors = require(“cors”);
require(“dotenv”).config();
Then it makes use of CORS and Specific and imports the API key out of your “.env” file:
app.use(cors());
app.use(categorical.json());
const MORALIS_API_KEY = course of.env.MORALIS_API_KEY;
On the backside, the script initializes the above key by way of the “Moralis.begin” methodology:
Moralis.begin({
apiKey: MORALIS_API_KEY,
}).then(() => {
app.pay attention(port, () => {
console.log(`Listening for API Calls`);
});
});
As well as, this additionally imports the OpenAI API configuration traces, which we obtained from the OpenAI docs:
const { Configuration, OpenAIApi } = require(“openai”);
const configuration = new Configuration({
apiKey: course of.env.OPENAI_API_KEY,
});
const openai = new OpenAIApi(configuration);
The above-covered traces of code encompass the implementation of the basis and “uploadtoipfs” endpoints that you simply noticed within the introduction. Shifting on, we’ll go over these two Specific server endpoints.

Root Endpoint
As you most likely bear in mind, the primary purpose of as we speak’s tutorial is to construct a dapp that lets you use ChatGPT to mint an NFT. You’ve already deployed the good contract that can do the minting, however you haven’t integrated ChatGPT into your backend. For that function, let’s create a root endpoint incorporating the OpenAI API to fetch the entry message from the frontend, cross that message to ChatGPT, and return ChatGPT’s reply. Listed here are the traces of code that handle that:
app.get(“/”, async (req, res) => {
const { question } = req;
attempt {
const response = await openai.createCompletion({
mannequin: “text-davinci-003”,
immediate: question.message,
max_tokens: 30,
temperature: 0,
});
return res.standing(200).json(response.knowledge);
} catch (e) {
console.log(`One thing went flawed ${e}`);
return res.standing(400).json();
}
});

The “uploadtoipfs” Endpoint
The final piece of the backend puzzle revolves round importing a ChatGPT dialog to IPFS. By doing so, you get your token URI that your good contract makes use of to mint a ChatGPT NFT. To do that with minimal effort, we used the Moralis IPFS API and created the “uploadtoipfs” endpoint:
app.get(“/uploadtoipfs”, async (req, res) => {
const { question } = req;
attempt {
const response = await Moralis.EvmApi.ipfs.uploadFolder({
abi: [
{
path: “conversation.json”,
content: { chat: query.pair },
},
],
});
console.log(response.end result);
return res.standing(200).json(response.end result);
} catch (e) {
console.log(`One thing went flawed ${e}`);
return res.standing(400).json();
}
});
Trying on the traces of code above, you may see the “Moralis.EvmApi.ipfs.uploadFolder“ methodology. The latter makes use of “dialog.json” as an IPFS path and the present ChatGPT dialog because the corresponding content material.

NextJS Frontend of Our ChatGPT NFT Minter Web3 App
You’ll be able to discover all frontend-related scripts contained in the “nextjs_moralis_auth” folder. Presuming that you’re JavaScript proficient and have some frontend mileage beneath the hood, we gained’t spend a lot time on the frontend. In any case, you simply want to put in all of the required frontend dependencies. Nonetheless, let’s take a look at some mention-worthy elements. As an illustration, we wrap our app with “WagmiConfig” and “SessionProvider” to make use of authentication throughout all the app:
operate MyApp({ Part, pageProps }) {
return (
<WagmiConfig shopper={shopper}>
<SessionProvider session={pageProps.session} refetchInterval={0}>
<Part {…pageProps} />
</SessionProvider>
</WagmiConfig>
);
}
One other necessary side is the code that renders the header of our frontend, together with the “Join” button. For that function, the “signin.jsx” script makes use of “handleAuth“, which lets you join or disconnect MetaMask. When you efficiently join MetaMask, the “person.jsx” web page takes over. The latter has a distinct header than “signin.jsx”. The “person.js” script additionally makes use of the “loggedIn.js” element for frontend and backend communication. So, it’s the “loggedIn.js” script that renders your frontend:
return (
<part>
<part className={types.chat_box}>
<part className={types.chat_history} id=”chatHistory”></part>
<part className={types.message_input}>
<enter
kind=”textual content”
id=”inputField”
placeholder=”Kind your message…”
onChange={getMessage}
/>
<button onClick={sendMessage}>Ship</button>
</part>
</part>
{showMintBtn && (
<button className={types.mint_btn} onClick={mint}>
MINT NFT
</button>
)}
</part>
);
}
Word: In order for you a extra detailed code walkthrough of the “loggedIn.js” script, use the video on the high (5:53).
ChatGPT Minter Web3 App Demo
In the event you’ve used our code and ran each the backend and frontend dapps, now you can use your native host to take your occasion of our ChatGPT NFT minter for a spin:

To entry the app performance, it’s essential to hit the “Authenticate by way of MetaMask” button. The latter will immediate your MetaMask extension, asking you to signal the signature request:

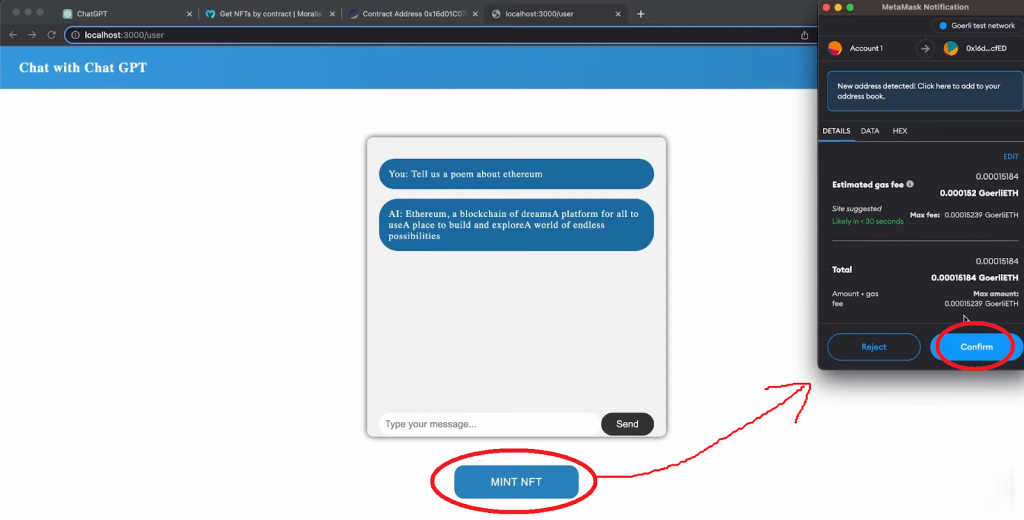
When you click on on “Signal”, the Web3 app (dapp) makes use of the “person.jsx” script that shows a ChatGPT field and a distinct header:
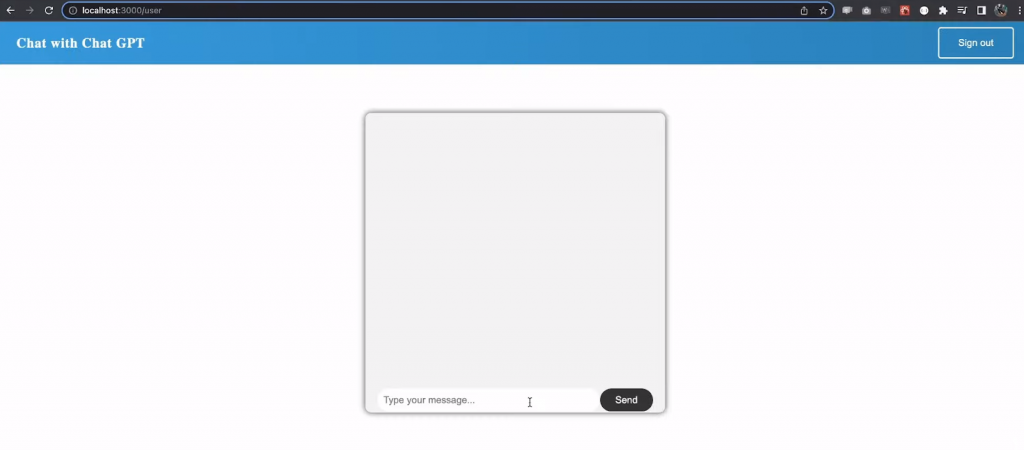
You need to use the entry area to kind your query/command and hit “Ship” to get ChatGPT’s reply. As quickly as ChatGPT replies, our dapp presents you with the “Mint NFT” button:
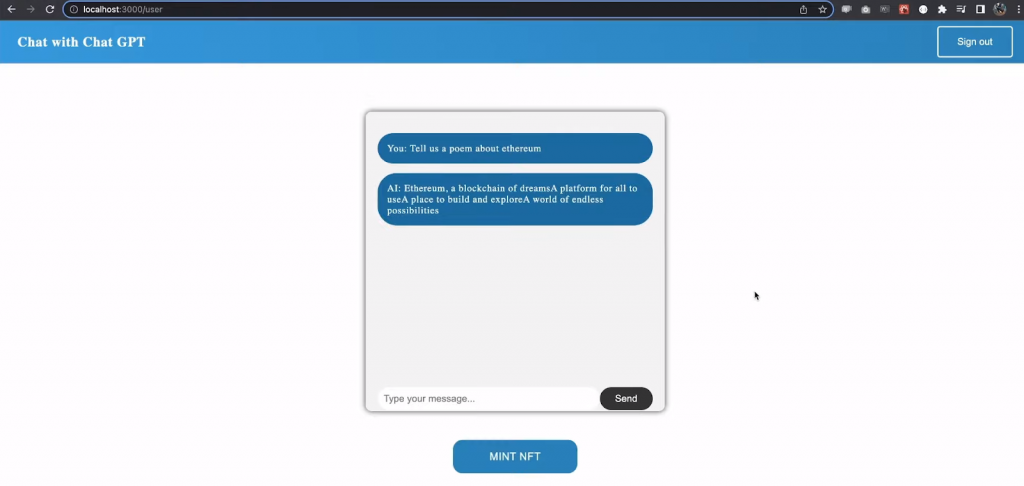
So, in the event you determine to transform your ChatGPT dialog into an NFT, it’s essential to use that button. Additionally, be certain that to make use of the identical pockets deal with as you need to deploy your good contract. In the event you click on on “Mint NFT”, MetaMask will pop up asking you to substantiate an NFT-minting transaction:
As soon as the Goerli chain confirms the transaction, you may view your new ChatGPT NFT on Etherscan. Nonetheless, in the event you have been to improve your Web3 app with the flexibility to fetch the NFT’s particulars, you’d need to use the “Get NFTs by contract” API endpoint. You need to use that endpoint’s API reference web page to check its energy:
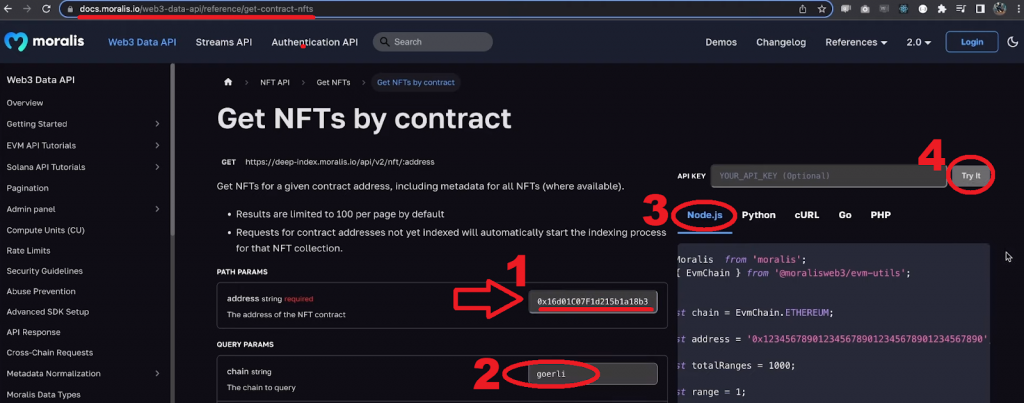
To see the response after hitting the above “Strive it” button, you’ll have to scroll down the “Get NFTs by contract” API reference web page:

What’s a ChatGPT NFT?
A ChatGPT NFT is a non-fungible token (NFT) that’s not directly related to ChatGPT – a sophisticated chatbot developed by OpenAI. As an illustration, it could possibly be an NFT that makes use of the ChatGPT emblem as its NFT-representing file or an NFT that was minted by a wise contract generated utilizing ChatGPT.

ChatGPT and Web3
Customers across the globe are already utilizing ChatGPT for a lot of totally different functions. Among the commonest ChatGPT use circumstances embrace producing programming code or code templates and discovering/fixing code errors, creating content material, producing advertising and gross sales pitches, performing accounting and knowledge evaluation, and extra.
ChatGPT can be utilized by way of its internet dashboard or by way of OpenAI’s API (as within the above tutorial). The latter permits devs to implement the facility of AI into all types of dapps. Now, take into account that to take advantage of out of ChatGPT, you could want to coach it on particular datasets which are related to your software.
Web3 devs and communities are already utilizing ChatGPT to generate textual content (creating chatbots or digital assistants), translate textual content, carry out sentiment evaluation, generate good contracts and scripts for dapps, and so on.
All in all, ChatGPT is a particularly highly effective device. With the suitable enter and correctly utilized output, it may be an awesome addition to varied dapps and might enrich the Web3 expertise.

The way to Use ChatGPT to Mint an NFT – Abstract
In as we speak’s article, we confirmed you how you can create a ChatGPT NFT minter Web3 app (dapp). You now know that by deploying a correct good contract and creating an appropriate backend and frontend, you should use ChatGPT to mint an NFT. Additionally, through the use of our code, you have been in a position to cowl all these elements with minimal effort. Now you can mess around along with your occasion of our dapp and create as many ChatGPT NFTs as you would like.
Within the above tutorial, you additionally encountered the Moralis IPFS API, which is only one of many Web3 APIs from Moralis. Moreover, along with your Moralis API key, you should use the complete scope of the Moralis Web3 Knowledge API, Authentication API, and Moralis Streams API. The latter is a superior Notify API different poised to make Web3 libraries out of date. So, with these enterprise blockchain options from Moralis, you may construct killer Web3 wallets, portfolio trackers, and other forms of dapps. Moreover, because of Moralis’ cross-chain interoperability, you may BUIDL on Ethereum, main EVM-compatible chains, Solana, and Aptos! In the event you select to construct on Aptos, be certain that to make use of the Aptos testnet faucet earlier than going reside.
Study extra about constructing dapps the simple means from the Moralis documentation, our YouTube channel, and our weblog. These free sources may help you change into a Web3 developer very quickly. In the event you want to take a extra skilled strategy to your blockchain improvement schooling, enroll in Moralis Academy.
[ad_2]
Source link
