[ad_1]
On this article, we’ll show the right way to construct a Polygon portfolio tracker by following the steps within the video above. Though the video focuses on Ethereum, we’ll goal the Polygon community just by updating the chain ID worth. Additionally, with two highly effective endpoints from Moralis, we’ll fetch the required on-chain information for our portfolio tracker. Let’s have a look at how easy it’s to make use of the 2 Web3 Information API endpoints overlaying the blockchain-related side of a Polygon portfolio tracker:
const response = await Moralis.EvmApi.token.getWalletTokenBalances({
handle,
chain,
});const tokenPriceResponse = await Moralis.EvmApi.token.getTokenPrice({
handle,
chain,
});
To run the above two strategies, you additionally have to initialize Moralis utilizing your Web3 API key:
Moralis.begin({
apiKey: MORALIS_API_KEY,
}
That’s it! It doesn’t must be extra difficult than that when working with Moralis! Now, the above strains of code are the gist of the blockchain-related backend functionalities of portfolio trackers throughout a number of chains. Because of the cross-chain interoperability of Moralis, whether or not you want to construct a Polygon portfolio tracker or goal some other EVM-compatible chain, the above-presented code snippets get the job accomplished!
After all, you have to implement the above strains of code correctly and add appropriate frontend parts. So, in the event you want to discover ways to just do that and create a clear Polygon portfolio tracker, ensure to comply with our lead. However first, join with Moralis! In any case, your Moralis account is the gateway to utilizing the quickest Web3 APIs.
Overview
Since Polygon continues to be some of the fashionable EVM-compatible chains, we need to show the right way to construct a Polygon portfolio tracker with minimal effort. The core of in the present day’s article is our Polygon portfolio tracker tutorial. That is the place you’ll have an opportunity to clone our completed code for the Ethereum tracker and apply some minor tweaks to focus on the Polygon community. On this tutorial, you’ll be utilizing NodeJS to cowl the backend and NextJS for the frontend. So far as the fetching of on-chain information goes, Moralis will do the trick with the above-presented snippets of code. You simply have to retailer your Moralis Web3 API key in a “.env” file.
Except for guiding you thru these minor tweaks, we may even stroll you thru crucial components of the code. When you full the tutorial, you’ll even have an opportunity to discover different Moralis instruments you should use to create all types of highly effective dapps (decentralized purposes). For instance, Moralis presents the Moralis Streams API, enabling you to stream real-time blockchain occasions immediately into the backend of your decentralized utility by way of Web3 webhooks!
All in all, after finishing in the present day’s article, you’ll be prepared to affix the Web3 revolution utilizing your legacy programming abilities!

Now, earlier than you leap into the tutorial, keep in mind to enroll with Moralis. With a free Moralis account, you achieve free entry to among the market’s main Web3 growth sources. In flip, you’ll be capable to develop Web3 apps (decentralized purposes) and different Web3 initiatives smarter and extra effectively!
Tutorial: Tips on how to Construct a Polygon Portfolio Tracker
We determined to make use of MetaMask as inspiration. Our Polygon portfolio tracker may even show every coin’s portfolio share, worth, and stability in a related pockets. Right here’s how our instance pockets appears:
For the sake of simplicity, we’ll solely deal with the belongings desk on this article. With that stated, it’s time you clone our challenge that awaits you on the “metamask-asset-table” GitHub repo web page:
After cloning our repo into your “metamask-portfolio-table” challenge listing, open that challenge in Visible Studio Code (VSC). If we first deal with the “backend” folder, you’ll be able to see it comprises the “index.js”, “package-lock.json”, and “bundle.json” scripts. These scripts will energy your NodeJS backend dapp.
Nevertheless, earlier than you’ll be able to run your backend, it is advisable set up all of the required dependencies with the npm set up command. As well as, you additionally have to create a “.env” file and populate it with the MORALIS_API_KEY environmental variable. As for the worth of this variable, it is advisable entry your Moralis admin space and replica your Web3 API key:

By this level, it is best to’ve efficiently accomplished the challenge setup. In flip, we will stroll you thru the primary backend script. That is additionally the place you’ll discover ways to change the chain ID to match Polygon.
Best Solution to Construct a Portfolio Tracker with Assist for Polygon
Should you deal with the backend “index.js” script, you’ll see that it first imports/requires all dependencies and defines native port 5001. The latter is the place you’ll be capable to run your backend for the sake of this tutorial. So, these are the strains of code that cowl these points:
const specific = require(“specific”);
const app = specific();
const port = 5001;
const Moralis = require(“moralis”).default;
const cors = require(“cors”);
require(“dotenv”).config({ path: “.env” });
Subsequent, the script instructs the app to make use of CORS and Categorical and to fetch your Web3 API key from the “.env” file:
app.use(cors());
app.use(specific.json());
const MORALIS_API_KEY = course of.env.MORALIS_API_KEY;
On the backside of the script, the Moralis.begin operate makes use of your API key to initialize Moralis:
Moralis.begin({
apiKey: MORALIS_API_KEY,
}).then(() => {
app.pay attention(port, () => {
console.log(`Listening for API Calls`);
});
});
Between the strains that outline the MORALIS_API_KEY variable and initialize Moralis, the script implements the 2 EVM API strategies offered within the intro. Listed here are the strains of code that cowl that correctly:
app.get(“/gettokens”, async (req, res) => {
attempt {
let modifiedResponse = [];
let totalWalletUsdValue = 0;
const { question } = req;
const response = await Moralis.EvmApi.token.getWalletTokenBalances({
handle: question.handle,
chain: “0x89”,
});
for (let i = 0; i < response.toJSON().size; i++) {
const tokenPriceResponse = await Moralis.EvmApi.token.getTokenPrice({
handle: response.toJSON()[i].token_address,
chain: “0x89”,
});
modifiedResponse.push({
walletBalance: response.toJSON()[i],
calculatedBalance: (
response.toJSON()[i].stability /
10 ** response.toJSON()[i].decimals
).toFixed(2),
usdPrice: tokenPriceResponse.toJSON().usdPrice,
});
totalWalletUsdValue +=
(response.toJSON()[i].stability / 10 ** response.toJSON()[i].decimals) *
tokenPriceResponse.toJSON().usdPrice;
}
modifiedResponse.push(totalWalletUsdValue);
return res.standing(200).json(modifiedResponse);
} catch (e) {
console.log(`One thing went improper ${e}`);
return res.standing(400).json();
}
});
Trying on the strains of code above, you’ll be able to see that we changed 0x1 with 0x89 for each chain parameters. The previous is the chain ID in HEX formation for Ethereum and the latter for Polygon. So, in the event you purpose to construct a Polygon portfolio tracker, ensure to go together with the latter. You can even see that the getWalletTokenBalances endpoint queries the related pockets. Then, the getTokenPrice endpoint loops over the outcomes offered by the getWalletTokenBalances endpoint. That approach, it covers all of the tokens within the related pockets and fetches their USD costs. It additionally calculates the whole worth of the pockets by merely including the USD values of all tokens. Lastly, our backend script pushes the outcomes to the frontend shopper.
Frontend Code Walkthrough
As talked about above, you’ll create the frontend of your Polygon portfolio tracker dapp with NextJS. So, the “nextjs_moralis_auth” folder is actually a NextJS app. To make it work, it is advisable set up all dependencies utilizing the npm set up command. Nevertheless, be sure you cd into the “nextjs_moralis_auth” folder earlier than operating the command. As soon as you put in the dependencies, you’ll be able to run your frontend and mess around along with your new Polygon portfolio tracker. However since we would like you to get some further perception from this text, let’s have a look at essentially the most vital snippets of the code of the varied frontend scripts.
The “signin.jsx” script supplies the “Join MetaMask” button. As soon as customers join their wallets, the “consumer.jsx” script takes over. The latter presents a “Signal Out” button and renders the LoggedIn element, each contained in the Consumer operate:
operate Consumer({ consumer }) {
return (
<part className={kinds.principal}>
<part className={kinds.header}>
<part className={kinds.header_section}>
<h1>MetaMask Portfolio</h1>
<button
className={kinds.connect_btn}
onClick={() => signOut({ redirect: “/” })}
>
Signal out
</button>
</part>
<LoggedIn />
</part>
</part>
);
}
Should you have a look at the “loggedIn.js” element, you’ll see that it comprises two different parts: “tableHeader.js” and “tableContent.js“. As such, these two parts ensure the on-chain information fetched by the above-covered backend is neatly offered on the frontend.
Portfolio Desk Elements
Right here’s a screenshot that clearly reveals you what “tableHeader.js” appears like in a browser:
As you’ll be able to see, the “tableHeader.js” script primarily offers with formatting and styling, which isn’t the purpose of this tutorial. The identical is true for the “tableContent.js” element, which ensures that the desk columns match our targets. It additionally calls the “GetWalletTokens” element:

The “getWalletTokens.js” script will get the on-chain information fetched by the backend. So, are you questioning the right way to get blockchain information from the backend to frontend? The “getWalletTokens.js” script makes use of useAccount from the wagmi library. The latter extracts the related handle and prompts the backend server with that handle by way of Axios:
useEffect(() => {
let response;
async operate getData() {
response = await axios
.get(`http://localhost:5001/gettokens`, {
params: { handle },
})
.then((response) => {
console.log(response.information);
setTokens(response.information);
});
}
getData();
}, []);
Trying on the above code snippet, you’ll be able to see that the response variable shops all of the on-chain information that the backend fetched. The script additionally saves response.information within the setTokens state variable. Then, the return operate contained in the “getWalletTokens.js” script renders the ultimate element: “card.js“:
return (
<part>
{tokens.map((token) => {
return (
token.usdPrice && (
<Card
token={token}
whole={tokens[3]}
key={token.walletBalance?.image}
/>
)
);
})}
</part>
);
Whereas rendering “card.js“, “getWalletTokens.js” passes alongside some props. The “card.js” element then makes use of these props to render the small print that lastly populate the “Property” desk:

Remaining Construct of Our Polygon Portfolio Tracker
When you efficiently run the above-presented backend and frontend, you’ll be capable to take a look at your tracker on “localhost:3000“:

Because the above screenshot signifies, you have to first join your MetaMask pockets by clicking on the “Join MetaMask” button.
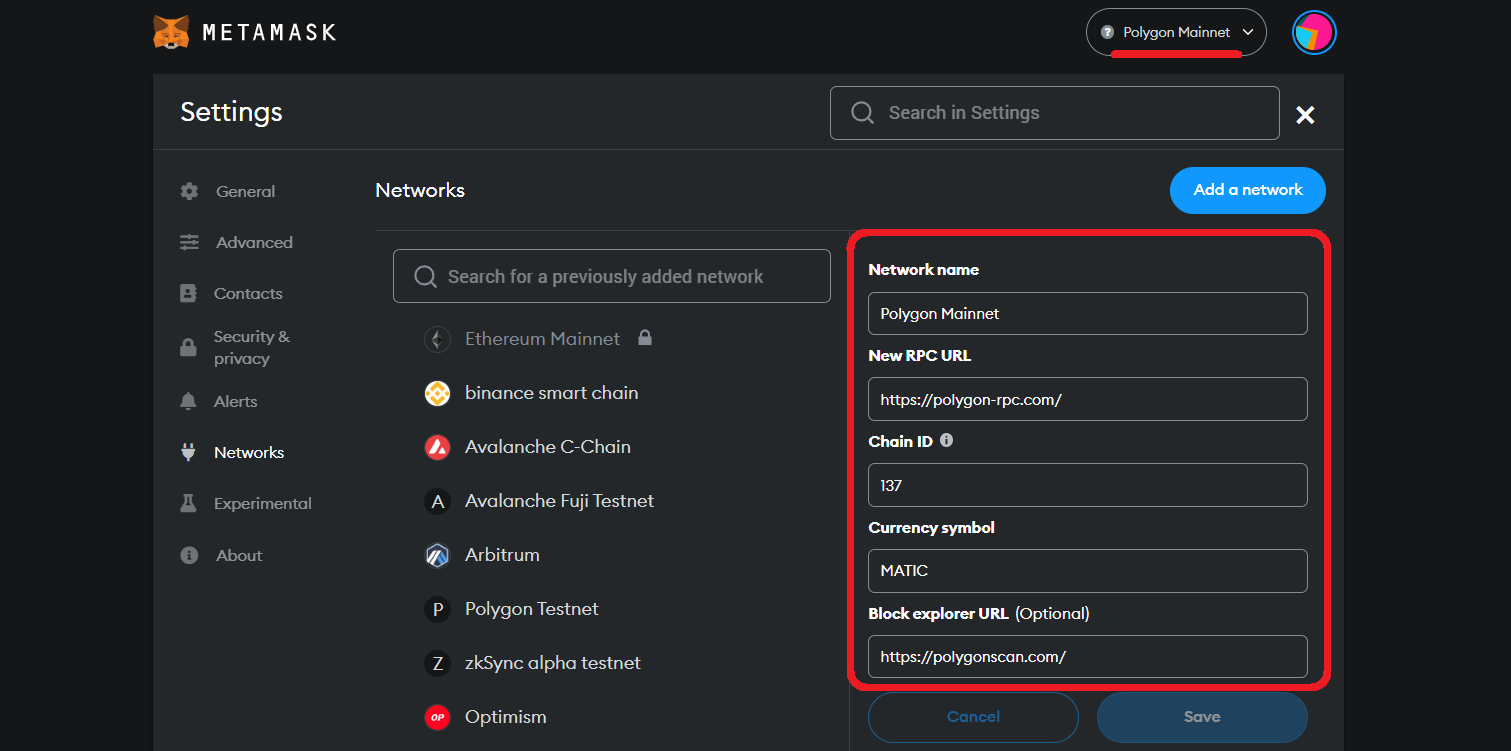
Word: By default, MetaMask doesn’t embody the Polygon community. Thus, ensure so as to add that community to your MetaMask and change to it:
When you join your pockets, your occasion of our portfolio tracker dapp will show your tokens within the following method:
Word: The “Tokens” part of our desk is the one one at present energetic. Nevertheless, we urge you to make use of the Moralis sources so as to add performance to the “NFTs” and “Transactions” sections as properly.
Past Polygon Portfolio Tracker Improvement
Should you took on the above tutorial, you most likely keep in mind that our instance dapp solely makes use of two Moralis Web3 Information API endpoints. Nevertheless, many different highly effective API endpoints are at your disposal once you go for Moralis. Whereas Moralis makes a speciality of catering Web3 wallets and portfolio trackers, it may be used for all types of dapps.
Your complete Moralis fleet encompasses the Web3 Information API, Moralis Streams API, and Authentication API:
The Web3 Information API comprises the next APIs enabling you to fetch any on-chain information the straightforward approach: NFT APIToken APIBalances APITransaction APIEvents APIBlock APIDeFi APIResolve APIIPFS API

With the Moralis Streams API, you’ll be able to take heed to real-time on-chain occasions for any sensible contract and pockets handle. That approach, you should use on-chain occasions as triggers to your dapps, bots, and so forth. Plus, you should use the facility of Moralis Streams by way of the SDK or our user-friendly dashboard.

Because of the Moralis Web3 Authentication API, you’ll be able to effortlessly unify Web3 wallets and Web2 accounts in your purposes.
Word: You possibly can discover all of Moralis’ API endpoints and even take them for take a look at rides in our Web3 documentation.
All these instruments help all of the main blockchains, together with non-EVM-compatible chains, similar to Solana and Aptos. As such, you might be by no means caught to any specific chain when constructing with Moralis. Plus, due to Moralis’ cross-platform interoperability, you should use your favourite legacy dev instruments to affix the Web3 revolution!
Except for enterprise-grade Web3 APIs, Moralis additionally presents another helpful instruments. Two nice examples are the gwei to ether calculator and Moralis’ curated crypto faucet listing. The previous ensures you by no means get your gwei to ETH conversions improper. The latter supplies hyperlinks to vetted testnet crypto taps to simply receive “take a look at” cryptocurrency.

Tips on how to Construct a Polygon Portfolio Tracker – Abstract
In in the present day’s article, you had a possibility to comply with our lead and create your personal Polygon portfolio tracker dapp. By utilizing our scripts, you have been ready to take action with minimal effort and in a matter of minutes. In any case, you solely needed to create your Moralis account, receive your Web3 API key and retailer it in a “.env” file, set up the required dependencies, change 0x1 with 0x89, and run your frontend and backend. You additionally had an opportunity to deepen your understanding by exploring crucial scripts behind our instance portfolio tracker dapp. Final however not least, you additionally discovered what Moralis is all about and the way it could make your Web3 growth journey an entire lot easier.
When you have your personal dapp concepts, dive straight into the Moralis docs and BUIDL a brand new killer dapp. Nevertheless, if it is advisable broaden your blockchain growth information first or get some attention-grabbing concepts, ensure to go to the Moralis YouTube channel and the Moralis weblog. These locations cowl all types of matters and tutorials that may assist you to turn out to be a Web3 developer at no cost. As an illustration, you’ll be able to discover the superior Alchemy NFT API different, the main Ethereum scaling options, discover ways to get began in DeFi blockchain growth, and far more. Furthermore, in relation to tutorials, you’ll be able to select quick and easy ones because the one herein, or you’ll be able to sort out extra intensive challenges. An excellent instance of the latter can be to construct a Web3 Amazon clone.
Nonetheless, in the event you and your crew want help scaling your dapps, attain out to our gross sales crew. Merely choose the “For Enterprise” menu possibility, adopted by a click on on the “Contact Gross sales” button:

[ad_2]
Source link
