[ad_1]
Are you trying to create your personal Web3 enterprise and wish to discover Web3 market growth? If that’s the case, then look no additional! This Web3 market growth tutorial will present you how you can create a blockchain-based Amazon clone utilizing Moralis. Sounds thrilling? Be part of us as we cowl the method of making a Web3 market from begin to end!
If you’re keen to leap straight into the code, you’ll find the entire GitHub repo for the ultimate product under:
Full Web3 Market Repository – https://github.com/MoralisWeb3/youtube-tutorials/tree/primary/moralis-amazon-clone
Throughout this Web3 market growth tutorial, you’ll familiarize your self with highly effective options such because the Web3 Authentication API and different enterprise-grade blockchain options from Moralis. So, if you wish to comply with alongside and construct your personal Web3 enterprise, keep in mind to enroll with Moralis earlier than transferring ahead!
Overview
On this Web3 market growth tutorial, we’ll initially train you how you can arrange the baseline for a blockchain-based Amazon market utilizing Moralis in three steps:
Arrange FirebaseClone and configure the Amazon repositoryRun the app
Following the preliminary Web3 market growth setup course of, we’ll hand you over to one among our Moralis software program engineers. The engineer will take you thru the rest of the steps in an intensive video tutorial (the video from the intro). If this sounds fascinating, learn on as we cowl this Web3 market growth tutorial from begin to end!
If you’re unfamiliar with Amazon and what this platform would possibly entail in a Web3 context, you can find a ”What’s a Market in Web3?” part under the tutorial. On this part, we discover the ultimate product of this tutorial by offering a short software demo. So, if you wish to try what you can be working in the direction of, we advocate beginning there.
Following the demo, you can find a piece on the best method to get into Web3 market growth. In doing so, we’ll discover Moralis and a few distinguished Web3 APIs. Nevertheless, there may be extra to Moralis than APIs. For instance, you’ll be able to discover ways to use a Goerli faucet or an Arbitrum Goerli faucet to get free testnet tokens, which you should use throughout this tutorial!
Nonetheless, with out additional ado, allow us to bounce straight into the Web3 market tutorial to provide you an thought of how you can begin your personal Web3 enterprise!
Web3 Market Tutorial – Construct a Web3 Enterprise
Within the following three sections, you’ll discover ways to arrange the bottom for a Web3 Amazon clone. As soon as you’re carried out establishing the preliminary challenge, we’ll hand you over to our software program engineer within the ”Video Tutorial – Web3 Market Improvement Walkthrough” part, who will stroll you thru the rest of the code in a complete video!

Now, allow us to begin by carefully analyzing how one can arrange Firebase!
Step 1: Set Up Firebase
Organising Firebase is the very first thing you will need to full on this Web3 market growth tutorial. As such, this preliminary step reveals you how you can arrange a Firebase challenge. Head over to ”firebase.google.com” and create your account:

With an account at your disposal, log in and arrange a brand new challenge by clicking on ”Add challenge”:

Enter a challenge title and full the rest of the directions:
All Firebase tasks initially implement the free ”Spark” billing plan by default. Nevertheless, the free plan doesn’t offer you entry to all of the required Firebase options. Consequently, you will need to swap to the ”Blaze” pay-as-you-go possibility. To take action, click on on the ”Spark plan” button on the prime and choose the ”Blaze” various:

From right here, it’s essential arrange Firebase’s ”Authentication” function. You are able to do this by clicking on ”Construct” after which hitting ”Authentication” within the navigation menu to the far left:

Subsequent, hit the ”Get began” button:

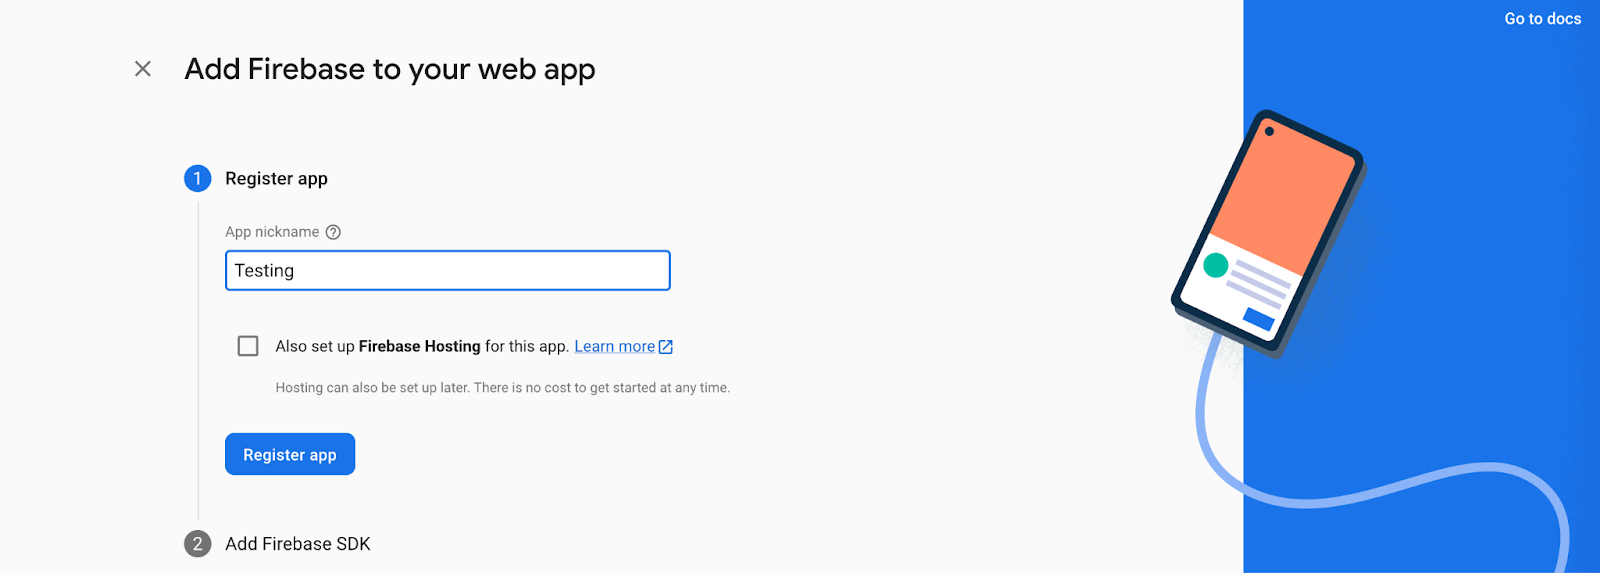
Now, with the ”Authentication” function all arrange, click on on ”Mission Overview” and create a brand new internet app:

Enter a reputation within the preliminary step and click on on ”Register app”:
For the following step, scroll all the way down to the underside and click on on ”Proceed to console”:

That you must generate a brand new ”Service Account” personal key. As such, hit the cogwheel on the prime left, click on on ”Mission settings”, navigate to the ”Service accounts” tab, and click on on ”Generate new personal key”:

Click on on ”Generate key”, which ought to obtain a JSON file:

You may then use the Moralis converter to transform your certificates into extension variables. So, open the converter and choose the file you downloaded:

As quickly as you add the file, the converter autonomously creates three parameters:

Hold the parameters for now, as you’ll need them within the subsequent step!
Step 2: Clone and Configure the Amazon Repository
For this step, launch your most well-liked IDE and create a brand new challenge folder. We shall be utilizing VSC; nonetheless, you’re free to make use of any IDE you like. With a brand new folder at hand, clone the app’s barebones template from the repository down under:
Web3 Market Improvement Firebase Began GitHub Repository – https://github.com/MoralisWeb3/youtube-tutorials/tree/primary/moralis-firebase-starter-template
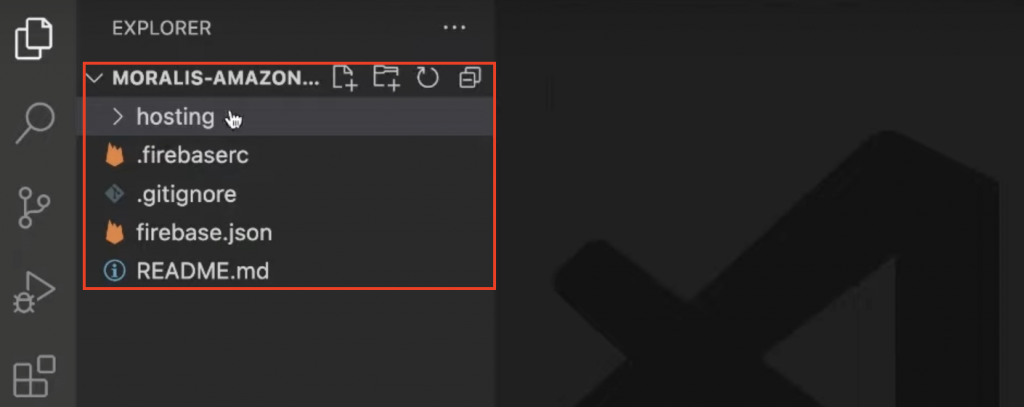
As quickly as you clone the challenge, you can find your self with a file construction much like this:
Subsequent, it’s essential set up the Firebase CLI. As such, open a brand new terminal in your IDE and run the next command:
npm set up -g firebase-tools
From there, run firebase login within the terminal, which can immediate your browser, permitting you to log in. As soon as logged in, you’ll be able to run the next command to checklist your Firebase tasks:
firebase tasks:checklist
Operating the above command lists all of your tasks, and you’ll go forward and duplicate the ID on your Web3 market:
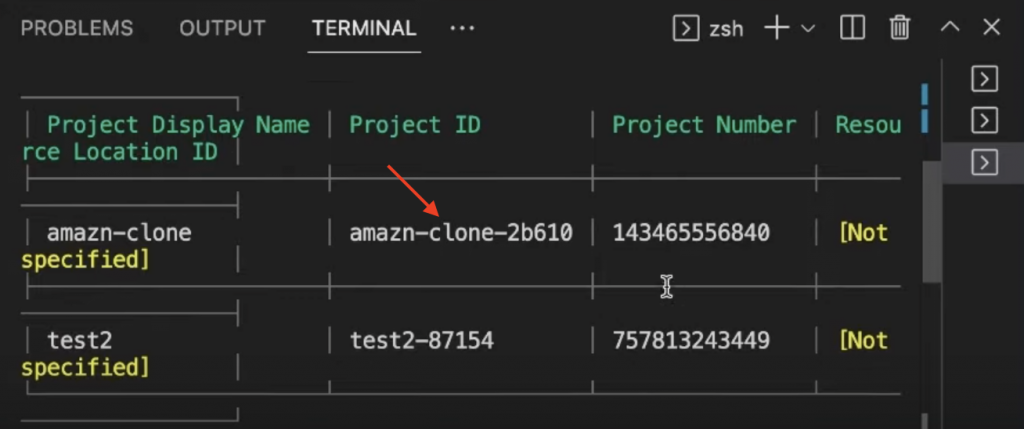
You may then use the ID when operating this terminal enter to set the challenge ID:
firebase use <PROJECT_ID>
Subsequent, allow the webframeworks function utilizing the command under:
firebase experiments:allow webframeworks
Allow Authentication with the Moralis Web3 Extension
From right here, you now have to allow authentication with the Moralis Web3 extension. To take action, open a brand new terminal and run this command:
firebase ext:set up moralis/moralis-auth
This may immediate your terminal, and it’s essential make some selections. For the preliminary immediate, enter y and hit enter:
You may then choose the Iowa various:

Subsequent, select the Google Cloud Secret Supervisor possibility:

Typically, you would possibly come throughout this error:

If that is so, click on on the hyperlink within the error message. This may take you to the next web page, the place you will need to allow the ”Secret Supervisor API”:

It would already be enabled. If that’s the case, disable and reenable it once more. Upon getting enabled the API supervisor, repeat the steps above by rerunning this command:
firebase ext:set up moralis/moralis-auth
This time, when choosing the Google Cloud Secret Supervisor possibility, you will need to enter your Moralis API key. As such, in case you have not already, enroll with Moralis proper now. With an account at your disposal, log in to your account, click on on the ”Web3 APIs” tab, and duplicate your key:

Enter your secret API key and hit enter. From there, you can be prompted so as to add a URL. Enter https://localhost and proceed:

Subsequent, you will need to add the extension parameters you bought in step one. So, comply with the directions within the terminal and enter every converter worth:

First, add the challenge ID:

Then, add the e-mail:

Select Google Cloud Secret Supervisor as soon as once more:

Add the personal key:

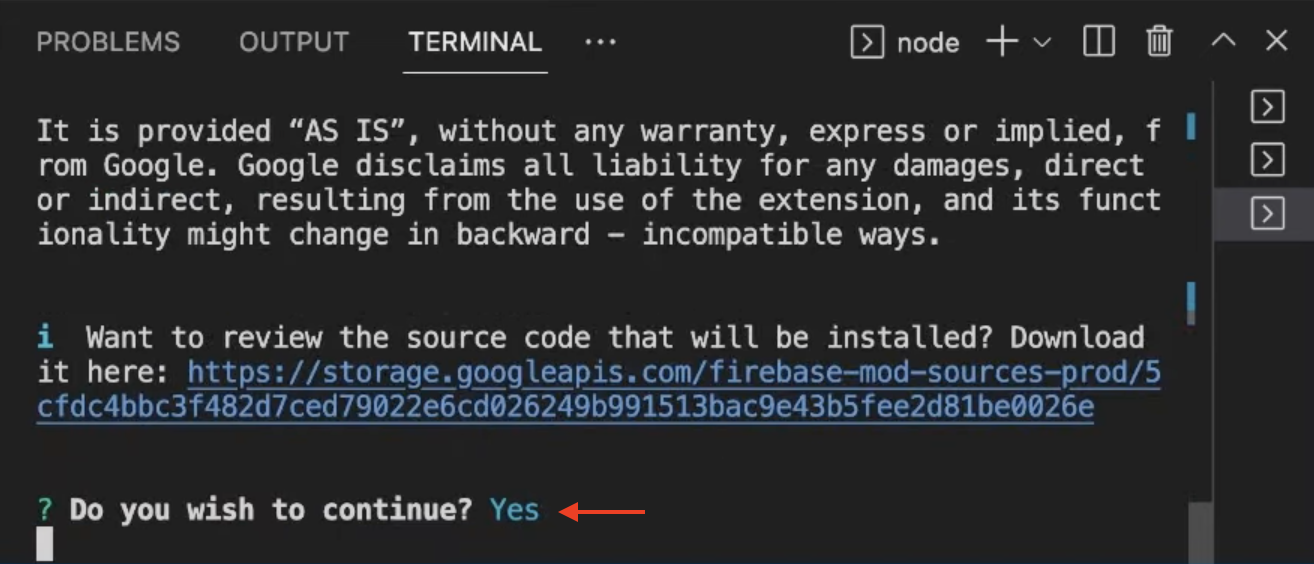
Lastly, deploy the extensions by operating the next terminal command:
firebase deploy –only extensions
This prompts your terminal once more, and you’ll simply hit enter for all of the questions!
Configure Surroundings Variables
Lastly, the second step’s last half is configuring your surroundings variables. As such, begin by renaming the ”.env.instance” file to ”.env” and open it. It should look one thing like this:
NEXT_PUBLIC_FIREBASE_API_KEY = ‘replace_me’
NEXT_PUBLIC_FIREBASE_AUTH_DOMAIN = ‘replace_me’
NEXT_PUBLIC_FIREBASE_PROJECT_ID = ‘replace_me’
NEXT_PUBLIC_FIREBASE_STORAGE_BUCKET = ‘replace_me’
NEXT_PUBLIC_FIREBASE_MESSAGING_SENDER_ID = ‘replace_me’
NEXT_PUBLIC_FIREBASE_APP_ID = ‘replace_me’
As you’ll be able to see, it’s essential change replace_me for every variable. To get these values, navigate again to your Firebase admin panel. From there, click on on ”Mission Overview” and hit ”app”:

You may then click on on the cogwheel for the appliance in query:

Subsequent, scroll down, and you’ll find all of the wanted values underneath the ”SDK setup and configuration” part:
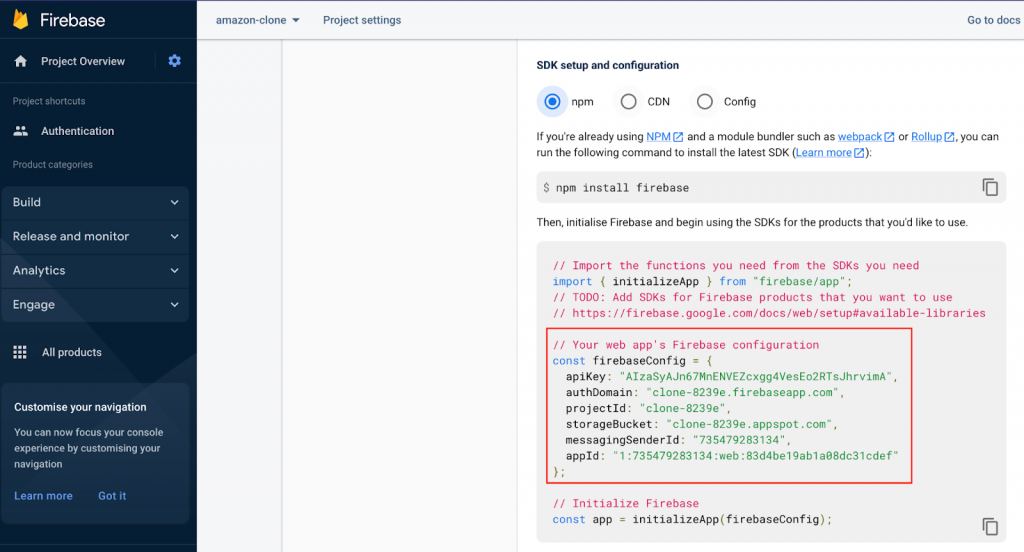
Copy every worth and add them for all of the parameters within the ”.env” file. All in all, it ought to look one thing like this:
NEXT_PUBLIC_FIREBASE_API_KEY = “AIzaSyAJn67MnENVEZcxgg4VesEo2RTsJhrvimA”
NEXT_PUBLIC_FIREBASE_AUTH_DOMAIN = “clone-8239e.firebaseapp.com”
NEXT_PUBLIC_FIREBASE_PROJECT_ID = “clone-8239e”
NEXT_PUBLIC_FIREBASE_STORAGE_BUCKET = “clone-8239e.appspot.com”
NEXT_PUBLIC_FIREBASE_MESSAGING_SENDER_ID = “735479283134”
NEXT_PUBLIC_FIREBASE_APP_ID = “1:735479283134:internet:83d4be19ab1a08dc31cdef”
To prime issues off, open a brand new terminal, cd into the ”internet hosting” folder, and run npm i to put in the required dependencies.
That’s it for the preliminary software template! All that continues to be from right here is operating the app, which we cowl within the third and last step of our Web3 market growth tutorial!
Step 3: Run the App
To start out the app, open a brand new terminal, cd into the principle folder, and run the next command:
firebase emulators:begin
As quickly as all processes finalize, you can begin the appliance by visiting this URL: ”http://localhost:5555”. The web site will initially look much like this:

That is solely the preliminary barebones state of the appliance, and there may be nonetheless work to be carried out earlier than the appliance is a whole Web3 clone of Amazon. Nevertheless, it is a nice place to begin; you solely want so as to add the rest of the performance and customise the structure. For this, we’ll hand you over to one among our software program engineers for a whole video walkthrough within the subsequent part!
Video Tutorial – Web3 Market Improvement Walkthrough
Now that you’ve got the challenge’s baseline setup, we’ll hand you over to our Moralis software program engineer, who will stroll you thru the remaining. Within the video under, our professional initially covers the three steps above. From there, the rest of the video covers the remainder of the code for implementing the required performance for a whole Web3 clone of Amazon. Here’s a checklist of the assorted elements with timestamps:
Dwelling element (16:22)Header (18:45)Sub-header (28:45)Predominant element (31:10)Product web page (42:10)Backend (1:01:10)
What’s a Market in Web3?
Like typical on-line platforms, Web3 marketplaces can take many shapes and kinds. Due to this, it turns into fairly difficult to reply the query, ”what’s a market in Web3?”. Nevertheless, to provide you an thought of some core performance and what one would possibly appear like, check out the next demo of the appliance you realized to create in the course of the Web3 market growth tutorial!
First up, right here is the ultimate app’s touchdown web page:
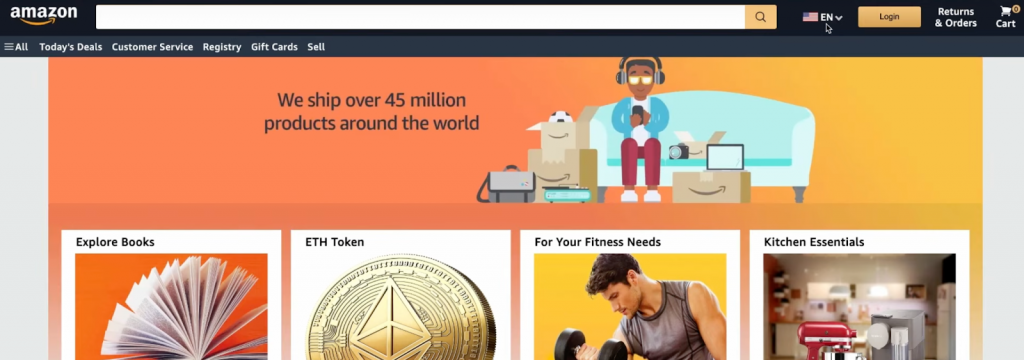
It seems fairly much like the unique Amazon web site, that includes a navigation bar on the prime with a language drop-down menu, a buying cart, a ”Login” button, and many others.:

Nevertheless, allow us to give attention to the login performance, as that is the place Web3 marketplaces most differ from typical platforms. As it is a Web3-based software, our Amazon clone encompasses a blockchain authentication circulate. Which means customers can check in with their Web3 wallets. As such, clicking on ”Login” will set off customers’ MetaMask wallets:

Shopping for an Merchandise
Together with this performance, the Web3 market platform additionally options a picture carousel and a few classes corresponding to books, tokens, and many others.:

As quickly as a consumer logs in, they will buy gadgets and use their pockets funds to pay. For instance, allow us to showcase this performance by clicking on ”Store Now” for the ”ETH Token” various:

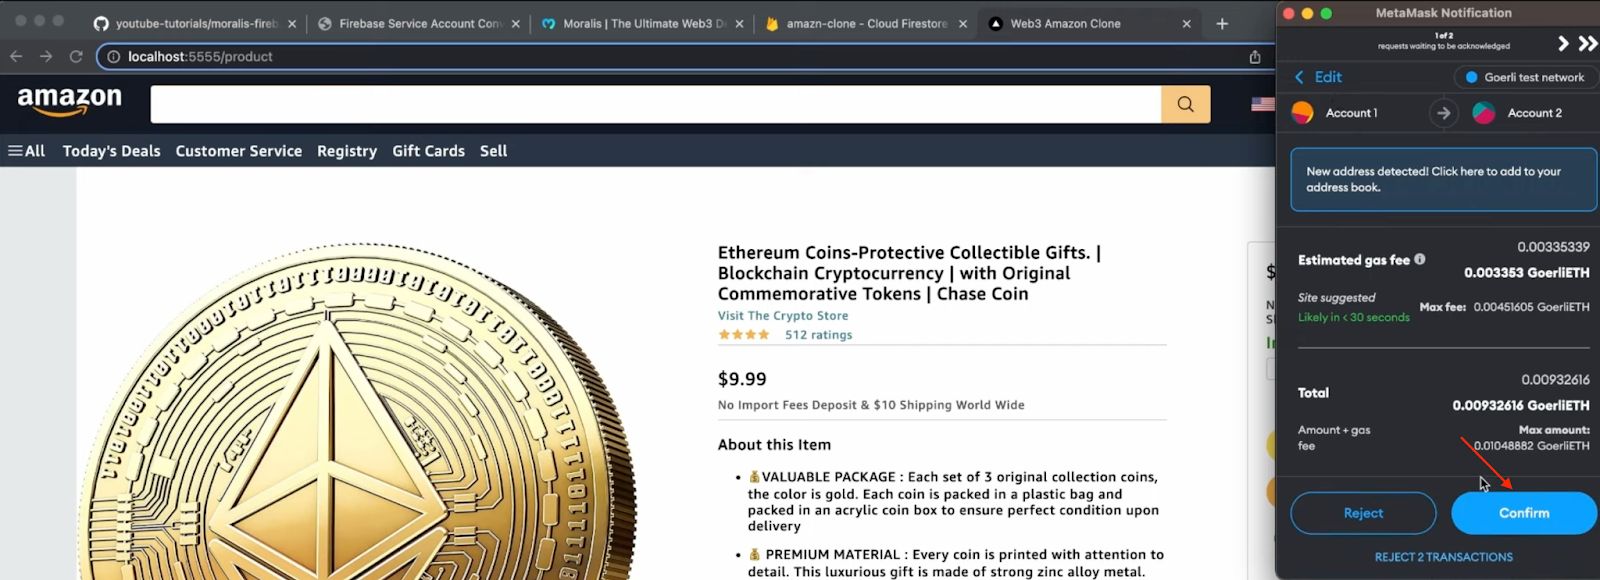
The product web page options all the things from a product score to an ”Add to Cart” button. Nevertheless, allow us to attempt to purchase the token proper now by hitting ”Purchase Now”:

This may set off a pop-up window, the place we have to enter an handle and click on on ”OK”:

Doing so will immediate the MetaMask pockets, enabling us to signal the transaction:
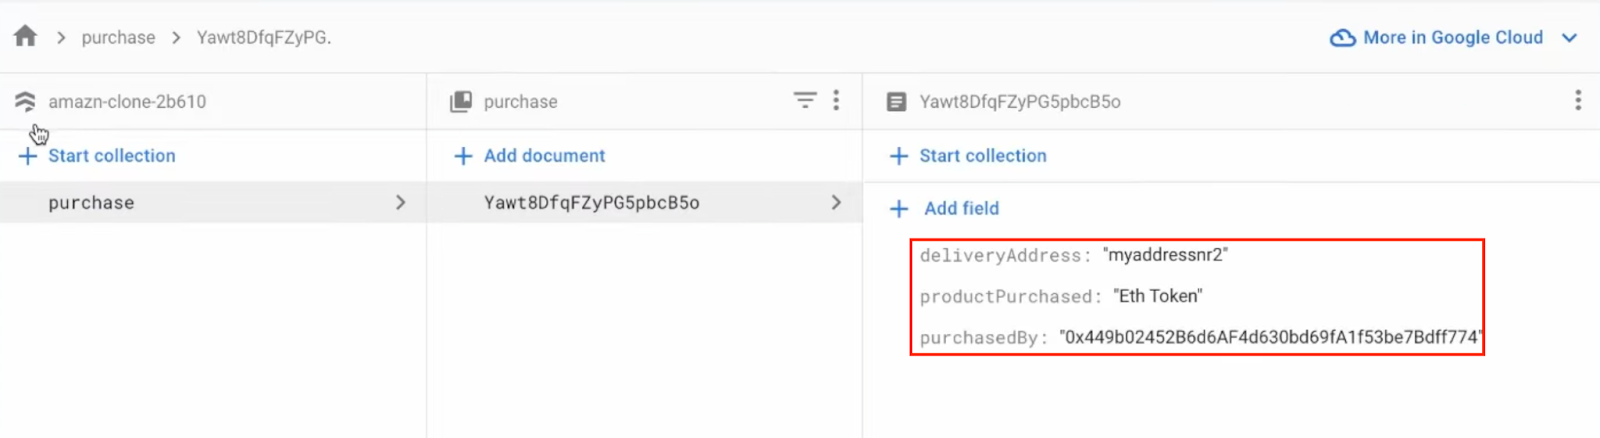
Together with executing the transaction, it’ll additionally robotically be recorded within the software’s Firebase database:

All transactions will include a supply handle, the product, and the client’s handle. With this data, we are able to simply fulfill the order:
That’s it for this demo! As you’ll be able to see, the Web3 clone shares many similarities with the unique Amazon platform. Nevertheless, two main variations are which you can authenticate your self along with your Web3 pockets and pay for transactions utilizing your cryptocurrency!
Nonetheless, how can we effortlessly create this Web3 enterprise?
Best Solution to Begin a Web3 Enterprise
If you’re unfamiliar with the blockchain {industry}, it may be difficult to get into Web3 growth as, from a traditional perspective, the entry obstacles have been comparatively excessive. Thus, to make blockchain growth as seamless as attainable, programmers are turning to Web3 infrastructure suppliers like Moralis!

Moralis is the best method to get began in Web3, and you’ll construct all the things from a portfolio app to a Web3 market effortlessly. Moreover, Moralis provides quite a lot of industry-leading Web3 APIs making blockchain growth as simple as Web2. As such, if you’re severe about turning into a Web3 developer, enroll with Moralis proper now!
Amongst a few of Moralis’ most distinguished APIs, you’ll be able to, as an illustration, discover the Moralis Streams API, Authentication API, and Web3 Knowledge API. If you wish to study extra about how these work, try our tutorial on how you can get blockchain information. You must also know that the APIs from Moralis are cross-chain appropriate. This implies you’ll be able to simply construct throughout a number of the hottest blockchain networks. This contains Ethereum, Polygon, Avalanche, BNB Chain, Arbitrum, Optimism, and many others.
So, if you’re trying to begin your Web3 growth journey, go for Moralis’ scalable Web3 APIs and be part of {industry} leaders corresponding to MetaMask, NFTrade, 1inch, and lots of others!
If you need additional inspiration on your first blockchain challenge, try our information on how you can construct a block explorer!
Abstract – Web3 Market Improvement – Methods to Construct a Web3 Enterprise
On this tutorial, we taught you how you can get into market growth for Web3 and construct a Web3 enterprise by displaying how you can arrange a Web3 market in three steps:
Arrange FirebaseClone and configure the Amazon repositoryRun the app
As such, in case you have adopted alongside this far, you now know how you can construct a Web3 clone of Amazon very quickly!
Should you discovered this tutorial instructive, contemplate testing different content material right here on the Moralis Web3 weblog. For instance, find out about Ethereum scaling options, how you can convert gwei to ETH, or discover the Arbitrum testnet. Additionally, keep in mind to register with Moralis if you wish to totally leverage the ability of blockchain know-how and construct your personal Web3 enterprise. What’s extra, creating an account is free, and also you obtain fast entry to the most effective APIs in the marketplace!
[ad_2]
Source link
